Introduction
Developing a custom view for TrackMate is hard and painful. Of course it must be a graphical representation of the model: the tracking results with all intermediate steps. If you want to build something really useful, it has to be interactive and should allow modifying the model. And be aware that modifications might happen somewhere else. Performance is also critical: since it stands at the user interface, it must be responsive, and possibly deal with large models (millions of detections).
Honestly, I think that one of the main good reason to extend TrackMate is that there is ready some views available.
Still, it is perfectly possible to build something useful without fulfilling all these requirements. And I still hope that someday someone will contribute a view that displays the model in the orthogonal slicer of Fiji.
This tutorial introduces the view interfaces of TrackMate, and since they deal with user interactions, we will also review the TrackMate event system.
A custom TrackMate view
Like for the spot feature analyzers, a TrackMate view is separated in two parts, that each extends a different interface:
- The TrackMateModelView, that is the actual view of the model. All the hard work is done here.
- The ViewFactory that is a factory in charge of instantiating the view and of the integration in TrackMate. This interface extends the TrackMateModule interface, so we expect to find there some of the methods we discussed earlier, and the SciJava annotation.
In this tutorial, we will build something simple. We will limit ourselves to develop a view that simple messages the user every time something happens in TrackMate. For instance, when the spots are detected, how many there are; if he selects spots and edges, how many of them; etc. And we will just reuse the Fiji log window for this, which will save us from the full development of a graphical view of the model.
But because this is a bit limited, we will not let the user pick this view as the main one, just after the detection step. A SciJava parameter will be used to make it invisible in the view selection menu. To make good use of it, we still need some way to launch this view, but this will be the subject of the next tutorial.
Right now, we just focus on building the view.
The ViewFactory
The factory itself has nothing particular. On top of the TrackMateModule methods, it just has a method to instantiate the view it controls:
@Override
public TrackMateModelView create( final Model model, final Settings settings, final SelectionModel selectionModel, final DisplaySettings displaySettings );
You can see that we can possibly pass 4 parameters to the constructor of the view itself:
- the model of course,
- but also the settings object, so that we can find there a link to the image object. The HyperStackDisplayer uses it to retrieve the ImagePlus over which to display the TrackMate data.
- The selection model is also offered, and the instance passed is the common one used in the GUI, so that a selection made by the user can be shared amongst all views.
- Finally, the DisplaySettings which contains the display settings the user configured in the GUI, and that your view should use if it can.
The TrackMateModelView interface
Methods
This is where the hard work takes place and there is a lot to say. However, the method you find in this interface are scarce and relate just to general use, and most of them are not mandatory:
-
public void render();This is the initialization method for your view. Your view should not show up to the user when it is instantiating, but only when this method is called. This allows TrackMate to properly manage the rendering. -
public void refresh();This method should be in charge of updating the view whenever it is sensible to do so. Careful: it is not called automatically when the model has changed. You have to listen to model change yourself, and call this method manually if you want your view to be in sync. However, it is called automatically whenever the user changes a display setting (because views are not made to listen to GUI changes). But more on that below. -
public void clear();This one is rather explicit. It ensures a way to clear a view in case it is not kept in sync with the model changes. -
public void centerViewOn( final Spot spot );This is a non-mandatory convenience tool that allow centering a view (whatever it means) on a specific Spot. It is called for instance when the user selects one spot in the GUI: all the views that implement this method move and pan to show this spot. -
public Model getModel();exposes the model this view renders. -
public String getKey();returns the unique key that identifies this view. Careful: this key must be the same that for the ViewFactory that can instantiates this view. This is used to save and restore the views present in a TrackMate session.
Listening to model changes
You don’t have to keep your view in sync with the model. You can make something useful that would just capture a snapshot of the model as it is when you launch the view and be happy about it. But, TrackMate is about allowing both automatic and manual annotation of the image data, so most likely a very useful view will echoes the changes made to the model. Ideally it would even enable these changes to be made. But this is out of the scope of this tutorial.
If you want to listen to changes made to the model, you have to register as a listener to it. This is made through
Model.addModelChangeListener( YourViewInstance );
and then you get a new method:
public void modelChanged( final ModelChangeEvent event )
The event itself can report 5 types of changes:
- The spots detection is done. In the GUI, this is sent just after the detection step, before the initial filtering step.
- The spots are filtered reversibly. This is sent everytime you change anything on the spot filtering panel (a new filter, a threshold value, etc..).
- The tracking step is done. That just follows the tracking step in the GUI.
- The tracks are filtered. Like for the spots.
- The model is modified. By modification, we mean an incremental, manual modification of the model. The user might have deleted a spot, or moved it in space, or changed its size, or add an edge between two spots, etc… In that case, the ModelChangeEvent instance can be interrogated to know what was changed, deleted, added, etc…
Listening to selection changes
The TrackMate GUI shares a common instance of SelectionModel that stores the selection the user made. This is convenient when exploring the tracking results.
Your view can be kept in sync with the selection changes by implementing the SelectionChangeListener interface. It adds a single method:
public void selectionChanged(SelectionChangeEvent event);
A simple event logger
Let’s keep our custom view simple: we will just build an event logger that recycles the IJ logger window to echo what happens to the model. We then of course have to implement the two listener interfaces mentioned above. But the code stays pretty simple: check here for the details.
As for the factory, nothing fancy:
package plugin.trackmate.examples.view;

import ij.ImageJ;
import ij.ImagePlus;

import javax.swing.ImageIcon;

import org.scijava.plugin.Plugin;

import fiji.plugin.trackmate.Model;
import fiji.plugin.trackmate.SelectionModel;
import fiji.plugin.trackmate.Settings;
import fiji.plugin.trackmate.TrackMatePlugIn_;
import fiji.plugin.trackmate.visualization.TrackMateModelView;
import fiji.plugin.trackmate.visualization.ViewFactory;

@Plugin( type = ViewFactory.class )
public class EventLoggerViewFactory implements ViewFactory
{

	private static final String INFO_TEXT = "<html>This factory instantiates an event logger view for TrackMate, that uses the IJ log window to just echo all the event sent by the model.</html>";

	public static final String KEY = "EVENT_LOGGER_VIEW";

	@Override
	public String getInfoText()
	{
		return INFO_TEXT;
	}

	@Override
	public ImageIcon getIcon()
	{
		return null;
	}

	@Override
	public String getKey()
	{
		return KEY;
	}

	@Override
	public String getName()
	{
		return "Event logger view";
	}

	@Override
	public TrackMateModelView create( final Model model, final Settings settings, final SelectionModel selectionModel )
	{
		return new EventLoggerView( model, selectionModel );
	}

	/*
	 * MAIN METHOD
	 */

	public static void main( final String[] args )
	{
		ImageJ.main( args );
		new ImagePlus( "../fiji/samples/FakeTracks.tif" ).show();
		new TrackMatePlugIn_().run( "" );
	}

}
Views must be launched elsewhere
Starting with version 7, the custom views are not automatically fitted in the TrackMate GUI. This means that even after you built them, you will also need to provide a way for the user to launch it from within TrackMate. This is also what we do for the other views in TrackMate. Right now, you can find the following built-in views in TrackMate:
- The
HyperStackDisplayer. This is the main view. It displays the tracking results on the ImageJ window and lets you edit tracking results. - TrackScheme, the lineage view.
- The table views.
TrackScheme and the table views are launched from buttons in the display config panel of the GUI. For your custom views, the best way to show them is to use a custom action, which is the subject of the next tutorial.
Fast-forwarding its results, here is what you get after a few manipulations:
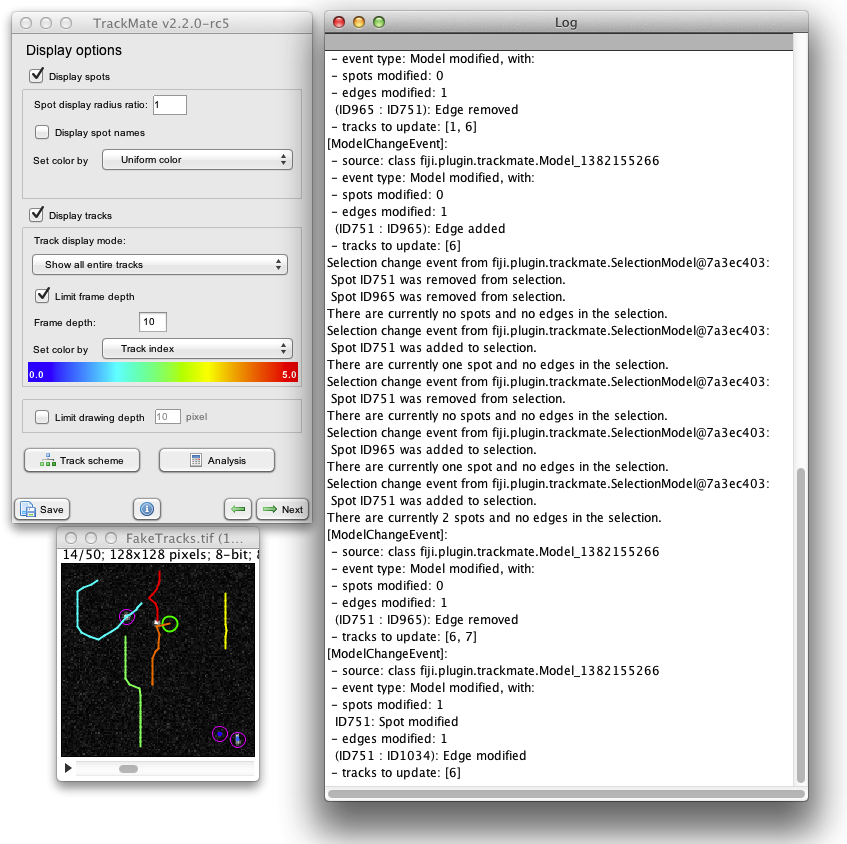
Jean-Yves Tinevez 17 March 2014 - 23 July 2021