See also the step-by-step tutorial on building a macro to automate batch processing.
Why Macros?
Macros can be used to
- automate repetitive tasks
- document what you did
- share common procedures
- add tools to the toolbar
- add keyboard shortcuts
Please be aware that there are several other available scripting languages that are more powerful than macros, too! See the summary of supported languages, as well as the Overcoming limitations section below.
Variables
The most important concept when starting to program macros are variables. A variable is a placeholder for a changing entity. It has a name and a value, which can be numeric or text (so-called strings).
Variables are needed whenever you want to execute the same code several times, but for different images, parameters, etc
Variables can also be used to store user input obtained through a dialog.
A variable can be assigned like this:
factor = 1024;
In this example, factor is the name of the variable, 1024 is the value assigned to the variable. The semicolon tells ImageJ that the assignment is done.
Example: assign text to a variable:
message = "Hello, World!";
In this case, the variable is named message, and the text Hello, World! is assigned to it; Text is specified inside double quotes.
Using variables
You can use variables in expressions: you can calculate with numeric variables, and you can concatenate text and text variables. Example:
x = 2;
y = 3;
result = x * x + y + y;
This assigns the variable x the value 2, the variable y the value 3, and then assigns the variable result the square of x plus the square of y.
This example shows how to concatenate a fixed text with the value of a variable:
name = "Bob";
msg = "Those days are over, " + name;
A common pitfall is to include the name of a variable in a string. The following code demonstrates this:
(BAD lines are commented out to discourage copying them. If you paste this code in the script editor, you can uncomment these lines to see their errors)
title = "/scripting/macro";
//write("The name: title");  // BAD - literally prints "title"
write("The name: " + title); // GOOD - properly uses the title variable value
The same principle applies when using variables which reflect parameters passed to a run() method, e.g.
specifiedRadius = 3;
//run("Median...", "radius=specifiedRadius");  // BAD - will literally pass "specifiedRadius"
run("Median...", "radius=" + specifiedRadius); // GOOD - will correctly pass the radius variable value
When concatenating strings, whitespace will not automatically be added. So care must be taken, for example when spaces are desired.
// We want to use the "Li white" threshold

userDefinedAutoThreshold = "Li";
//run("Auto Threshold", "method=" + userDefinedAutoThreshold + "white");   //does NOT work because the macro runs as "method=Liwhite"
run("Auto Threshold", "method=" + userDefinedAutoThreshold + " white");   //WORKS because including a space in " white" results in "method=Li white"
Self-referencing assignments
When a variable is assigned, the right-hand side is evaluated first, and only then the assignment is performed. This allows you to double the value of a variable:
amount = amount * 2;
First, amount * 2 is evaluated. The result is then assigned back to the variable amount, effectively doubling it.
A very important operation is to increment a variable’s value by one:
counter = counter + 1;
It is so important that there is a short form for it:
// This statement does the same as counter = counter + 1;
counter++;
Functions
Most of the time, you will call functions which implement the actions you want to execute. Functions have names, like variables, but they also have parameters that you can pass to the functions. ImageJ comes with many predefined functions that you can call to perform specific calculations or other operations.
This example writes Hello, World! to the Log window:
write("Hello, World!");
As before, a semicolon signifies the end of the statement. The name of the function is write, and the parameter list is enclosed in parentheses. In the case of write, there is only one parameter. If there are more parameters to be passed, they have to be separated by commas:
newImage("My pretty new image", "8-bit black", 640, 480, 1);
Like write, newImage is a builtin function of ImageJ. The order of the parameters is relevant, this is the way the function knows what each parameter means.
Defining functions
For recurring tasks, you can define your own functions:
function closeImageByTitle(title) {
        selectWindow(title);
        close();
}
Note that the title is just another variable, which is implicitly assigned when the function is called. In other words, this call will execute the code in above definition, with the variable title set to My pretty new image:
closeImageByTitle("My pretty new image");
Comments
When you read your code again in six months from now, you want to understand what your code does, and why. For this, you can add comments, i.e. text which is ignored by ImageJ when it executes the macro. Example:
// This variable contains the radius of the circle to be drawn
r = 15;
Everything after the two slashes up to the end of the line is a comment.
Multi-line comments
You can also have multi-line comments enclosed in /* ... */ blocks:
/*
 It turned out in practice that 0.5 is a good choice for alpha, because
 it leads to fewer artifacts than anything larger, and it is large enough
 to guarantee a quick convergence.
*/
alpha = 0.5;
Commented-out code
When reading macros written by other people, you will often find the concept of commented-out code. This is code that is pretended to be a comment so that it is not executed. Example:
a = 0.5;
// write("value of a: " + a);
run("Gaussian Blur...", "radius=" + a);
Typical uses for commented-out code are instructions that help with debugging, but are too verbose (or too slow) for regular execution of the macro.
Conditional code blocks
Sometimes, you need to execute a certain part of the code if and only if a certain condition is met. Example:
// If the image is not binary, abort
if (!is( "binary" )) {
    exit( "You need a binary image for this macro!" );
}
There are several parts to a conditional block: the if keyword, the condition inside the parentheses, and the code block enclosed in curly braces.
In this case, the condition calls the function is to ask whether the current image is binary, and the exclamation mark negates the result, i.e. !is("binary") yields true if and only if the current image is not binary (as opposed to is("binary"), which returns true in the opposite case).
If the code block consists of only one statement, the curly braces may be omitted, but it is a good practice to keep them (for example, nested conditional blocks are much easier to understand with curly braces than without).
Likewise, it is a good practice to indent the code inside the conditional block (i.e. to add white space in front of the lines inside the block). This makes reading the code much easier, too.
else
You can optionally add an else clause, i.e. a code block that is executed when the condition is not met. Example:
if (is("binary")) {
        write("The current image is binary");
}
else {
        write("The current image is not binary");
}
Loops
1st example
To repeat instructions several times, loops are used. Example:
for (i = 0; i < 10; i++) {
        run("Dilate");
}
This code will run the Dilate command ten times. The syntax of the for loop consists of the for keyword, followed by three statements enclosed in parentheses, and the code block to be executed.
The three statements defining how often to run the code block are the
- initializer: typically, a counter variable is initialized, in this case
ito the value zero, - the condition: as long as this condition is met (here
i < 10), the code block is executed, - the incrementor: this statement is executed after the code block, just before testing again whether the block should be executed again.
In this example, the variable i is first initialized to zero, then the condition is checked, and as i is smaller than 10, the code block is executed. After that, i is incremented, and the condition is checked again. As 1 is still smaller than 10, the code block is executed again. This repeats for the values 2, 3, …, 9, but after the variable i was incremented from 9 to 10, the condition does not hold true anymore, so the loop is finished.
Even if the counter variable was not used inside the code block in this example, you are free to do so, of course.
Note that starting with 0 and testing for the condition “smaller than 10” will result in the code block being run 10 times. It is the standard way to execute a certain block of code a fixed number of times.
Looping over slices of a stack
To loop over a stack, one can use the variable nSlices.
#@ImagePlus (label="Some stack") image

selectImage(image);
for (i=1; i<=nSlices; i++) {
    setSlice(i);
    run("Duplicate...", "title=Slice");
    // do some processing
}
Looping over rois in RoiManager
This small IJmacro scriptlet loops over the roi in the Roi Manager, selecting one at a time.
for (i = 0; i < roiManager("count"); i++){
     roiManager("Select", i);
     // do some operation
}
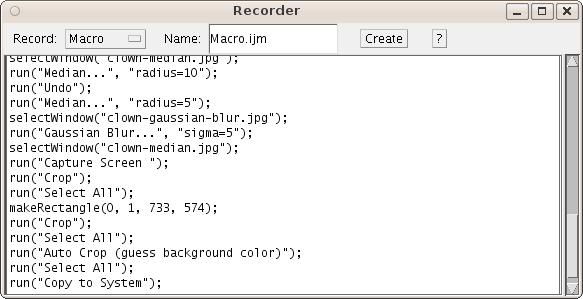
The recorder
Typically, macros are not written from scratch, but recorded using the Macro Recorder: Just click on Plugins › Macros › Record… and perform some actions. These actions will be recorded in the recorder window, and you can click to open the recorded instructions in an editor:
In some cases, you might need to edit the recorded macro to make it usable with other images than the one you used to record the macro with. Example: when you merge channels, you end up with a statement like this:
run("Merge Channels...",
    "red=[Edges of boats.gif] green=boats.gif blue=boats.gif gray=*None*");
The parameters passed to Merge Channels… depend very much on the current image’s name. One possible solution looks like this:
title = getTitle();
run("Merge Channels...",
     "red=[Edges of " + title + "] green=" + title + " blue=" + title + " gray=*None*");
Note that we need to use string concatenation in order to insert the current image’s name in place of boats.gif, as described in above.
In order to allow spaces in the name, you might also want to add extra [...] around the title:
title = getTitle();
run("Merge Channels...",
     "red=[Edges of " + title + "] green=[" + title + "] blue=[" + title + "] gray=*None*");
Installing macros
To install keyboard shortcuts or tool icons, you need to wrap macro code in macro blocks:
macro "Title of the macro" {
       write("Hello, world!");
}
Then you need to install them:
Simply save your macro in a plugins subfolder of ./ImageJ/scripts/ (e.g. ./ImageJ/scripts/Plugins/MyScripts/My_Macro.ijm), and it will appear in the respective menu (e.g. Plugins › MyScripts › My Macro) after restarting the program.
Note: The Plugins › Macros › Install… command is a command of the original ImageJ that does not yet support the SciJava Script Parameters syntax (#@) that was introduced with ImageJ2.
Keyboard shortcuts
Keyboard shortcuts can be defined by adding the key within brackets at the end of the macro name. These keyboard hotkeys will only work if they are registered as shortcuts.
Example:
// install a keyboard shortcut: when pressing J,
// the user is asked for JPEG quality and for a location
// to save the current image as .jpg file

macro "Save As JPEG... [j]" {
    quality = call("ij.plugin.JpegWriter.getQuality");
    quality = getNumber("JPEG quality (0-100):", quality);
    run("Input/Output...", "jpeg="+quality);
    saveAs("Jpeg");
}
Make sure to register a shortcut using Plugins › Shortcuts › Add Shortcut…
Tool icons
By choosing a macro name that ends in Action Tool, you can install new tools into the toolbar:
// A click on the empty rectangle will have the same
// effect as <span class="bc"><span>File</span> › <span>Save As</span> › <span>Jpeg...</span></span>

macro "Save As JPEG Action Tool - C000R11ee" {
    saveAs("Jpeg");
}
The icon is defined by a funny-looking string (in this case, C000R11ee). To learn how to define your own icon, please have a look here.
Many tools open an option dialog upon double-click on the icon. You can do that, too, by choosing a name that ends in Action Tool Options:
// A right-click on the tool icon lets the user change
// the JPEG Quality

macro "Save As JPEG Action Tool Options" {
    quality = call("ij.plugin.JpegWriter.getQuality");
    quality = getNumber("JPEG quality (0-100):", quality);
    run("Input/Output...", "jpeg="+quality);
}
Example macros
This section contains a number of macros which you can use as starting points to write your own macros.
If you’re interested in performing a certain procedure for all files in a given folder, you might want to have a look a the tutorial How to apply a common operation to a complete directory or at the macro template that you can open in the Script Editor via Templates › Macros › Process Folder.
Resizing to a given width of the selection bounds
When you need to resize an image but all you know is what width (in pixels) a structure has that you selected as a ROI, this macro is for you:
desiredSelectionWidth = 480;

roiType = selectionType();
getSelectionCoordinates(x, y);
getSelectionBounds(dummy, dummy, selectionWidth, selectionHeight);
factor = desiredSelectionWidth / selectionWidth;
newWidth = round(factor * getWidth());
newHeight = round(factor * getHeight());
run("Select None");
run("Size...", "width=" + newWidth + " height=" + newHeight
    + " average interpolation=Bicubic");
for (i = 0; i < x.length; i++) {
    x[i] = round(x[i] * factor);
    y[i] = round(y[i] * factor);
}
makeSelection(roiType, x, y);
Splitting timepoints
This macro splits a hyperstack into its individual timepoints, so that you end up with as many new images as the original hyperstack had frames:
/* split timepoints */

// remember the original hyperstack
id = getImageID();

// we need to know only how many frames there are
getDimensions(dummy, dummy, dummy, dummy, nFrames);

// for each frame...
for (frame = 1; frame <= nFrames; frame++) {
    // select the frame
    selectImage(id);
    Stack.setPosition(1, 1, frame);

    // extract one frame
    run("Reduce Dimensionality...", "channels slices keep");
}

// close the original hyperstack
selectImage(id);
close();
Merging timepoints
This macro does the opposite from the previous ones: it merges all the open images into one big hyperstack, assuming that they are the different timepoints of one movie.
// join frames

// get the dimensions
title = getTitle();
getDimensions(width, height, channelCount, sliceCount, frameCount);

if (frameCount > 1)
    exit("Only stacks with 1 timepoint may be open!");

// verify that all images have correct dimensions
setBatchMode(true);
imageCount = nImages;
for (image = 1; image <= imageCount; image++) {
    selectImage(image);
    getDimensions(width2, height2, channelCount2, sliceCount2, frameCount2);
    if (width2 != width || height2 != height || channelCount2 != channelCount ||
            sliceCount2 != sliceCount || frameCount2 != frameCount)
        exit("Dimensions of " + getTitle() + " do not match dimensions of " + title + ": "
            + width2 + "x" + height2 + "x" + channelCount2 + "x" + sliceCount2 + "x" + frameCount2 + " are not "
            + width2 + "x" + height + "x" + channelCount + "x" + sliceCount + "x" + frameCount + "!");
}

// now rename all images so that the names are unique
for (image = 1; image <= imageCount; image++) {
    selectImage(image);
    rename("image-" + image);
}

// now concatenate one by one
selectImage("image-1");
rename("image-0");
for (image = 1; image < imageCount; image++) {
    run("Concatenate...", "stack1=image-" + (image - 1) + " stack2=image-" + (image + 1) + " title=image-" + image);
}

// there is only one image left; rename it to the original title
rename(title);

// set the correct dimensions
Stack.setDimensions(channelCount, sliceCount, imageCount);

// show the image
selectImage(title);
setBatchMode(false);
Normalize all images to the global mean
This macro takes the mean of all open images’ means and then adjusts the pixel values in each image to that mean:
setBatchMode(true);

total = 0;
for (i = 1; i <= nImages; i++) {
    selectImage(i);
    getRawStatistics(dummy, mean, dummy, dummy, dummy, dummy2);
    total = total + mean;
}
total = total / nImages;

for (i = 1; i <= nImages; i++) {
    selectImage(i);
    getRawStatistics(dummy, mean, dummy, dummy, dummy, dummy2);
    difference = total - mean;
    run("Add...", "value=" + difference);
}

setBatchMode(false);
Make a false-colored montage
Here is a more complicated macro, maybe you can guess from reading the code how it does what it does? After that, you might want to try it on the Clown example…
function simplifyColors() {
    run("Duplicate...", "title=step-1");
    run("HSB Stack");
    setSlice(2);
    stack = getImageID();
    run("Duplicate...", "title=threshold");
    run("Gamma...", "value=0.30");
    run("Bilateral Filter", "spatial=15 range=150");
    run("Select All");
    run("Copy");
    close();
    selectImage(stack);
    run("Paste");
    setSlice(1);
    run("Duplicate...", "title=bilateral");
    run("Bilateral Filter", "spatial=15 range=150");
    run("Enhance Contrast", "saturated=0.4");
    run("Select All");
    run("Copy");
    close();
    selectImage(stack);
    run("Paste");
    run("RGB Color");
}

function warholize(order, invertR, invertG, invertB) {
    if (order == 0)
        order = "1,2,3";
    else if (order == 1)
        order = "1,3,2";
    else if (order == 2)
        order = "2,1,3";
    else if (order == 3)
        order = "2,3,1";
    else if (order == 4)
        order = "3,1,2";
    else if (order == 5)
        order = "3,2,1";
    run("Make Substack...", "slices=" + order);
    if (invertR != 0) {
        setSlice(1);
        run("Invert", "slice");
    }
    if (invertG != 0) {
        setSlice(2);
        run("Invert", "slice");
    }
    if (invertB != 0) {
        setSlice(3);
        run("Invert", "slice");
    }
    run("Stack to RGB");
}

function makeMontage(big) {
    orig = getImageID();
    w = getWidth();
    h = getHeight();

    columns = 3;
    rows = 3;
    orders = newArray(3, 4, 5, 1, 3, 5, 5, 1, 2);
    inverts = newArray(6, 5, 7, 1, 4, 1, 0, 2, 0);

    if (big) {
        columns = 8;
        rows = 6;
        orders = newArray(columns * rows);
        inverts = newArray(columns * rows);
        for (column = 0; column < columns; column++)
            for (row = 0; row < rows; row++) {
                index = column + columns * row;
                orders[index] = row;
                inverts[index] = column;
            }
    }
    else if (randomize) {
        for (i = 0; i < orders.length; i++) {
            orders[i] = floor(random() * 5.999);
            inverts[i] = 1 * floor(random() * 1.2)
                + 2 * floor(random() * 1.2)
                + 4 * floor(random() * 1.2);
            // avoid duplicates
            for (j = 0; j < i; j++)
                if ((orders[j] == orders[i] && inverts[j] == inverts[i])
                        || (orders[i] == 0 && inverts[i] == 0)) {
                    i--;
                    j = i;
                }
        }
    }

    // create the panel
    newImage("Warhol'ized " + getTitle(), "RGB white",
        (w + 1) * columns + 1, (h + 1) * rows + 1, 1);
    result = getImageID();

    // for speed, and to minimize user interference, start the batch mode
    setBatchMode(true);
    selectImage(orig);
    run("Duplicate...", "title=stack");
    run("RGB Color");
    simplifyColors();
    run("RGB Stack");
    stack = getImageID();

    // fill the panel
    for (column = 0; column < columns; column++)
        for (row = 0; row < rows; row++) {
            selectImage(stack);
            index = column + columns * row;
            i = inverts[index];
            warholize(orders[index], i & 1, i & 2, i & 4);

            // copy the false-color image into the clipboard
            makeRectangle(0, 0, w, h);
            run("Copy");
            close();

            // paste the clipboard, at the correct location
            selectImage(result);
            makeRectangle((w + 1) * column + 1, (h + 1) * row + 1, w, h);
            run("Paste");
        }

    run("Select None");
    selectImage(stack);
    close();
    setBatchMode(false);
}

randomize = true;
makeMontage(false);
Mimic the merge sides command in the BioRad MRC600 confocal
Macro to mimic the merge sides command in the original BioRad MRC600 confocal.
For an example raw image, see http://www.flickr.com/photos/mcammer/1618746622/
For an example result, see http://www.flickr.com/photos/mcammer/8551068739/
Splits a grayscale image and merges. Works on stacks.
Michael Cammer with editing by Johannes Schindelin 2013-03-12
macro "Split and Merge" {
  width = getWidth();
  height = getHeight();
  if ( (width % 2) == 0  ) exit("Image not even # pixels wide.");
  makeRectangle(0, 0, width/2, height);
  right = getImageID();
  slices = nSlices;
  run("Duplicate...", "title=LEFT duplicate range=1-"+slices);
  selectImage(right);
  makeRectangle(width/2, 0, width/2, height);
  run("Crop");
  rightTitle = getTitle();
  run("Merge Channels...", "c1=LEFT c2="+right);
  rename("merged_"+right);
}  // end
More example macros
There are quite a lot of macros on the ImageJ website, and specifically example macros including a few from the Macro workshop at the ImageJ conference 2010. Since there is no categorized index, you might want to use the search facility on this page.
Overcoming limitations
Macros have a major limitation compared to the other scripting languages: they have only a fixed set of built-in functions. Sometimes, though, one needs access to functions outside this realm; in that case, there are three primary means of overcoming this limitation:
Macro extensions
It is possible to implement code in Java which extends the macro language via the Ext prefix. However, this cannot be done within the macro itself.
The call function
The call function can invoke Java methods directly. However, this function only supports calling public static Java methods which accept String only, and return String only. Most times, though, the needed function does not conform to these requirements; this approach is suitable mostly for routines designed to be called from the macro language in this way.
The eval function
The eval function can execute JavaScript (or BeanShell or Python) code directly. This is a powerful and flexible approach which can invoke nearly any Java API without needing to write external Java code.
Here is an example which sets the position of a 3D Viewer window:
run("MRI Stack (528K)");
run("3D Viewer");
call("ij3d.ImageJ3DViewer.add", "mri-stack.tif", "None", "mri-stack.tif", "0", "true", "true", "true", "2", "0");

// Loop over all frames to find the 3D Viewer window(s)
x = 200;
y = 300;
eval("script",
    "frames = java.awt.Frame.getFrames();" +
    "for (f=0; f<frames.length; f++) {" +
    "  frame = frames[f];" +
    "  if (\"ImageJ 3D Viewer\".equals(frame.getTitle())) {" +
    "    frame.setLocation(" + x + ", " + y + ");" +
    "  }" +
    "}"
);
The exec function
The exec function can call any external program or process with optional arguments.
It can be used to e.g. automatically open a tabular software with a result table after analysis. It can also be used to open a specific webpage in the default browser.
See Examples.
Note that the macro code will wait for the external process to terminate, and only after that continue the execution of the rest of the code (except when opening a webpage or excel).
If you dont want the macro to wait until the end of the external process you can call the command
setOption("WaitForCompletion", false);
before the exec call. (since ImageJ 1.52u38)
Further documentation
A complete description of the macro language, a reference of the built-in functions, and examples can be found here.