Types of color images
Images with color come in three different forms: pseudo-color, 24-bit RGB image, or color composite image.
Pseudo-color
A pseudo-colored image has a single channel, (i.e. grey) image that has color ascribed to it via a “Look Up Table” or LUT (a.k.a. palette, color table). This is a table of grey values (zero to 256 or 4095 whether 8-bit or 12-bit grey) with accompanying red, green and blue values. Instead of displaying grey, the image displays a pixel with a defined amount of each color. Differences in color in the pseudo-colored image reflect differences in intensity of the object rather than differences in color of the specimen that has been imaged. For pseudo-color functions see later.
24-bit RGB images
The colors in RGB images (24-bit with 8-bits for each of the red, green and blue channels) are used to show multi-channel images. The colors are designed to reflect genuine colors (i.e. the green in an RGB image reflects green color in the specimen). There are several RGB functions in Fiji. Native functions can be found in Image › Color.
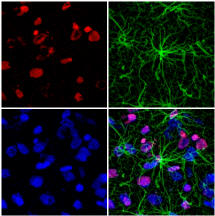
Color Composite Images
A color composite image is similar to the color images one would find in the image processing software Photoshop. In Photoshop these images are made of “layers”, and in Fiji they are made of “channels”. Both “layers” and “channels” are the same idea. The advantages of using this type of image instead of RGB images include:
- Each channel is kept separate from the others and can be turned on or off using the ‘Channels Tool’ (Image › Color › Channels Tool). You have the option of viewing the image as a composite of all or some of the different channels, as individual channels, or as individual greyscale channels. There is a button labeled ‘More’ at the bottom of the window that allows you to make a composite, convert the image to RGB, merge or split channels, edit the image’s LUT, or choose new channel colors from a list.
- Each original channel can be kept as 16-bit.
- More than 3 channels can be merged and kept separate. Each channel can be selected via the scroll bar at the bottom of the window.
- The contrast and brightness of individual channels can be adjusted after merging.
Color composite images can be converted to 24-bit RGB via the ‘Channels Tool’ dialog box.
The disadvantage of the Composite image type is that this relatively recent Fiji development is not supported by all existing plugins. Sometime the composite can revert to a multi-slice stack. To convert it back to a composite you can use the menu command Image › Color › Make Composite.
Merging multi-channel images
Interleaved multi-channel experiments
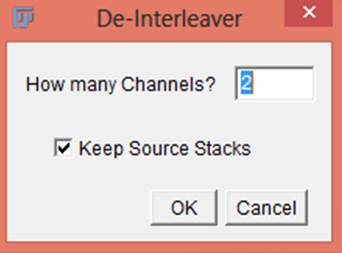
Multi-channel experiments acquired on some systems are imported with the different channels interleaved, i.e. Slice 1 is Timepoint1-channel1 and Slice 2 is Timepoint1-channel2. The stack needs to be “De-interleaved” before it can be RGB-merged. This can be done with Image › Stacks › Tools › Deinterleave and entering the number of channels in the dialog (typically “2”). You can also choose to check a box for whether or not the source stacks should be kept. The two stacks can then be merged via: Image › Color › RGB merge.
RGB color merging
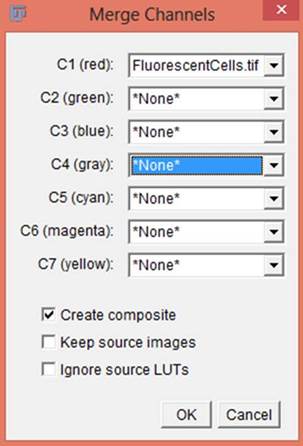
The native Fiji function Image › Color › Merge Channels… can be used to merge red, green and/or blue channel images or Image Stacks
This reduces 16-bit images to 8-bits (based on the current Brightness and Contrast values) then generates a 24-bit RGB image.
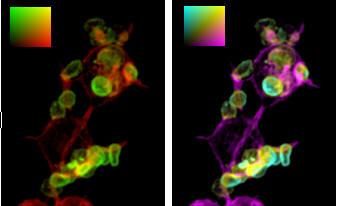
An alternative to the normal Red-Green merge is to merge the images based on Cyan and Magenta, or Cyan-Yellow or any other color combination.
This can aid visualization of colocalization due to our poor perception of red and green colors. The Colour_merge plugin gives the user the option of using the ‘difference’ arithmetic processing on the image stacks you select. This is not strictly a merge (when cyan and magenta merge they produce white, not yellow) but facilitates visualization of the separate channels (See Demandolx and Davoust, J. Microscopy, 1997 v185. p21 1). You can perform a true merge if you turn off the “Difference” option.
Run the plugin and select the two images to be merged. Select the desired colors from the drop-down options.
Merging transmitted light and fluorescence images
Fluorescence and transmitted light brightfield images can be merged with the Image › Color › Merge Channels…. This instruction lets you than choose the C4 (gray) option. This can prevent a ‘washed out’ look to the fluorescence.
This also reduces 16-bit images to 8-bits (based on the current Brightness and Contrast values) then generates a 24-bit RGB image.
Merging images to a color composite
The menu command Image › Color › Merge Channels… opens a dialog to merge grey, red, green, blue, cyan, magenta, and yellow channels to a new composite image.
Splitting multi-channel Images
An RGB image or stack can be split to the respective red, green and blue image components using the menu command Image › Color › Split Channels.
Sometime a merged RGB image may need to be displayed along with the separate channels in a final figure. This can be done with the “RGB to Montage” plugin.
It works with single slice RGB images. A new RGB stack is created, channel 1 being the red channel; 2 the green and 3 the blue. The fourth slice is the merged slice. If a channel is empty (e.g. a red-green merged image will have no blue) then the slice is omitted. Then the plugin prompts you for the layout of the montage. You have the option to alter the width of the white border between the image panels. If the ‘Pseudo-color ‘option is off, each channel will be greyscale. If scale bar size is set to zero, no scale bar will be added.
Color Composite
The composite can be reverted to a greyscale stack via the menu command Image › Hyperstacks › Hyperstack to Stack. The channels can be subsequently split to individual images via the menu command Image › Stacks › Stack to Images.
Pseudo-color
Judicious use of LUTs can be very useful in highlighting the desired features of an image. The human eye can perceive relatively few shades in one image. Pseudo-coloring images can make data more visible
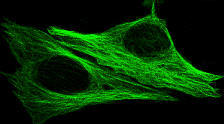
Traditional “Green” LUT
Enhanced “Green Hot” LUT
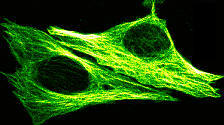
Microtubules under nucleus now more apparent
Have a play and see which LUT helps illustrates the features in your image.
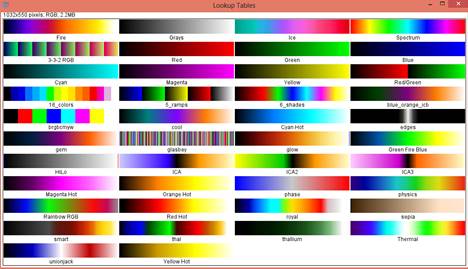
Montage compiled from a stack generated using the menu commands Image › Color › Display LUTs.
Different LUTs are available via the menu commands Image › Lookup Tables.
When using a non-standard LUT it may be useful to add a greyscale ramp so the user can judge which color represents which grey-scale value. A ramp can be added with the native function Analyze › Tools › Calibration Bar…. If there is no space for the ramp, try enlarging the image canvas with the menu command Image › Adjust › Canvas Size….
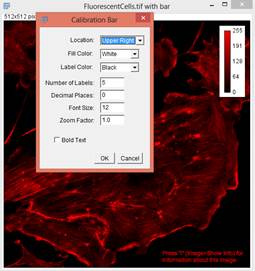
Analyze › Tools › Calibration Bar…