See also the Introduction into Macro Programming and Batch Processing articles.
Introduction
One of the great strengths of ImageJ is its ability to automate workflows. If you have a workflow you wish to automate, there are a number of options:
Please note that the above list is not exhaustive! In this tutorial, we will be exploring option #1. However, it is advisable to experiment with the other options above - you may find an alternative approach (or perhaps a combination of approaches) is more suitable for your requirements.
Overview of this tutorial
This tutorial demonstrates how to
- Use the macro recorder to record a series of commands to form the basis of a macro
- Edit the output from the macro recorder so that it can be run on any open image
- Enclose the code from step 2 inside a loop so that it runs on multiple images
- Add some progress updates
- Add a dialog so that a user can modify the parameters to the macro prior to execution
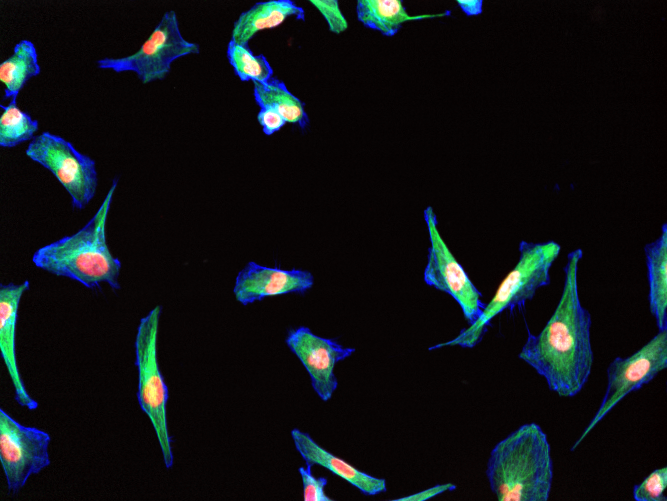
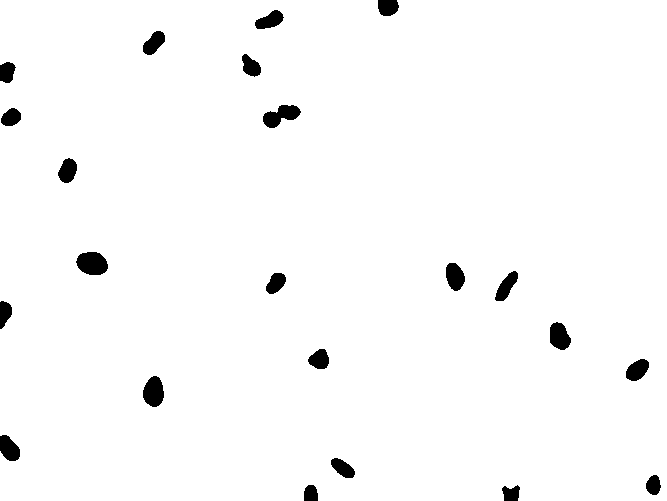
Data from the Image Data Resource is used in this tutorial, which is browsable online. Instructions on downloading images from the IDR are here. Below we outline a simple macro designed to count nuclei in 10 such images; here is an example such image:
Record Commands with the Macro Recorder
Start the macro recorder
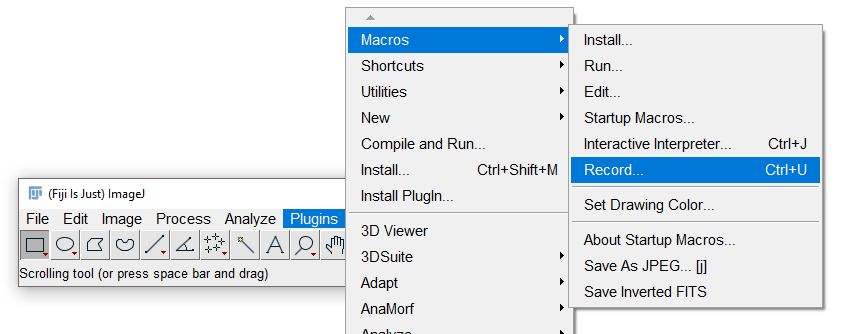
To start the macro recorder, go to Plugins › Macros › Record:
Every command you now access through ImageJ’s menu will be recorded as a line of text in the macro recorder.
The vast majority of the functionality in ImageJ/Fiji’s menus is macro-recordable. Occasionally, some commands will not be recorded, or not recorded correctly. Please refer to the documentation and image.sc in such cases.
Perform a simple workflow
Perform a series of commands that you would like to automate with a macro.
The commands recorded below resulted from:
- Opening of an image with Bio-Formats, splitting channels into separate windows.
- Selecting the first channel containing the nuclei

- Applying a Gaussian blur
- Thresholding the image with the default method
- Using the Watershed algorithm to separate adjacent objects

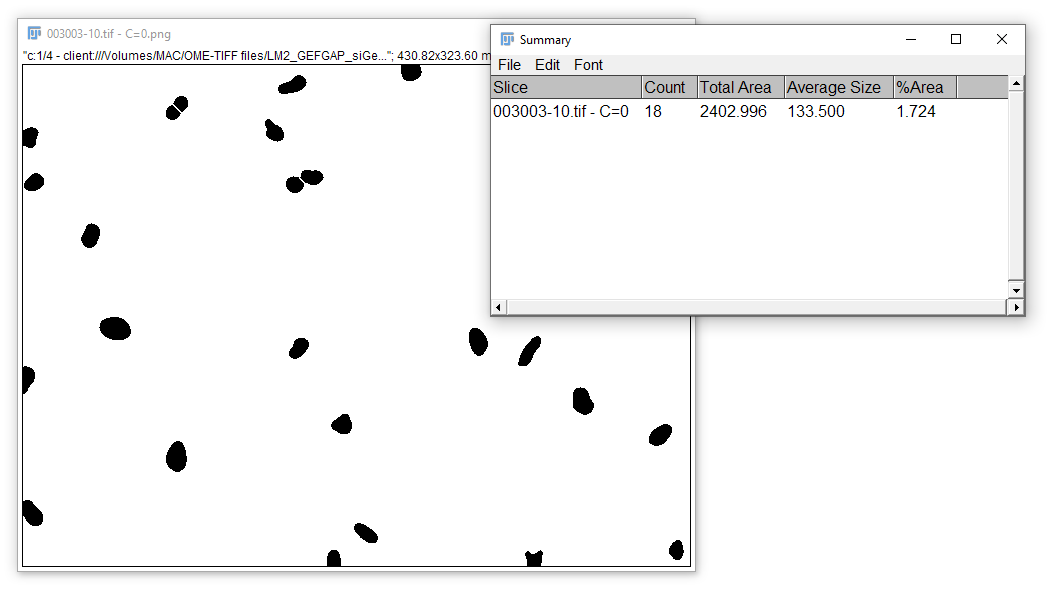
- Generating a particle count using the
summarizeoption in the Analyze Particles tool.
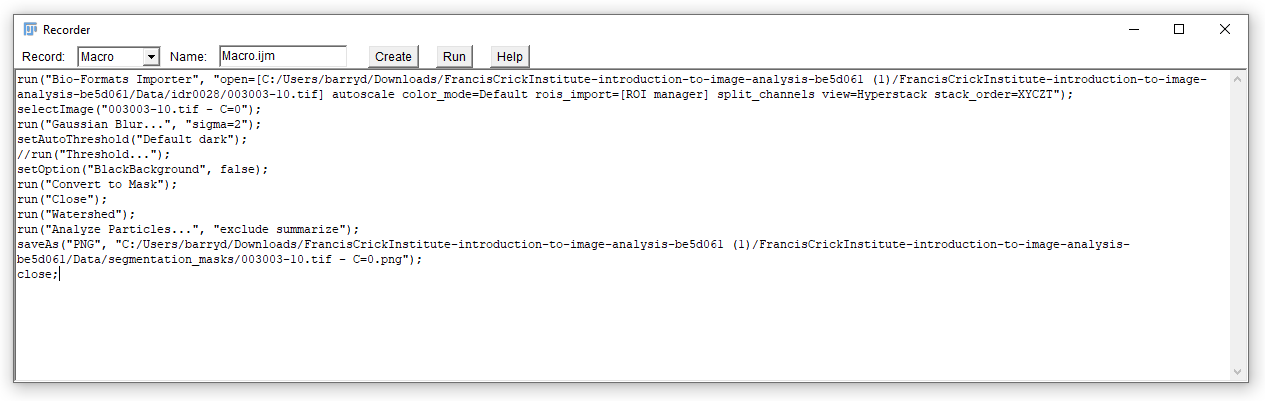
The result of the commands recorded above should look like this:
Edit the Output from the Macro Recorder
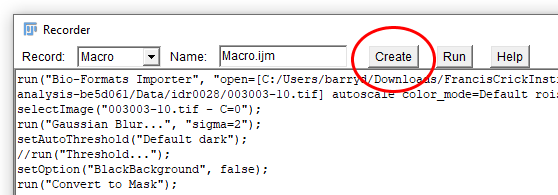
It’s possible to edit commands directly within the Macro Recorder, but it’s probably easier to use the Script Editor. You can launch the Script Editor directly from the Macro Recorder by clicking the Create button.
Save your macro and run it
Give your macro a sensible name and save it by going to File › Save As… in the Script Editor. Now try running your macro by selecting Run › Run from the menu. Your macro should produce the same output as the series of commands you recorded earlier. The code in the image above is reproduced below should you wish to copy it:
run("Bio-Formats Importer", "open=[C:/Users/barryd/Downloads/FrancisCrickInstitute-introduction-to-image-analysis-be5d061 (1)/FrancisCrickInstitute-introduction-to-image-analysis-be5d061/Data/idr0028/003003-10.tif] autoscale color_mode=Default rois_import=[ROI manager] split_channels view=Hyperstack stack_order=XYCZT");
selectImage("003003-10.tif - C=0");
run("Gaussian Blur...", "sigma=2");
setAutoThreshold("Default dark");
//run("Threshold...");
setOption("BlackBackground", false);
run("Convert to Mask");
run("Watershed");
run("Analyze Particles...", "exclude summarize");
saveAs("PNG", "C:/Users/barryd/Downloads/FrancisCrickInstitute-introduction-to-image-analysis-be5d061 (1)/FrancisCrickInstitute-introduction-to-image-analysis-be5d061/Data/segmentation_masks/003003-10.tif - C=0.png");
Generalise your macro
The obvious problem with the macro in its current form is that it will only ever work on the image that was loaded when the commands that form the basis of the macro were originally recorded. Modifying the first two lines is the first step in “generalising” the macro, so that it runs on any image:
run("Bio-Formats Importer", "autoscale color_mode=Default rois_import=[ROI manager] split_channels view=Hyperstack stack_order=XYCZT");
selectImage(1);
run("Gaussian Blur...", "sigma=2");
setAutoThreshold("Default dark");
setOption("BlackBackground", false);
run("Convert to Mask");
run("Watershed");
run("Analyze Particles...", "exclude summarize");
outputDir = getDirectory("Select Output Directory");
saveAs("PNG", outputDir + "segmentation_output.png");
There are three changes above:
- On the first line, the
openargument that was previously passed to Bio-Formats has now been removed. As such, ImageJ will produce a File Open dialog, asking the user to specify which image they wish to open with Bio-Formats - On the second line, the
selectImagecommand has been modified to select the first image window (assuming this is the channel with the nuclei signal). Alternatively, we could have modified the Bio-Formats Importer statement to only open the first channel in the image. - The last two lines now ask the user to specify an output directory, before saving the segmentation mask.
While this macro will now run on any image, it only allows us to process one image at a time, which is not ideal!
Create a Loop to Run on Multiple Images
The macro we have so far works on one image at a time, by asking the user to select it as input. To automate the analysis on multiple images in a folder, we will have to setup a for loop.
Enclose code within a for loop
We can run our code multiple times, to process multiple images, by enclosing it in a for loop:
for (i = 0; i < 10; i++) {
	run("Bio-Formats Importer", "autoscale color_mode=Default rois_import=[ROI manager] split_channels view=Hyperstack stack_order=XYCZT");
	selectImage(1);
	run("Gaussian Blur...", "sigma=2");
	setAutoThreshold("Default dark");
	setOption("BlackBackground", false);
	run("Convert to Mask");
	run("Watershed");
	run("Analyze Particles...", "exclude summarize");
	outpuDir = getDirectory("Select output directory");
	saveAs("PNG", outputDir + "segmentation_output.png");
}
However, there are a number of problems with the above code:
- The user is required to specify the input image and output directory on each iteration of the loop
- The loop will always run exactly 10 times…
- …which will result in a lot of image windows being opened
- The output image will have the same name for each iteration of the loop
Let’s deal with each of these one at a time.
Obtain an input directory
Let’s add some code before the for loop to get an input directory and obtain a list of files from that input directory. We can also move the line of code specifying the output directory here so it doesn’t get called every time the loop is executed:
inputDir = getDirectory("Select Input Directory");
images = getFileList(inputDir);
outputDir = getDirectory("Select Output Directory");
Now we need to update the command that runs the Bio-Formats Importer, such that it opens a different image on each iteration of the loop:
run("Bio-Formats Importer", "open=[" + inputDir + File.separator() + images[i] + "] autoscale color_mode=Composite rois_import=[ROI manager] view=Hyperstack stack_order=XYCZT");
The + sign allows for concatenating strings, while using the File.separator() command takes care of differences between operating systems in conventional file separator characters. Enclosing a folder path or file name with squared brackets [...] ensures that they are read as a single string even in the presence of spaces.
Close windows when we’re done with them
The macro in its current form will open four windows every time the for loop is executed (assuming the input images have four channels). Multiply this by the number of times the loop gets executed (currently 10) and that’s a lot of windows. We can deal with this by adding a close statement to the end of the code block within the for loop. Using a wildcard character (*) with the close statement instructs ImageJ to close all image windows:
close("*");
The complete macro now looks like this…
inputDir = getDirectory("Select Input Directory");
images = getFileList(inputDir);
outputDir = getDirectory("Select Output Directory");

for (i = 0; i < 10; i++) {
	run("Bio-Formats Importer", "open=[" + inputDir + File.separator() + images[i] + "] autoscale color_mode=Default rois_import=[ROI manager] split_channels view=Hyperstack stack_order=XYCZT");
	selectImage(1);
	run("Gaussian Blur...", "sigma=2");
	setAutoThreshold("Default dark");
	setOption("BlackBackground", false);
	run("Convert to Mask");
	run("Watershed");
	run("Analyze Particles...", "exclude summarize");
	saveAs("PNG", outputDir + "segmentation_output.png");
	close("*");
}
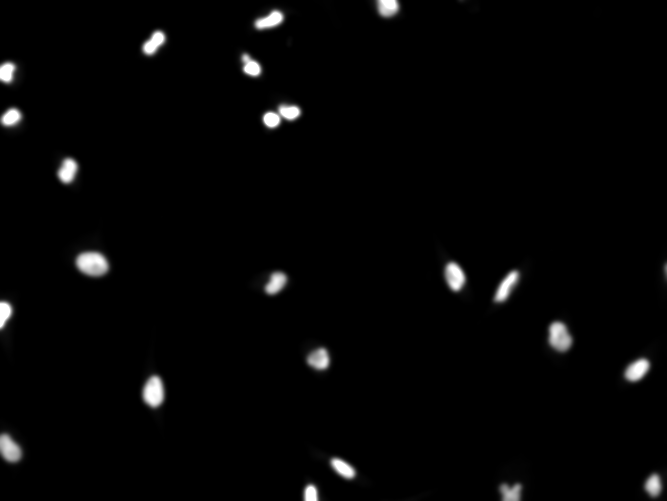
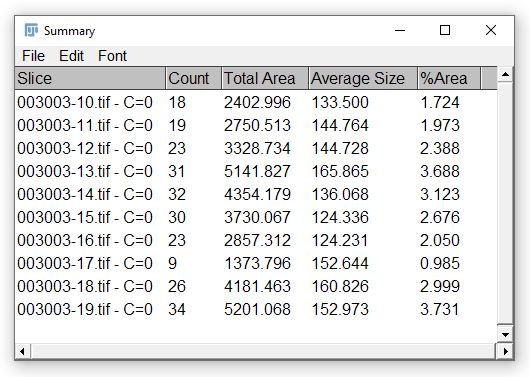
…and should now produce some meaningful output when run:
Run the loop for the required number of times
At present, the code within the for loop will always be executed exactly 10 times, regardless of how many images there are in the input directory. We can change this behaviour for placing something more meaningful in the conditional statement i < 10, such as:
for (i = 0; i < lengthOf(images); i++) {
Here, the lengthOf command returns the length of the images array, so the for loop will continue to be executed until all images in the array have been analysed.
Change the name of the output image
Finally, in order to have a fully functional (if rudimentary) macro, we need the name of the segmentation output image to be updated on each iteration of the for loop - at present, an image with the name segmentation_output.png is repeatedly overwritten. We could modify the saveAs statement to include the current value of i in the filename as follows:
saveAs("PNG", outputDir + "segmentation_output_" + i + ".png");
This will result in output images being saved as:
segmentation_output_0.png
segmentation_output_1.png
segmentation_output_2.png
...
To be more informative, we could include the input filename in the output image filename, as follows:
saveAs("PNG", outputDir + "segmentation_output_" + images[i] + ".png");
For an input image called 003003-10, this command would return segmentation_output_003003-10.png as output name.
The complete script now looks like this:
inputDir = getDirectory("Select Input Directory");
images = getFileList(inputDir);
outputDir = getDirectory("Select Output Directory");

for (i = 0; i < lengthOf(images); i++) {
	run("Bio-Formats Importer", "open=[" + inputDir + File.separator() + images[i] + "] autoscale color_mode=Default rois_import=[ROI manager] split_channels view=Hyperstack stack_order=XYCZT");
	selectImage(1);
	run("Gaussian Blur...", "sigma=2");
	setAutoThreshold("Default dark");
	setOption("BlackBackground", false);
	run("Convert to Mask");
	run("Watershed");
	run("Analyze Particles...", "exclude summarize");
	saveAs("PNG", outputDir + "segmentation_output_" + images[i] + ".png");
	close("*");
}
Add Some Progress Updates
It’s generally a good idea to keep the user informed of progress when code is running. We can do this by adding print statements at different points in the macro, so updates get printed to the Log window:
inputDir = getDirectory("Select Input Directory");
images = getFileList(inputDir);
outputDir = getDirectory("Select Output Directory");

setBatchMode(true);

print("\\Clear");
print("Found " + images.length + " files in " + inputDir);
print("0% of images processed.");

for (i = 0; i < lengthOf(images); i++) {
	print("\\Update:" + (100.0 * i / images.length) + "% of images processed.");
	run("Bio-Formats Importer", "open=[" + inputDir + File.separator() + images[i] + "] autoscale color_mode=Default rois_import=[ROI manager] split_channels view=Hyperstack stack_order=XYCZT");
	selectImage(1);
	run("Gaussian Blur...", "sigma=2");
	setAutoThreshold("Default dark");
	setOption("BlackBackground", false);
	run("Convert to Mask");
	run("Watershed");
	run("Analyze Particles...", "exclude summarize");
	saveAs("PNG", outputDir + "segmentation_output_" + images[i] + ".png");
	close("*");
}
print("\\Update:100% of images processed.");

setBatchMode(false);
The setBatchMode statements cause ImageJ to enter, then exit, “Batch Mode”, which suppresses image windows. This allows the macro to execute faster.
Add Comments
Adding comments to the macro will improve reusability both by others and our future selves. You can use the // sign before a line to add a comment in an ImageJ macro: this will ensure the line is not executed. The macro with added comments would look like this:
// Ask user for input directory and obtain file list
inputDir = getDirectory("Select Input Directory");
images = getFileList(inputDir);

// Ask user for output directory
outputDir = getDirectory("Select Output Directory");

// Suppress image windows (not displayed to screen)
setBatchMode(true);

// Initialise progress update
print("\\Clear");
print("Found " + images.length + " files in " + inputDir);
print("0% of images processed.");

// Loop through images
for (i = 0; i < lengthOf(images); i++) {

	// Update progress
	print("\\Update:" + (100.0 * i / images.length) + "% of images processed.");

	// Open image with Bio-Formats (split channels)
	run("Bio-Formats Importer", "open=[" + inputDir + File.separator() + images[i] + "] autoscale color_mode=Default rois_import=[ROI manager] split_channels view=Hyperstack stack_order=XYCZT");

	// Select the first channel
	selectImage(1);

	// Perform Gaussian blurring with sigma=2
	run("Gaussian Blur...", "sigma=2");

	// Threhold using the default algorithm
	setAutoThreshold("Default dark");
	setOption("BlackBackground", false);
	run("Convert to Mask");

	// Run Watershed to separate adjacent objects
	run("Watershed");

	// Measure morphological features
	run("Analyze Particles...", "exclude summarize");

	// Save segmentation mask
	saveAs("PNG", outputDir + "segmentation_output_" + images[i] + ".png");

	// Close all images
	close("*");
}

// Print message when the analysis is finished
print("\\Update:100% of images processed.");

// Turn off batch mode
setBatchMode(false);
Create a Dialog to Obtain User Input
As an alternative to the getDirectory statements used above, it is possible to create a more functional, self-contained dialog to receive input from the user.
Specify inputs and outputs
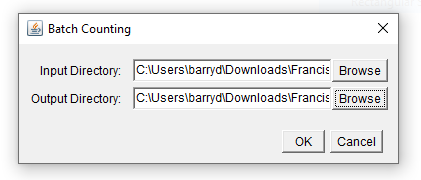
We can create and customise a Generic Dialog to obtain a variety of different inputs from the user. We can also use this interface to provide instructions to the user. Let’s begin with a simple dialog that prompts the user to specify input and output directories:
// Initialise variables
var inputDir;
var outputDir;

// Create dialog box
Dialog.create("Batch Counting");
Dialog.addDirectory("Input Directory:", inputDir);
Dialog.addDirectory("Output Directory:", outputDir);
Dialog.show();

// Update variables with user input
inputDir = Dialog.getString();
outputDir = Dialog.getString();
The code above does three things:
- Initialise two variables for the input and output directories. In the example, these are initialised to empty variables, but we could add here specific file locations if desired (e.g.
var inputDir = "C:/Users/barryd";) - Create a dialog with two directory selection fields and buttons
- Obtain the specified input and output directories when the user closes the dialog by clicking
OK. If the user clicksCancel, the macro exits.
Running the macro now should produce the following dialog:
Modifying parameters via a dialog
In addition to specifying input and output directories, there are a range of other controls that can be added to a dialog. For example, we can add fields allowing the user to specify…
- a filter radius for Gaussian smoothing
- a particular thresholding method from the full list available in ImageJ
- which channel corresponds to nuclei
Note that we can initialise the dialog with default values.
// Initialise variables
var inputDir;
var outputDir;
var gaussRad = 1.0;
var thresholdMethod = "Default";
var allThreshMethods = getList("threshold.methods");
var nucleiIndex = 1;

// Create dialog box
Dialog.create("Batch Counting");
Dialog.addDirectory("Input Directory:", inputDir);
Dialog.addDirectory("Output Directory:", outputDir);
Dialog.addNumber("Nuclear Channel:", nucleiIndex);
Dialog.addNumber("Gaussian Filter Radius:", gaussRad);
Dialog.addChoice("Threshold Method:", allThreshMethods);
Dialog.show();

// Update variables with user input
inputDir = Dialog.getString();
outputDir = Dialog.getString();
nucleiIndex = Dialog.getNumber();
gaussRad = Dialog.getNumber();
thresholdMethod = Dialog.getChoice();
For a full list of controls that can be added to a Dialog, see the relevant macro language documentation.
Running the macro will now produce a dialog that looks like this:
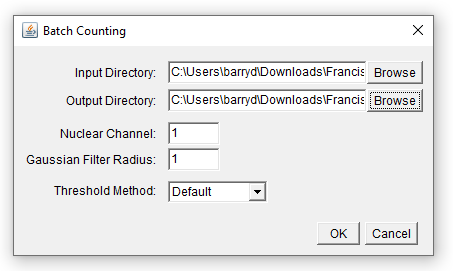
In order for the variables captured from the dialog to have any effect, we must modify the remainder of the code, placing the variables where they are needed.
Note the following:
- The
selectImagecommand now takesnucleiIndexas an argument - The
run("Gaussian Blur...")command now takes itssigmaparameter fromgaussRad setAutoThresholduses whatever method is specified bythresholdMethod
// Obtain file list
images = getFileList(inputDir);

// Suppress image windows (not displayed to screen)
setBatchMode(true);

// Initialise progress update
print("\\Clear");
print("Found " + images.length + " files in " + inputDir);
print("0% of images processed.");

// Loop through images
for (i = 0; i < lengthOf(images); i++) {

	// Update progress
	print("\\Update:" + (100.0 * i / images.length) + "% of images processed.");

	// Open image with Bio-Formats (split channels)
	run("Bio-Formats Importer", "open=[" + inputDir + File.separator() + images[i] + "] autoscale color_mode=Default rois_import=[ROI manager] split_channels view=Hyperstack stack_order=XYCZT");

	// Select the channel containing nuclei
	selectImage(nucleiIndex);

	// Perform Gaussian blurring with specified sigma
	run("Gaussian Blur...", "sigma=" + gaussRad);

	// Threhold using the specified algorithm
	setAutoThreshold(thresholdMethod + " dark");
	setOption("BlackBackground", false);
	run("Convert to Mask");

	// Run Watershed to separate adjacent objects
	run("Watershed");

	// Measure morphological features
	run("Analyze Particles...", "exclude summarize");

	// Save segmentation mask
	saveAs("PNG", outputDir + "segmentation_output_" + images[i] + ".png");

	// Close all images
	close("*");
}

// Print message when the analysis is finished
print("\\Update:100% of images processed.");

// Turn off batch mode
setBatchMode(false);
The full macro, including the dialog box, now looks like this:
// Initialise variables
var inputDir;
var outputDir;
var gaussRad = 1.0;
var thresholdMethod = "Default";
var allThreshMethods = getList("threshold.methods");
var nucleiIndex = 1;

// Create dialog box
Dialog.create("Batch Counting");
Dialog.addDirectory("Input Directory:", inputDir);
Dialog.addDirectory("Output Directory:", outputDir);
Dialog.addNumber("Nuclear Channel:", nucleiIndex);
Dialog.addNumber("Gaussian Filter Radius:", gaussRad);
Dialog.addChoice("Threshold Method:", allThreshMethods);
Dialog.show();

// Update variables with user input
inputDir = Dialog.getString();
outputDir = Dialog.getString();
nucleiIndex = Dialog.getNumber();
gaussRad = Dialog.getNumber();
thresholdMethod = Dialog.getChoice();

// Obtain file list
images = getFileList(inputDir);

// Suppress image windows (not displayed to screen)
setBatchMode(true);

// Initialise progress update
print("\\Clear");
print("Found " + images.length + " files in " + inputDir);
print("0% of images processed.");

// Loop through images
for (i = 0; i < lengthOf(images); i++) {

	// Update progress
	print("\\Update:" + (100.0 * i / images.length) + "% of images processed.");

	// Open image with Bio-Formats (split channels)
	run("Bio-Formats Importer", "open=[" + inputDir + File.separator() + images[i] + "] autoscale color_mode=Default rois_import=[ROI manager] split_channels view=Hyperstack stack_order=XYCZT");

	// Select the channel containing nuclei
	selectImage(nucleiIndex);

	// Perform Gaussian blurring with specified sigma
	run("Gaussian Blur...", "sigma=" + gaussRad);

	// Threhold using the specified algorithm
	setAutoThreshold(thresholdMethod + " dark");
	setOption("BlackBackground", false);
	run("Convert to Mask");

	// Run Watershed to separate adjacent objects
	run("Watershed");

	// Measure morphological features
	run("Analyze Particles...", "exclude summarize");

	// Save segmentation mask
	saveAs("PNG", outputDir + "segmentation_output_" + images[i] + ".png");

	// Close all images
	close("*");
}

// Print message when the analysis is finished
print("\\Update:100% of images processed.");

// Turn off batch mode
setBatchMode(false);
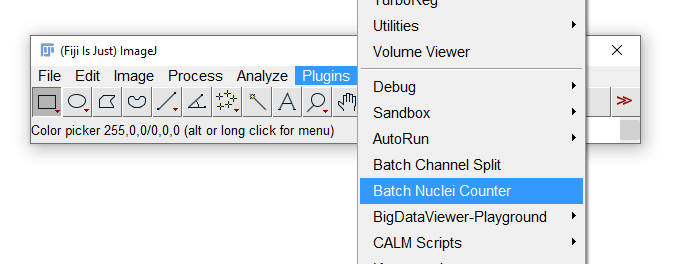
Installing the Macro
It is possible to “install” macros in ImageJ, such that they appear on the Plugins menu. While this is not necessary to run a macro, which can always be opened and executed as is, this can be a good idea if you need to run the script regularly. In order to do so, we first need to wrap our macro in macro blocks. With the macro blocks added, our complete macro now looks as follows:
macro "Batch Nuclei Counter" {

	// Initialise variables
	var inputDir;
	var outputDir;
	var gaussRad = 1.0;
	var thresholdMethod = "Default";
	var allThreshMethods = getList("threshold.methods");
	var nucleiIndex = 1;

	// Create dialog box
	Dialog.create("Batch Counting");
	Dialog.addDirectory("Input Directory:", inputDir);
	Dialog.addDirectory("Output Directory:", outputDir);
	Dialog.addNumber("Nuclear Channel:", nucleiIndex);
	Dialog.addNumber("Gaussian Filter Radius:", gaussRad);
	Dialog.addChoice("Threshold Method:", allThreshMethods);
	Dialog.show();

	// Update variables with user input
	inputDir = Dialog.getString();
	outputDir = Dialog.getString();
	nucleiIndex = Dialog.getNumber();
	gaussRad = Dialog.getNumber();
	thresholdMethod = Dialog.getChoice();

	// Obtain file list
	images = getFileList(inputDir);

	// Suppress image windows (not displayed to screen)
	setBatchMode(true);

	// Initialise progress update
	print("\\Clear");
	print("Found " + images.length + " files in " + inputDir);
	print("0% of images processed.");

	// Loop through images
	for (i = 0; i < lengthOf(images); i++) {

		// Update progress
		print("\\Update:" + (100.0 * i / images.length) + "% of images processed.");

		// Open image with Bio-Formats (split channels)
		run("Bio-Formats Importer", "open=[" + inputDir + File.separator() + images[i] + "] autoscale color_mode=Default rois_import=[ROI manager] split_channels view=Hyperstack stack_order=XYCZT");

		// Select the channel containing nuclei
		selectImage(nucleiIndex);

		// Perform Gaussian blurring with specified sigma
		run("Gaussian Blur...", "sigma=" + gaussRad);

		// Threhold using the specified algorithm
		setAutoThreshold(thresholdMethod + " dark");
		setOption("BlackBackground", false);
		run("Convert to Mask");

		// Run Watershed to separate adjacent objects
		run("Watershed");

		// Measure morphological features
		run("Analyze Particles...", "exclude summarize");

		// Save segmentation mask
		saveAs("PNG", outputDir + "segmentation_output_" + images[i] + ".png");

		// Close all images
		close("*");
	}

	// Print message when the analysis is finished
	print("\\Update:100% of images processed.");

	// Turn off batch mode
	setBatchMode(false);
}
Find the scripts folder within your ImageJ/Fiji installation and save your macro within the Plugins subdirectory. You should now see your macro appear at the bottom of the Plugins menu when you restart the application:
See also
- Batch Processing
- Scripting documentation and tutorials.
- How to apply a common operation to a complete directory