The previous TrackMate tutorial is dedicated to manually correcting the results of an automated process. This small tutorial here shows how to do a fully manual annotation with TrackMate.
This page contains a summary of the keyboard shortcuts we use here.
Setting up
![]()
There is not much to do. We will use the same, simple dataset that for the tutorial Getting started with TrackMate. You can find it in File › Open Samples › Tracks for TrackMate (807K).
As for the TrackMate plugin, you could start it up normally, selecting Plugins › Tracking › TrackMate in the menu, and then when offered to select a detector and a tracker, always pick the manual one. That would work well, but we offered another entry point that has a simpler GUI dedicated to manual tracking. Pick the Plugins › Tracking › Manual tracking with TrackMate menu item.
You should should get the layout pictured on the right. Notice that we are already displaying the Display options panel of the classic GUI, and that the previous button is disabled at the bottom. Notice also that the color scales for both spot and track features display a dummy range.
Creating spots one by one
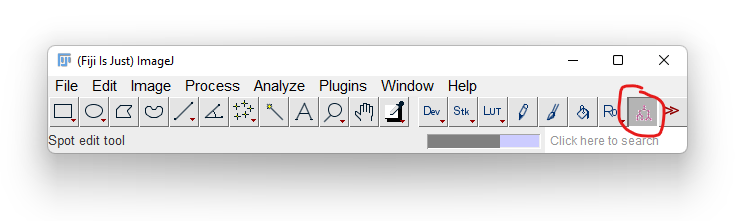
The default view (the one that re-uses the HyperStack viewer of ImageJ) can readily edit the tracks. You just have to make sure that the TrackMate tool is selected in the ImageJ toolbar:
With this tool selected, you can now make the image window active and use the mouse of the keyboard to create spots.
- To create (or add) a spot, press A with the mouse at the desired location. By default, the new spot will have the radius of the last spot you edited.
- To move a spot around, press ␣ Space with the mouse over the target spot. Then move the mouse around. No need for mouse clicks.
- To delete a spot, press the D key with the mouse over the target spot.
- To change a spot radius, press Q and E over the target spot. ⇧ Shift + Q and ⇧ Shift + E change the radius by a larger amount.
And that’s it for spot creation.
Create and removing single links

All we have done so far was to create single spots, that are not part of any tracks. Tracks are created on the fly when you link several spots together. You can do it in TrackScheme, as explained elsewhere. Here is how to do it directly on the image. To go on, create a few spots above the bright blob of the source image. We need at least a couple of them in consecutive frames.
We need to add spots to the selection. The selection in TrackMate is a very useful tool for inspection, particularly because it is shared amongst all the possible views of a session, including e.g. TrackScheme. When you click in a spot, the selection is made of this spot, and all views are centered on the target spot.
To create a link, we need exactly two spots to be in the selection. To add or remove a spot from the selection, use ⇧ Shift +  Left Click. Selected spots are highlighted with a green, thick circle. To empty the selection, click on an empty (no spot) part of the image.
Once you have two spots in the selection, you can create a link between them by simply pressing the L key. It should be immediately displayed, as on the example on the right.
As you can see, there is nothing that prevents you from creating a link over many frames, between any two spots. A spot can have several link arriving or departing from it. The only impossible things is to create a link between two spots that belong to the same frame.
Removing a link is done the same way: Select exactly two spots that are connected by a link, and press the L key. The link will be removed.
The auto-linking mode
![]()
Creating long tracks this way would be tedious, as you would always have to select a spot before creating a link. There is way to simplify this.
Press ⇧ Shift + L to toggle the auto-linking mode on/off. When the mode is on, new spots will be automatically created to the spot in the selection (if there is only one). Then the selection is set to be the newly created spot, which allows you to quickly trace tracks by moving through frames and pressing the A key over the desired location.
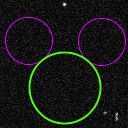
Let’s apply this to our data. First create a spot over the bright blob at the top of the first frame, and roughly adjust its radius. Make sure the selection contains this spot, and only it (it must be highlighted in green), and press ⇧ Shift + L to toggle the auto-linking mode on. Then move the second frame and place the mouse over the new spot location. Press A; a spot is created AND it is linked to the first spot by a track normally painted in red. Repeat until you reach about the frame 15 (the track branches, at some point, you have to decide what way you want to go). You should get - rather quickly - something like the picture on the right.
![]()
Tracks created this way do not have to be linear. You can create branching segments simply by remembering that in the auto-linking mode, links are created between the last selected spot.
Therefore, to create the branch that goes on the right, go back on the frame 9 (the frame just before the branching happens) and click into the spot that’s there to select it. Then move to the next frame and create the spots that belong to the right branch, just like you did before. These spots will be added to the same track, and should get a inverted Y-branch like pictured on the right.
Tracks are updated live
![]()
Note that you do not have to worry about what track a spot belongs to when creating a link. Tracks are automatically managed on the fly. If you now create a second link between a pair of spots that are not connected with anything, a new track will be created automatically, and the color of the first ones will change.
The same is valid when you delete a link or a spot. For instance, let’s create 3 tracks out of our inverted Y. Go to the frame 9, and delete the spot that is at the crossing. You now have 3 tracks.
Track and spot features are updated live
TrackMate uses computes and uses some numerical features for its spots, edges and tracks. You can use these features to color the TrackMate objects.
For instance this is what happened in the previous section, when you deleted a spot and created 3 tracks out of one. On the GUI panel, the tracks were configured to have their color set by the track index. When you removed the spot, the track index was recalculated and used to give the track a color that ranges from blue to red.
The track and spot colors are refreshed immediately in the HyperStack displayer. Note, though, that the color range in the GUI has not been updated. It still displays -Infinity - Infinity. This is by construction, to alleviate a bit the load when editing large models. If you want to refresh the color range, you have to click directly on it, and it will be properly repainted. On the right you can see what I get if I pick the feature Y for spot coloring, and the track index, after refreshing.
The semi-automatic tracking tool
Since v2.1.0, TrackMate includes a tool that can automatically find spots and automatically link them to build a track. This is extremely handy to annotate images for which the automated detection in bulk yields too much spurious spots. I wish I had come with the idea before I started doing C.elegans lineaging.
This tool is configured in the TrackMate tool option panel. It is not part of the classic GUI; to make it appear, double-click on the TrackMate tool in the ImageJ toolbar. You should see something like this:
![]()
We are interested in the Semi-automatic tracking panel. The bottom panel has just convenience buttons that allow you to select tracks or parts of tracks from the current selection (great to delete faulty tracks at once), and the right panel is a log. The semi-automatic tracking tool itself works as follow: It takes the single spot in the selection, and use its radius to build a neighborhood of this spot, but in the next frame. It then searches this neighborhood for a bright blob with a similar radius. If the found spot is close enough and have a quality high enough, it is linked to the first spot. The process is then repeated, until no suitable spot can be found or until there is no time-point to inspect anymore.
The Quality threshold and the Distance tolerance settings allow to tune the tool. A quality threshold of 0.5 means that the spot found must have a quality of at least 50% of the first spot to be accepted. A distance tolerance of 2 means that it must not be further away than twice the radius of the first spot to be accepted.
Let’s put this in practice. Go to the frame 16 (or wherever you stopped annotating in the previous section), and select the last spot of the right track. You can start the semi-automatic tracking by either clicking on the purple button on the tool panel, or by pressing the ⇧ Shift + A key. The tracking process is updated live.
How far can it go really depends on the radius you set for the first spot, so results may vary. Here is how it looks on a movie:
Great, no?
Wrapping up
These are the tools that should allow you to work very quickly. For fun: redo this tutorial with a TrackScheme window open. You should see that it works very well with manual annotation.
Jean-Yves Tinevez, January 2022