The content of this page has not been vetted since shifting away from MediaWiki. If you’d like to help, check out the how to help guide!
|
|
|
| File |
SPIM_Registration.jar |
| Category |
SPIM Registration |
Citation
Please note that the multi-view fusion plugin available through Fiji, is based on a publication. If you use it successfully for your research please be so kind to cite our work:
- S. Preibisch, S. Saalfeld, J. Schindelin and P. Tomancak (2010) “Software for bead-based registration of selective plane illumination microscopy data”, Nature Methods, 7(6):418-419. Webpage PDF Supplement
Overview of the multi-view fusion plugin
The multi-view fusion plugin is able to combine several 3d acquisitions of the same specimen taken from different viewpoints (this includes different tiles) into one single output image. This can be done for single timepoints or an entire timeseries. Prerequisite for the fusion is an aligned dataset, an overview of the complete registration and fusion process can be found here. The registration can be achieved using one the following plugins:
The multi-view fusion plugins offers two registration options:
- Single-channel
- Multi-channel
Note, that in order to fuse a multi-channel acquisition, a single-channel registration can be sufficient as the registration of one channel can be applied to other channels of the same timepoint. Both options work in the same way and have very similar options. The additional options of multi-channel registration are explained in the last section.
Creating a cropped output image
The output images are typically very large, as the plugin by default fuses the complete bounding box around all registered views. Therefore, it is recommended to define a cropping area in the output image that contains only the sample.
If you do not have enough memory to create an uncropped output image, there is an option to first create a down-sampled version of the output image in which you can identify the cropping area. In a second run, you can create the fused image with full resolution only for the cropped area that contains the specimen. Note that when you define the cropping area in a downsampled image, you need to adjust the the values to the original scale. That is, if you downsample 2-fold, you have to multiply all coordinates by 2.
What do I have to consider when I want to fuse a timeseries?
If you want to process a timeseries you should first run the fusion only for the reference timepoint in order to determine the correct cropping parameters. In a second run you can fuse the complete timeseries using these cropping parameters.
How do I view fused, saved output image(s)
The fused images will be saved in the output directory of the dataset as a collection of two-dimensional planes. The created output images can be viewed for example with Plugins › Image5D › Virtual Image 5D Opener or via the File › Import › Bio-Formats… (check the option Group files with similar names).
How to use the plugin
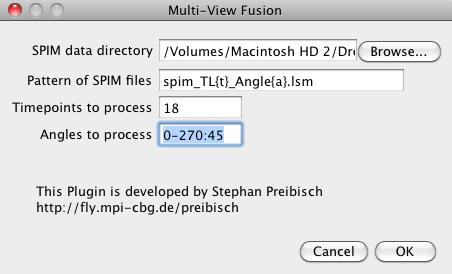 Shows the first dialog that queries the location of the multi-view files
The multi-view fusion consists of two consecutive dialogs. The first dialog queries the information necessary to analyze the dataset. Please note that all the parameters will be looked up in the bead-based registration or segmentation-based registration, so typically just pressing ok is sufficient, except you process a timeseries. These are the options of the first dialog:
- SPIM data directory: Fill in the directory name that contains all the image files (or directories with equally sized 2d image planes). You can either drag&drop the directory, browse for it or type the name directly.
- Pattern of SPIM files: Define the naming convention of the input files by explaining how the angle and the timepoint is encoded into the filename. For example the file names are named in following way
spim_tl1_angle0.lsm, spim_tl1_angle45.lsm … spim_tl1_angle270.lsm
spim_tl2_angle0.lsm, … spim_tl2_angle270.lsm
spim_tl100_angle0.lsm, … spim_tl100_angle270.lsm.
That means the pattern of the file names corresponds to spim_tl{t}_angle{a}.lsm, where {t} is replaced with the current timepoint and {a} with the current angle. If the numbers contain leading zeros (e.g. 000, 045, 090, 135 instead of 0, 45, 90, 135), this can be encoded by simply adding more letters to the placeholder, in this case {aaa}.
- Timepoints to process: Define the timepoint(s) that should be processed. You can give single numbers (e.g. 18), enumerate (e.g. 1, 18, 19, 100), define ranges (e.g. 1-18) or combine all of them in any combination wanted (e.g. 1,2,10,20-50).
- Angles to process: Define the angles (at least 2) that should be processed (for each timepoint if applicable). You can enumerate angles (e.g. 0, 90, 180, 270), define ranges in steps (e.g. 0-270:45 which means use angle 0 to 270 in steps of 45, i.e. 0, 45, 90, 135, 180, 225, 270) or combine all of them in any combination wanted (e.g. 0, 45, 180-270:45).
After entering the data the program will check which kind of registrations are available for each channel. Typically, the individual registration for each channel is available, and maybe also several timeseries registration with various reference timepoints. If no registration files could be found, the plugin will quit.
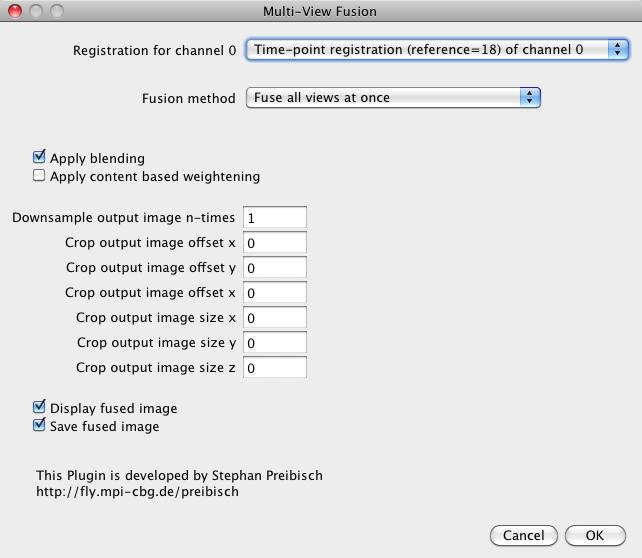 Shows the second dialog that queries the details of the multi-view fusion
In the second dialog, you have to define the details of the multi-view fusion. It offers the following options:
- Registration for channel x: You can choose which registration is used for this channel. You can typically choose between the individual registration of this timepoint or any registration to a reference timepoint. If you perform multichannel fusion, more than one channel might be available.
- Fusion Method: Define how the input data is handled in order to compute the output image(s). There are three options available:
- Fuse all images at once loads all the input images and computes the output image. This is the fastest method, but it also needs significant amounts of RAM.
- Fuse images sequentially loads one input image after the other and computes the contribution sequentially. This is slower but typically uses less RAM. However, this methods needs to allocate the output image twice during the fusion process as it needs to store image content and weights separately.
- Create independent registered images is a special output option where each view is transformed and saved individually, where all output images have the same bounding box. This option can be for example used to asses the registration quality by overlaying them afterwards.
- Apply blending: Check this if you want to apply blending at the edges of the overlapping views; this removes brightness differences at the hyperplanes where the overlapping images intersect.

If neither blending nor content-based weightening is selected, only normal averaging is performed for fusion.
</div> </div>
- Apply content-based weightening: Check this if the content-based weightening should be used; this weights each pixel of each view by its local information content and thereby increases the contrast of the output image.
The content based weightening is rather fast but consumes a lot of RAM.
</div> </div>
Blending and content-based fusion can be combined!
- Downsample image n-times: The factor defines the downsampling of the output image, e.g. 2 means that the output image will be half as big in each dimension and therefore need 8x less RAM than the full resolution output image. This is especially useful if the bounding box around the imaged sample (defined below) is not known yet as has to be determined.
- Crop output image offset x/y/z: Defines the offset of the cropping area (bounding box) in the x/y/z-dimension of the output image relative to the uncropped image. A value of 0 refers to the top-front-left corner of the bounding box surrounding all views.
All the values are relative to the downsampling factor in downsample image n-times.
</div> </div>
- Crop output image size x/y/z: Defines the size of the cropping area (bounding box) in the x/y/z-dimension of the output image relative to the uncropped image. A value of 0 means no cropping.
All the values are relative to the downsampling factor in downsample image n-times.
- Display output image: Display the fused image(s) when finished. Be careful when checking this button and performing a timelapse registration.
- Save output image: Write the fused image(s) to disk when finished. It will save the output image(s) as a collection of two-dimensional planes.
A suggested bounding box for the example dataset is offset: [272, 352, 360] – size: [720, 380, 350]