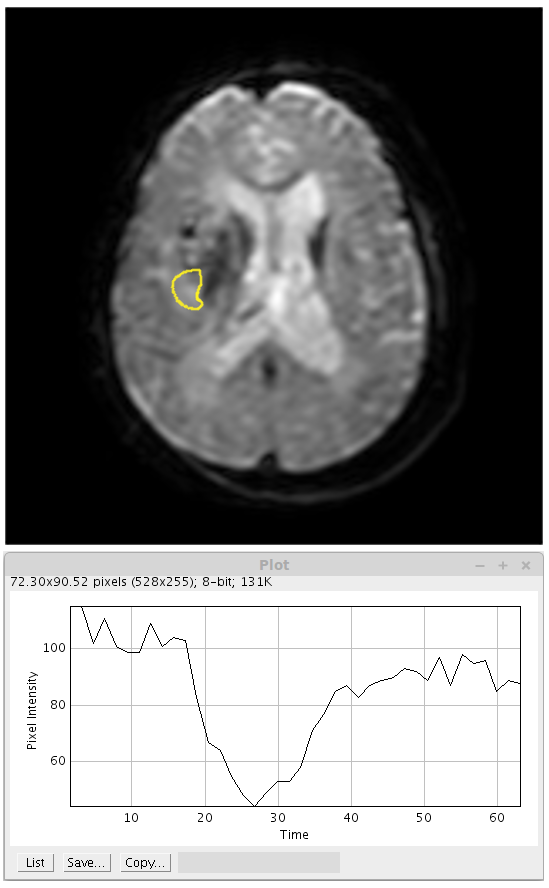
Example of the perfusion curve obtained in the peritumoral region on brain cancer.
Perfusion is defined as the passage of fluid through the lymphatic system or blood vessels to an organ or a tissue. The practice of perfusion scanning, is the process by which this perfusion can be observed, recorded and quantified. The term perfusion scanning encompasses a wide range of medical imaging modalities.
The ultimate goal of perfusion MRI is to measure or assess the blood flow irrigating the explored organ, expressed in milliliters per 100 gram of tissue per minute. This flow corresponds to microcirculatory tissue perfusion rather than the flow of the main vascular axes. There are different techniques of detecting perfusion parameters with the use of MRI, the most common being dynamic susceptibility contrast imaging (DSC-MRI) and arterial spin labelling (ASL). In DSC-MRI, Gadolinium contrast agent is injected and a time series of fast T2*-weighted images is acquired. As Gadolinium passes through the tissues, it produces a reduction of T2* intensity depending on the local concentration. The acquired data are then postprocessed to obtain perfusion maps with different parameters, such as CBV (cerebral blood volume), CBF (cerebral blood flow), MTT (mean transit time) and TTP (time to peak).
Update notes:
- Feb-04-2015: The method is capable to process a image stack with the perfusion gadolinium contrast agent.
Perfusion Metrics
The quantitative values that our plugin can calculate are listed bellow.
This plugin still in experimental development and the CBV and CBF measurements are not set with the correct units (ml/g/min). All data related with these measurements are shown in arbitrary units, given by the pixel gray intensity).
CBV
MTT
CBF
Peak value
Time to peak
How to use
First of all, the perfusion gadolinium contrast agent image sequence has to be transformed into a HyperStack (use the plugin MRI Perfusion/Create HyperStack). It is important here that the image sequence loaded must to have a DICOM header, otherwise the method will fail to transform the image stack into a HyperStack. Also, the perfusion image sequence that we say here is a image sequence with each brain slice are acquired in a period of time, which usually all the brain is acquired.
After the HyperStack transformation step, you can choose what brain region you want to measure the perfusion metrics values1. Use the ROI tool provided by ImageJ to do the brain area selection. Before ROI selection, you can choose the two plugin metrics methods: Maps2 and Metrics.
It will be displayed several tables with the measures calculated in each pixel into the ROI. At the last column of all tables its show the mean values for all pixels into the ROI.
-
The size of the region of interesting influence directly the time consuming of our plugin. Large regions could use several minutes to process all the perfusion metrics ↩
-
It is still an experimental method. The maps generated are create in a separeted window. Further updates will merge these maps into the original perfusion image. ↩