Labkit Automatic Segmentation Guidelines
(In progress)
Labkit allows to quickly segment images using the automatic segmentation. These guidelines are meant to help users improve their automatic segmentation pipeline.
Labeling the image
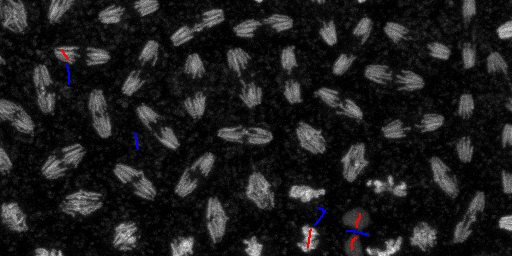
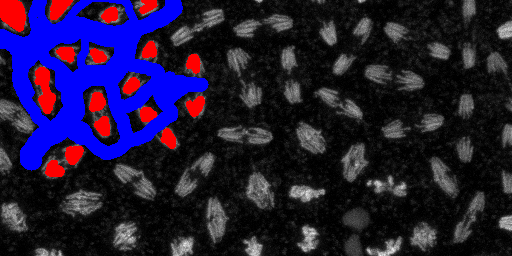
Labkit’s pixel classification algorithm only needs very little training data. Providing a large amount of training data often results in a poorly performing classification. To get a good result use the smallest available brush size, draw thin lines. Pick a few representative objects in the image and for those mark foreground and background pixels (or whatever classes you are using). The following two images show a good and a bad example on how to place the scribbles for a random forest training.
| good | bad |
|---|---|
 |
 |
The lines that you draw should start roughly on edge of an object and go inwards. Similarly, if you mark background pixels start close to an object and draw a line away from the object. Here are again good and bad examples.
| good | bad | bad |
|---|---|---|
 |
 |
 |
Avoid to mark the pixels at the edge of an object as foreground / background. It is likely that you might mark a few pixels wrongly or at least inconsistent. This will confuse the pixel classification algorithm.
Here is a good example of how to label the gap between two objects:
| good |
|---|
 |
If background intensity varies a lot, label a few locations with different background intensities. If your foreground intensity varies a lot, label a few objects with different intensities.
Time series: If the objects you want to segment change their appearance over time. Pick a few representative time frames, and mark some representative objects in each of those frames.
Pixel Classification Settings
![]()
Labkit’s pixel classification algorithm applies a list of filters on the image to gather informations about the individual pixels. The pixel classification settings dialog allows you to select which filters Labkit uses. The default settings should normally work well, but selecting the filters manually might in some cases help to improve the runtime or the quality of the results.
Most of the filters first apply a gaussion blur on the image before they perform their individual operations. Select sigma values that are in the range of your object sizes. For example if you want to segment blob-like structures. Where the blobs diameter is roughly 10, then this value divided by 2 is a good sigma value to use respective sigma = 5. But also add values that are smaller, and bigger sigmas = 1.25; 2.5; 5; 10 would be a good way to go. The pixel classification is slower for high sigma values, so it’s best to avoid sigma values larger than 16.
| Feature name | Runtime / Complexity | Remarks |
|---|---|---|
| original image | very low | Always useful |
| gaussian blur | low | Always useful, they work well on images that are easy to segment. |
| difference of gaussians | low | ^ |
| gaussian gradient magnitude | low | ^ |
| laplacian of gaussian | moderate | Useful for images that are harder to segment, might help to segment close gaps. |
| hessian eigenvalues | moderate | ^ |
| structure tensor eigenvalues | high | Similar to hessian eigenvalues but slow. Use only if it really helps on your images. |
| min, max, mean | low | Use special cases. |
| variance | moderate | Useful to segment objects with a rough texture. |