Please Note: This version of the documentation is outdated. We recommend reading the short guide instead. It contains current information on new features.
General information
What is HPC Workflow Manager
HPC Workflow Manager is a Fiji plugin, it enables users to parallelize Macro scripts, define tasks, report the progress of the tasks, upload data to the remote cluster, monitor computation progress, and examine and download the results via their local Fiji installation.
HPC Workflow Manager is developed at IT4Innovations, Ostrava, Czech Republic.
Why use HPC Workflow Manager
Today, parallel processing solves some of our biggest problems in much the same way that settlers of the Old West solved their biggest problems using parallel oxen. If they were using an ox to move a tree and the ox was not big enough or strong enough, they certainly didn’t try to grow a bigger ox—they used two oxen. If our computer isn’t fast enough or powerful enough, instead of trying to develop a faster, more powerful computer, why not simply use multiple computers?
-Essentials of Computer Organization and Architecture, 5th Edition by Null
The end of major serial execution performance gains due to limitations in Moore’s law means that it is no longer possible to solve problems with big datasets and/or computational requirements just by getting a newer processor and hopping that the existing serial programs will perform better. Instead, more processors in parallel must be used. Personal computers have been moving in this direction for many years by adding multiple cores, accelerating performance through the use of GPUs, bringing memory closer to the CPU, etc. Still, there are massive datasets that require even more performance. Such performance can only be found today in supercomputers.
Life scientists are one category of users that can truly benefit from such a stratospheric amount of performance.
Access to supercomputers can often be difficult to get. HPC Workflow Manager aims to reduce the difficulty of obtaining access for the individual user and provide an integrated to Fiji via plugin way which is easy to use through its graphical user interface method for users to add parallelization support to existing Macro scripts.
Workflow types
The HPC Workflow Manager Client supports two workflow types:
- SPIM; and
- Macro.
This guide will only explain how to use the newly added Macro workflow type.
If you are interested in the SPIM workflow type visit this page.
How to use
How to start the plugin
From the Fiji menu bar select Plugins › Multiview Reconstruction › HPC Workflow Manager and fill in the Login dialog that will appear. For example, see the filled-in dialog in Figure 1.
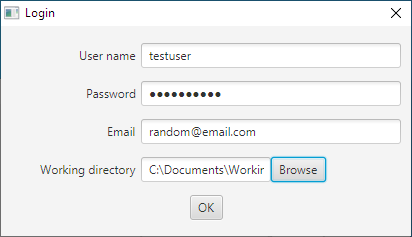
Figure 1: Example of a filled in login dialog.
How to login
You need to enter the username, password, and email for your account. If it is the first time you use this installation of the plugin you must create a new directory anywhere to use as a working directory. If you have used HPC Workflow Manager in the past you can use an already existing working directory. Select the working directory by clicking on the browse button or typing the path. The directory must already exist.
Press “Ok” and the dialog should disappear, and a progress dialog should appear. If not, then a new message should inform you of the error made during filling in the dialog. Correct the error and try again.
How to create a new job
After the connection to the HPC Cluster is made and the jobs are downloaded from the cluster you should see a window like the one in Figure 2. If it is the first time you run this plugin the table will be empty.
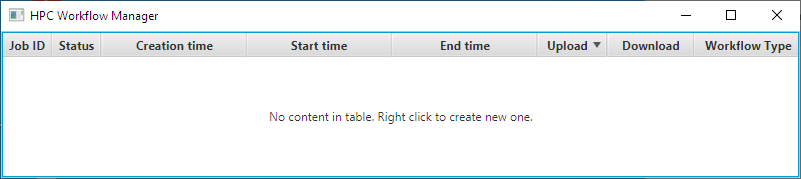
Figure 2: Example of the main window of the HPC Workflow Manager, it displays all jobs ever submitted by the user, in this case, it is empty as it is the first time the plugin is used.
Right-click in the empty table or an empty row of the table to display the context menu, an example of the context menu is featured in Figure 3.
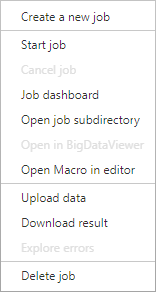
Figure 3: Context menu press right click on an empty row or empty table to display.
Select the first option “Create a new job”. The “Create job” window will appear. From the “Workflow Type” section, select the “Macro Execution” option.
In the input data location, you must provide a directory that contains your Macro script (the script must be named “user.ijm”). If this is the first time you are using the HPC Workflow plugin with Macro support, you can use the example found here.
In the node configuration, select four nodes (4) by pressing the up arrow in the spinner four times.
In the “Output data location” section leave the default option, “Job subdirectory”, selected.
Now, the filled-in form should look like Figure 4. If you are using Linux save the “HelloWorld” example script in your home directory (“~/HelloWorld/user.ijm”) and use that path instead of “C:/Documents/HelloWorld”. When you are sure that the form is filled-in correctly press the “Create” button.
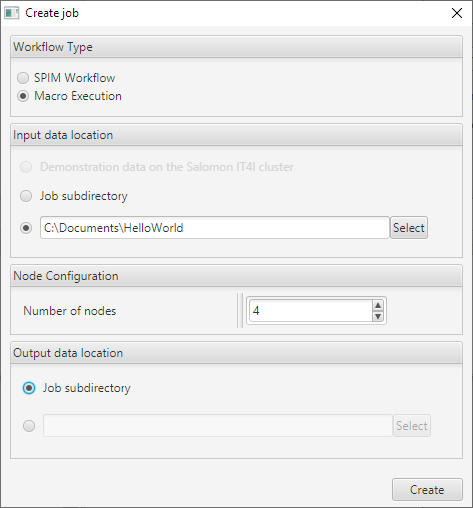
Figure 4: Example of a new Macro job configuration.
How to upload the data and the Macro script
If you have created a new job, the main window should look roughly like Figure 5.

Figure 5: A new Macro job has been created.
Before you can start the job, you need to upload your script (“user.ijm”). To do this you must select the “Upload data” item from the context menu. If your script also needs data, they should also be located in the same directory that the user’s script is in. The data will be uploaded along with the Macro script file.
A timer will appear in the download column. When it has completed uploading the data and user’s script the cell that corresponds to the job should indicate that it is “Done” (Figure 6).
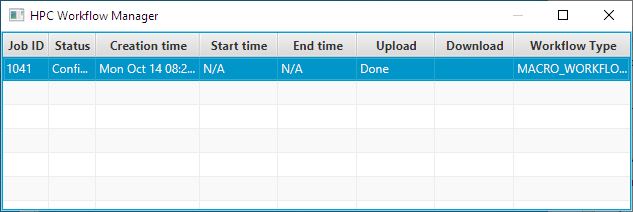
Figure 6: Uploading files (in this case just the user’s script) is done.
Now that the script file is uploaded the job can be started.
How to start a job
Let’s inspect figure 6 closer. In the figure you can see the following columns:
- “Job ID” - Job’s identification number;
- “Status” – The job’s current status which can be:
- “Unknown” – the state of the job is not known;
- “Configuring” – the job is being configured;
- “Queued” – the job is in a queue and when there are available nodes it will be executed;
- “Running” – the job was executed and it is currently running;
- “Finished” – the job has stopped running successfully, completing its tasks;
- “Failed” – the job has stopped running unsuccessfully, it did not complete its tasks;
- “Canceled” – the job was stopped by the user; and
- Disposed – the job was disposed.
- “Creation time” – the time when the job was created.
- “Start time” – the time when the job was last started.
- “End time” – the time when the job last ended.
- “Upload” – whether the job was uploaded.
- “Download” – whether the job was downloaded.
- “Workflow Type”- whether it is SPIM or Macro workflow type.
Right-click on the new job to display the context menu (of Figure 3). You will notice that there are new enabled items.
Right-click the row of the job and select “Start Job” from the context menu.
To make the source code of the user cleaner and easier to understand the special functions that make parallelism available to the user are appended to the user script on upload and a new file is created called “parallelMacroWrappedScript.ijm” which is the file that will be executed on the cluster.
To inspect the submitted file (for example for debugging) you can right-click the job and select “Open Macro in editor” where you can see the contents of the user script along with the appended function definitions that provide parallelism.
Finally, to start the job, right-click on the job and select the “Start job” item from the context menu.
Inspecting progress
There are two ways to inspect the progress of a job.
The first one is by looking at the “Status” of a job. This way you can see whether a job is running on the HPC Cluster or not. In the case of Figure 7, the job is “Queued”.

Figure 7: Job is queued.
However, this is a very coarse-grained way to see the progress of the job and when it starts running it does not provide any useful information until it has ended (“Finished”, “Failed” etc.).
The second way is to open the “Job dashboard” for the desired job by either double-clicking the job’s row or right-click and select the “Job dashboard” context menu item. Note that the job must be in the state “Running” for this functionality to work, you may open the window earlier and it will start displaying the progress when the state changes automatically.
Select the tab “Macro Progress” and ignore the rest of the tabs for now (see section Job dashboard for descriptions of the rest of the tabs).
To view the progress, click on the “Macro Progress” if it is not already selected (it should be selected by default). Please be patient while the progress is loading. There is a status bar on the lower right corner of the window where you can monitor the process of getting the progress from the HPC Cluster (the progress is stored in a separate progress file for each compute-node of the HPC Cluster it is run on).
You can see a snapshot of the progress of the tasks of the running job of the example in figure 8.
Each line represents a different task, each column represents a different compute-node where the task is executed on, with the exception of the first column that provides task descriptions. Cells that do not have a progress indicator represent nodes that either will not execute the task at all or they have not started executing the task yet. In the second case, a progress indicator will appear when the progress is updated to zero percent (0%) or more.
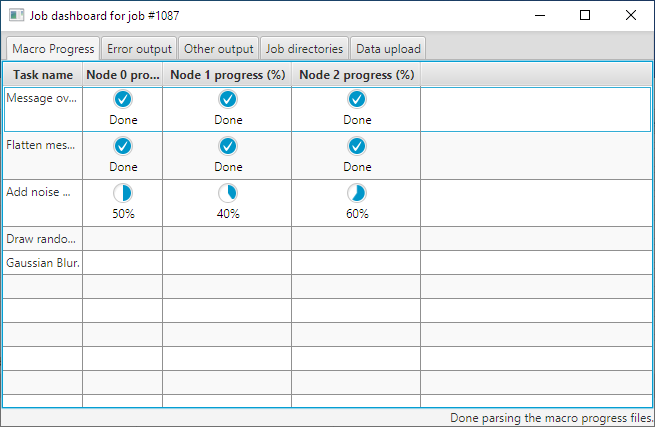
Figure 8: The job is running and the progress indicators display the progress for each task on each compute-node.
Job dashboard
In the “Job dashboard” there are the following five tabs:
- “Macro Progress” – this tab is described in the previous section Inspecting progress (click here );
- “Error output” - the error output and warnings that are redirected live from the HPC Cluster (click here );
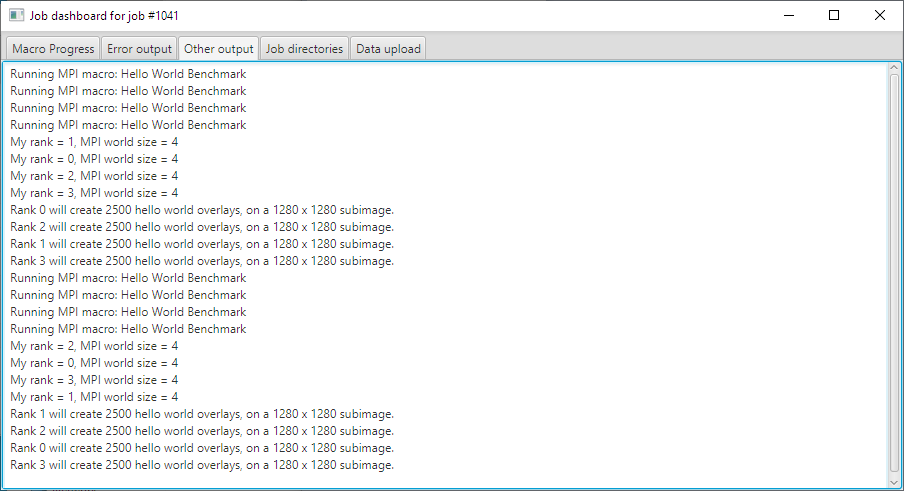
- “Other output”- the live redirected standard output from the cluster in the tab (click here );
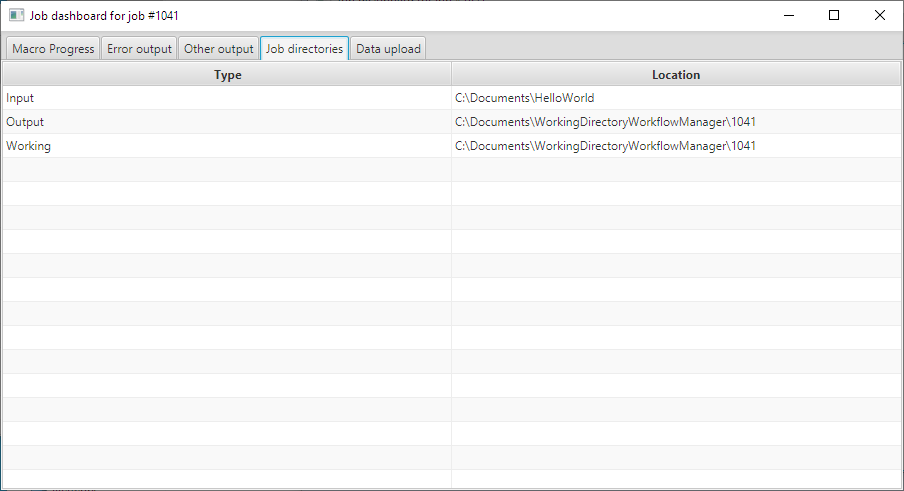
- “Job directories” – contains a listing of the job directories (Input, Output and Working) (click here ); and
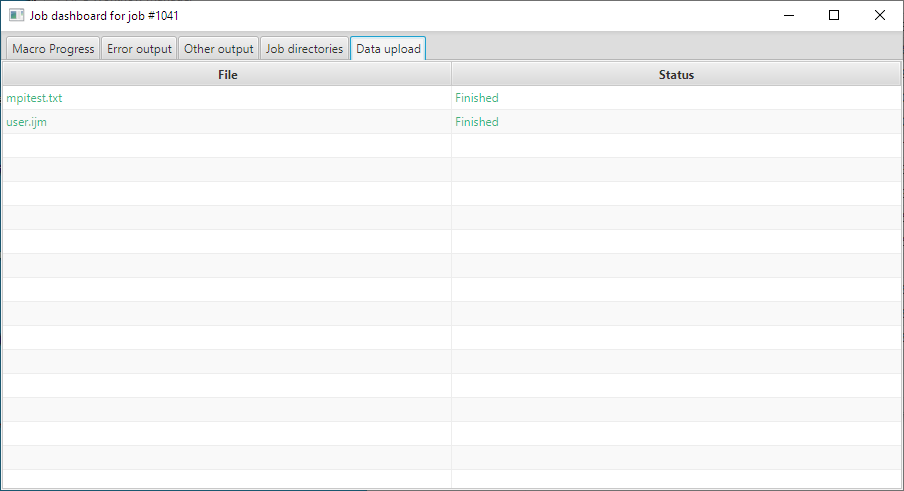
- “Data upload” – contains a listing of the files that were uploaded (click here );
How to download the results
Once the job has finished you can right-click and select the item “Download result” which will now have become available.
When the timer in the “Download” column has finished and the state is “Done” the files will have been transferred. You can see the downloaded files by right-clicking the job and selecting the item “Open job sub-directory”.
How to write a parallel Macro
Prerequisites
If you are new to Macro programming it is suggested to read Introduction into Macro Programming first. This will provide you with a sufficient introduction to the basics of Macro programming in Fiji.
If you opt to use the script editor you may also find Using the Script Editor useful. Using the script editor is suggested as it supports autocompletion for the functions added by HPC Workflow Manager.
You should also be familiar with the graphical user interface of the HPC Workflow Client.
How to use parallelization function (by example)
Writing a small parallel script will make you familiar with the parallelization functionality offered to help you start using parallelism on Macro scripts.
Simple greeting example
Let’s write a simple “greeting” Macro script where each node will greet the rest with a print message and wait for the rest to greet it as well. Then it will announce its departure and end. No node should finish before all of them have introduced themselves. Let’s start:
First, we can write a serial version:
    print("The greeting program.");
    print("Hello I am a single node.");
    print("Bye, from the only node.");
Now let’s parallelize this by adding a call to parInit() at the beginning in order to start the parallel execution of the program. We must also add a call to parFinalize() at the end of our program to stop the parallelization. The code should now look like this:
parInit();
  print("The greeting program.");
  print("Hello I am a single node.");
  print("Bye, from the only node.");
parFinalize();
Very well, our program is now parallelized. However, the messages no longer make sense.
We should get the id of the node and print it instead as well as the total number of the nodes (just for fun).
To get the id of the node (that is its rank) we must call parGetRank().
parInit();
  myRank = parGetRank();
  if (myRank == 0){
    print("The greeting program.");
  }
  print("Hello I am node number: "+myRank);
  print("Bye, from node number: "+myRank);
parFinalize();
Notice that we also nested the first print() in an if statement comparing the rank with the first one (0), this is done in order to print this message only once.
You may choose any rank of the available nodes, it is not necessary to use the first one although it is the convention. You may run the script with a different amount of nodes in the future and the only rank that is guaranteed to exist is zero (0), this is because there will always be at least one node executing the script and it will have rank zero (0) assigned to it. Thus, the code surrounded in the if statement with rank zero will always be executed and executed by only one node.
To greet all of the nodes let’s add the total number of nodes used to run the script (size) as well by calling get size parGetSize(). Add the following line after getting the rank to get the size:
size = parGetSize();
And modify the first print to read:
print("Hello to all "+size+" nodes. I am node number: "+myRank);
Very well, our program is now parallelized. Unfortunately, it is incorrect.
If you run it enough times you will notice that sometimes a node will “depart” before all of them give their greetings. This is because some nodes may execute their code faster or slower, there is no guaranty that each line will execute at the same time, or which one will execute first between nodes.
For example, if there are two (2) nodes the redirected output in the “Other output” tab could look like this:
The greeting program.
Hello I am node number: 1
Bye, form node number: 1
Hello I am node number: 0
Bye, from node number: 0
To correct this we will put a barrier to the flow of the execution of the code.
Any node that calls this function will stop until every node has also called this function.
Do this by adding calling parBarrier() bellow the greeting and above the announcement of the departure of the node.
  print("Hello I am node number: "+myRank);
  parBarrier();
  print("Bye, from node number: "+myRank);
The script will run correctly now, for example for three (3) nodes the following output may be printed:
Hello I am node number: 1
Hello I am node number: 3
Hello I am node number: 0
Bye, form node number: 3
Bye, from node number: 0
Bye, from node number: 1
Which is correct. Now let us imagine that node number one (1) and only node number one (1) brought with it a cake. And wants to share that information by printing it. You can have code executed in only specific nodes by using an if statement and comparing the rank like so:
 if(myRank == 1){
   print("I brought the cake.");
 }
Add the above snippet anywhere in the parallel region (that is between parInit() and parFinalize()) and before calling parBarrier().
Great, now since node one brought the cake it would like to share it with the rest of the nodes. Let’s imagine that the cake is an array made out of numbers. Like the following one:
cake = newArray(1, 2, 3, 4);
There are four pieces of cake. Add the above line inside the if statement’s body. Above the if statement add the following:
cake = newArray(0);
Which means that the rest of the nodes do not have a cake. You will understand why this is necessary later.
Node number one wants to divide them equally. This is why parScatterEqually() must be used.
parScatterEqually() will at the same time send and receive the cake piece or pieces (array items). It needs three arguments, the array to split as well as send (scatter), the length of the sent array, and which node is to spit the array and send it. Thus, in this case, you must add the bellow line after the if statement’s body:
receivedPieces = parScatterEqually(cake, 4, 1); // Do NOT use lengthOf(cake);
Remember the rest of the nodes do not have a cake and cannot know its size! All nodes including one (1) will receive parts of the cake. Since there are more than three pieces of cake the first node (rank == 0) will get the extra piece. (parScatterEqually() will always give any extra array elements to the first node, to avoid this one must use parScatter() and specify exactly how many elements is each node to receive).
Now you may print the piece or pieces that the node received. This is the last step of the example in this section. Overall, the code should now look like this:
parInit();
  myRank = parGetRank();
  if(myRank == 0){
    print("The greeting program.");
  }
  size = parGetSize();
  print("Hello to all "+size+" nodes. I am node number: "+myRank);
  cake = newArray(0);
  if(myRank == 1){
    print("I brought the cake.");
    cake = newArray(1, 2, 3, 4);
  }
  receivedPieces = parScatterEqually(cake, 4, 1);
  parBarrier();
  for(i = 0; i < lengthOf(receivedPieces); i++){
    print("I node number "+myRank+" received piece: "+receivedPieces[i]);
  }
  print("Bye, from node number: "+myRank);
parFinalize();
Lastly, something important to remember is that nodes do not share memory. Each node is separate, they can only communicate through messages (sending data). Currently only by calling parScatterEqually() or parScatter().
How to use the progress reporting functions (by example)
The first step is to add all tasks by using the parAddTasks() function. Simply call this method after parInit() as many times as the tasks that you want to have including a unique description for each one of them. The description must be unique. The tasks are automatically assigned an auto-incremented id in the order they were added.
You may store the id of the task added in a variable for easier handling later on.
The second step is to call the parReportTasks() function which will output to each node’s progress log a listing of the task id along with the task’s description.
Notice that the task ids may differ between nodes as a task may be added only in one node if so desired by the user.
The third step is to call the parReportProgress() function which will add the current progress to the progress report file.
Note that progress can be only a percentage between 0 and 100 and it cannot move backward.
Other information may be reported by calling the parReportText() function.
Expanding on the greeting example
Expanding on the previous example of the nodes greeting each other and sharing a cake we now add the necessary function calls to report the progress of each task.
The example can be split into four(4) tasks:
- A node introduces itself to all other nodes. (Gets the rank and size and prints them.)
- Node number one (1) gets the cake. (Creates the array with the data.)
- Each node receives some pieces of the cake. (The node receives the elements of the array, node one also sends the pieces to all nodes including itself.)
- Each node announces the pieces that they got. (Print the elements in the received array.)
Take a look at the code featured at the end of this section which will be explained in detail here.
Notice that task number three (3) is nested in an if statement. This is because we want only one node to create the cake (data).
In a real problem, the data could be a giant dataset that is available only on one computer and we want to send parts of it to the other nodes that will perform some computations using their part of the data.
Be careful, since the task is added only on node one (1) the indices of the tasks after it will be different in the rest of the nodes by one.
For example, the following two nodes will have different task numbers for the same tasks in the list presented earlier in this section:
- node zero (0) will have: list(1) -> id(0), list(3) -> id(1), list(4) -> id(2).
- while node (1) will have: list(1) -> id(0), list(2) -> id(1), list(3) -> id(2), list(4) -> id(3).
This can cause great difficulty, this is why it is suggested to always store the task id returned when adding the task in a variable and use it instead.
parInit();
  introductionTask = parAddTask("Introduction to other nodes.");

  myRank = parGetRank();
  size = parGetSize();

  if(myRank == 1){
    print("The greeting program. Now with progress reporting!");
    cakeTask = parAddTask("Get the cake.");
  }
  getPieceTask = parAddTask("Get the cake pieces.");
  annoucementTask = parAddTask("Announce the pieces you got.");
  parReportTasks();

  parReportProgress(introductionTask,0);
  print("Hello to all "+size+" nodes. I am node number: "+myRank);
  parReportProgress(introductionTask, 100);

  cake = newArray(0);
  if(myRank == 1){
    parReportProgress(cakeTask, 0);
    print("I brought the cake.");
    cake = newArray(30);
      for(i = 0; i < lengthOf(cake); i++){
        cake[i] = i;
        parReportProgress(cakeTask, i/30 * 100);
      }
      parReportProgress(cakeTask, 100);
  }

  parReportProgress(getPieceTask, 0);
  receivedPieces = parScatterEqually(cake, 10, 1);
  parReportProgress(getPieceTask, 100);

  parBarrier();

  parReportProgress(annoucementTask, 0);
  for(i = 0; i < lengthOf(receivedPieces); i++){
    print("I node number "+myRank+" received piece: "+receivedPieces[i]);
    parReportProgress(annoucementTask, i/lengthOf(receivedPieces)*100);
  }
  parReportProgress(annoucementTask, 100);

  print("Bye, from node number: "+myRank);
parFinalize();
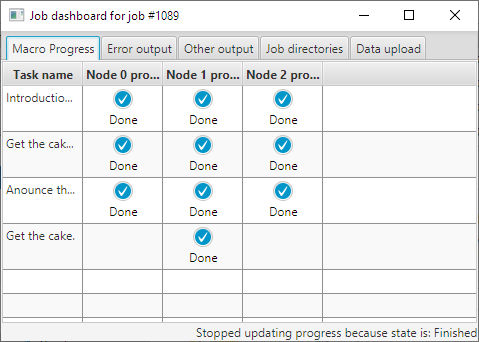
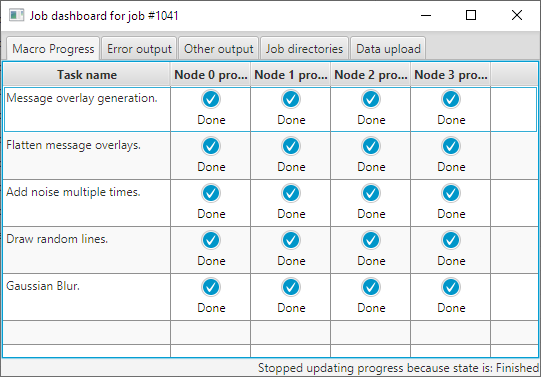
Figure 9: The job has finished and all the progress indicators are present. Note that the task “Get the cake” has a progress indicator only on node one (1) as expected. This is because this task was added in an if statement checking that the rank is one.
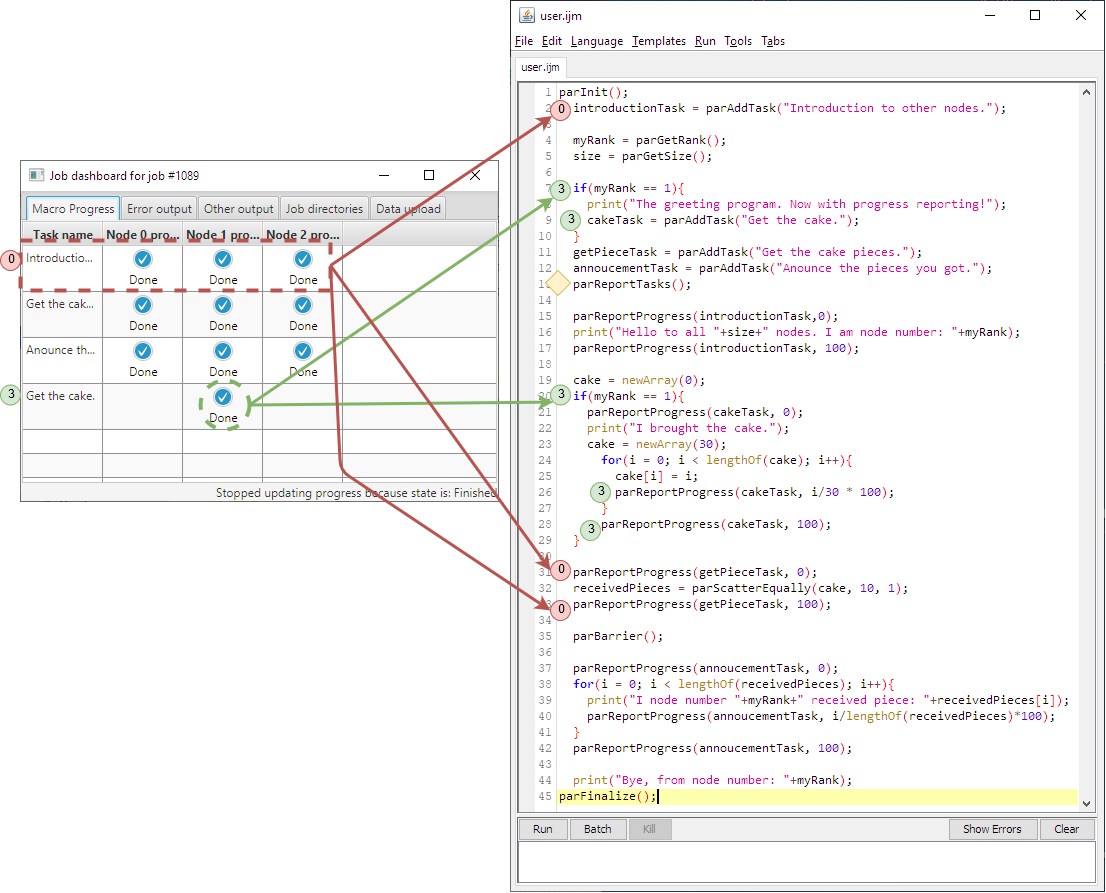
Figure 10: The red circle labeled zero (0) is a task performed by all nodes. It is first added, and then its progress is reported twice: once when it is zero and finally when it is done. The green circle labeled three (3) is first added and then its progress is reported as well, however, notice that all its related commands are inside the body of if statements. Notice that all calls of parAddTask() are before parReportTasks().
Available functions (list)
Many of the functions have an MPI equivalent, this will also be listed in the table to aid people familiar with MPI. This is because the current implementation uses OpenMPI 4.0. Note however that this does not mean that this will be a wrapper for MPI for Fiji Macro and the underlying implementation may and probably will change.
| Function name | Input | Output | Description | MPI equivalent |
|---|---|---|---|---|
| parInit | None | None | Initializes parallelization, it should be called at the beginning of the parallel code. | MPI_Init |
| parFinalize | None | None | Finalizes parallelization, it should be called at the end of the parallel code. | MPI_Finalize |
| parGetRank | None | Id of the current node. | Returns the id of the current node. | MPI_Comm_rank |
| parGetSize | None | Total number of nodes. | Returns the total number of nodes. | MPI_Comm_size |
| parBarrier | None | None | Parallel barrier, all nodes must reach the point of calling this function for any of them to continue further. Provides synchronization. | MPI_Barrier |
| parScatterEqually | An array to split and send, the length of the array to send, the rank of the node that will split and send the array. | An array. | This will try to split an array to equal parts send it from the given rank. It will also receive the part of the array it should and return it (including the rank that sends the parts). In case the number of array elements is not equally divisible it will send any extra elements to the first rank (0). | None |
| parScatter | An array to split and send, number of elements to send, number of elements to receive and the rank of the node to send the elements. | An array. | This works like parScatterEqually but in this case the user is responsible for providing the parameters to split the array. | MPI_Scatter |
| parGather | An array to send, number of items to send, number of items to receive, receiver’s rank | An array. | All ranks send an equal amount of array items to a single node of a given rank. Be careful, the receiveCount parameter should be the count of items received from each rank separately. This is the inverse operation of parScatter. | MPI_Gather |
| parGatherEqually | An array to send, number of elements in received array, receiver’s rank | An array. | The given rank will receive an array send in parts by all ranks. This is the inverse operation of the parScatterEqually. | None |
Table 1: Parallelization functions
| Function name | Input | Output | Description |
|---|---|---|---|
| parReportProgress | Task id (ex 8), progress percentage (ex 85 %) | None | Outputs progress in percentage for a specified task in the node’s progress log. |
| parReportText | Text | None | Outputs given text to the node’s log. |
| parAddTask | Description | Index of added task. | Creates a new task with the description provided. |
| parReportTasks | None | None | Outputs all task ids with their descriptions. |
| parEnableTiming | None | None | Enables timing each task in the progress logs. It measures time passed to reach 100% from 0% progress. |
Table 2: Progress log functions
If you need help remembering the functions and what they do you may use autocompletion to get help. Just type “par” and a list of options will appear. There is a link to this page in the autocomplete help. An example is provided in figure 10.
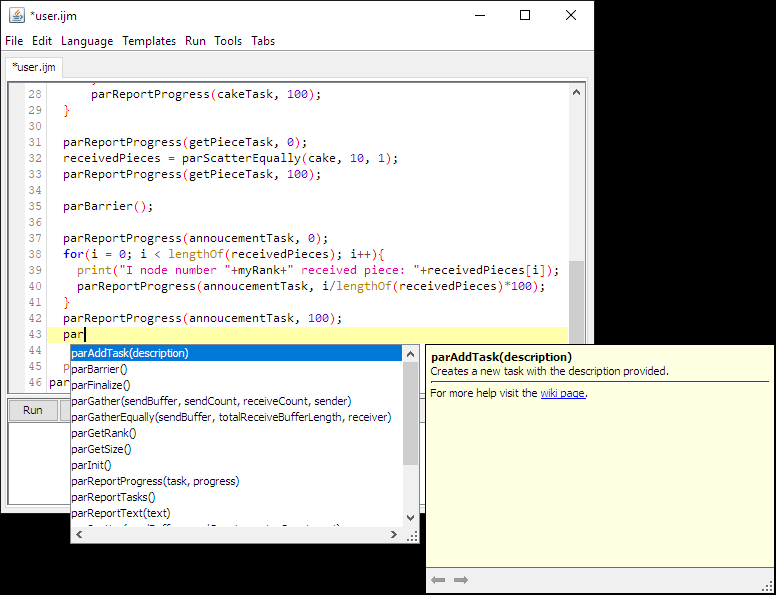
Figure 11: Function autocompletion example.
Installation
HPC Workflow Manager client is available to install through its update site.
Instructions
- Download, install and launch Fiji;
- go to Help › Update… › Manage update sites;
- tick “P2E-IT4Innovations”;
- close the window;
- click “Apply changes”; and
- restart Fiji.