The content of this page has not been vetted since shifting away from MediaWiki. If you’d like to help, check out the how to help guide!
This page is a copy of Jython Scripting. The original wiki page is in a rewrite progress. When rewriting Jython Scripting is finished, this wiki page will be shortened to only contain Jython code examples.
Jython is an implementation of the Python programming language designed to run on the Java platform.
Quickstart
- Press [ to bring up the Script Editor.
- Select an example Jython script from the Templates › [by language] › Python menu.
- Press ⌃ Ctrl + R to run the script!
The Jython interpreter plugin
The interpreter provides a screen and a prompt. Type any jython code on the prompt to interact with ImageJ.
Launch it from Plugins › Scripting › Jython Interpreter. See Scripting Help for all keybindings, and also Scripting comparisons.
Note that ImageJ also ships a unified Script Interpreter plugin, accessible from Plugins › Scripting › Script Interpreter. But it is currently beta quality, and the Python language does not work properly due to bugs. Once this issue is fixed, the unified Script Interpreter will replace the language-specific interpreters such as the Jython Interpreter.
Within the interpreter, all ImageJ, java.lang.* and TrakEM2 classes are automatically imported. So creating new images and manipulating them is very straighforward.
Language basics
- Any text after a # is commented out.
- There are no line terminators (such as ‘;’ in other languages), neither curly braces to define code blocks.
- Indentation defines code blocks.
- Functions are defined with
def, and classes withclass. - Functions are objects, and thus storable in variables.
- Jython (and python in general) accepts a mixture of procedural and object-oriented code.
- Jython currently implements the Python language at its 2.5 version. All documentation for python 2.5 applies to Jython bundled with Fiji (with the remarks listed later).
Importing classes
To reference Java classes from Jython you will need to import them.
Unlike the original ImageJ, ImageJ2 (and therefore Fiji) does not automatically import any classes. Consequently, scripts written for ImageJ will not run in ImageJ2 without adding the proper imports. The rationale is that the auto-import feature is not safe. What if two classes of the same name live in two different packages? Or if a new class is introduced that makes formerly unique names ambiguous? All of a sudden, all of the scripts that reference the original class no longer work. In short: auto-imports are dangerously imprecise.
You can specify imports in Jython as follows:
from java.io import File
Where java.io.File is the class to be imported. See also section Importing other .py scripts (modules) for importing user python modules.
Workflow for creating Jython scripts
To create a script for the GUI, the recommended setup is the following:
- Edit and save a file in your favorite text editor. If you want ImageJ 1.x to insert it into the Menu structure, the file must be saved somewhere under ImageJ plugins folder, have an underscore on the name, and a .py extension.
- Run Plugins › Scripting › Refresh Jython scripts only the very first time after newly creating the file under any folder or subfolder of ImageJ’s plugins folder. A menu item will appear with its name, from which it can be run.
- Keep editing (and saving) the file from your editor. Just select the menu item to execute it over and over. Or use the Plugins › Utilities › Find Commands… window to launch it easily (keybinding ‘l’).
The next time Fiji is run, it will setup all your scripts in the Plugins menu.
If all you need is a script to run in headless mode, simply do:
fiji --headless filepath.py
Some limitations of Jython
Though Jython tries to be as close as possible as Python, there are some differences you may experience during scripting.
- Float "special numbers" such as *NaN* and *Inf* are not handled.
For instance,
a = float('nan')
will create the correct float number in python, but will throw an exception in jython.
Instead, to create a NaN in jython, use:
>>> a = Double.NaN
>>> print a
NaN
To test if a number is NaN:
>>> if Double.isNaN(a):
        print "a is NaN!"
a is NaN!
- Some existing python modules can't be imported in jython.
This is for instance the case of the module numpy, which would have been really convenient for analysing data and results.
But see these java numerical libraries: http://math.nist.gov/javanumerics/#libraries , of which:
:* JaMa (Java Matrix Package)
:* Java3D (particularly its vecmath package provides general matrix and vector classes (GMatrix, GVector).
… are already included in Fiji.
- Your Jython version may be matching a much older Python version than you expect.
The latest Jython stable release (as of May 2015) is 2.7.0. Fiji (as of December 2015) distributes Jython 2.5.3. Any recent Python syntax such as except ExceptionType as e: or with open(filepath, 'r') as f: will fail.
Jython tutorials for ImageJ
Defining variables: obtaining the current image
imp = IJ.getImage()
Which is the same as:
imp = WindowManager.getCurrentImage()
Since calling the above is long and tedious, one can declare a variable that points to the above static methods:
c = WindowManager.getCurrentImage
Above note the lack of parentheses.
To execute the function, just use parentheses on it:
imp = c()
The above gets the value of c, which is the method named getCurrentImage in class WindowManager, and executes it, storing its returned object in imp.
Manipulating pixels
Creating a grayscale ramp image
First create an image and obtain its pixels:
imp = ImagePlus("my new image", FloatProcessor(512, 512))
pix = imp.getProcessor().getPixels()
The length of an array:
n_pixels = len(pix)
Then loop to modify them:
# catch width
w = imp.getWidth()

# create a ramp gradient from left to right
for i in range(len(pix)):
   pix[i] = i % w

# adjust min and max, since we know them
imp.getProcessor().setMinAndMax(0, w-1)
… and show the new image:
imp.show()
Creating a random 8-bit image
First import necessary packages: Random, from standard java util library, and jarray, the Jython module for native java arrays:
from java.util import Random
from jarray import zeros
Then create the array and fill it with random bytes:
width = 512
height = 512

pix = zeros(width * height, 'b')
Random().nextBytes(pix)
(‘z’ = boolean, ‘c’ = char, ‘b’ = byte, ‘h’ = short, ‘i’ = int, ‘l’ = long, ‘f’ = float and ‘d’ = double, as explained in the jarray documentation.)
Now make a new IndexColorModel (that’s what ImageJ’s ij.process.LUT class is) for 8-bit images:
channel = zeros(256, 'b')
for i in range(256):
    channel[i] = (i -128)
cm = LUT(channel, channel, channel)
… and compose a ByteProcessor from the pixels, and assign it to an ImagePlus:
imp = ImagePlus("Random", ByteProcessor(width, height, pix, cm))
imp.show()
Creating a random image, the easy way
All the above can be summarized like the following:
from java.util import Random
imp = IJ.createImage("A Random Image", "8-bit", 512, 512, 1)
Random().nextBytes(imp.getProcessor().getPixels())
imp.show()
Running a watershed plugin on an image
# 1 - Obtain an image
blobs = IJ.openImage("https://imagej.net/ij/images/blobs.gif")
# Make a copy with the same properties as blobs image:
imp = blobs.createImagePlus()
ip = blobs.getProcessor().duplicate()
imp.setProcessor("blobs copy", ip)

# 2 - Apply a threshold: only zeros and ones
# Set the desired threshold range: keep from 0 to 74
ip.setThreshold(147, 147, ImageProcessor.NO_LUT_UPDATE)
# Call the Thresholder to convert the image to a mask
IJ.run(imp, "Convert to Mask", "")

# 3 - Apply watershed
# Create and run new EDM object, which is an Euclidean Distance Map (EDM)
# and run the watershed on the ImageProcessor:
EDM().toWatershed(ip)

# 4 - Show the watersheded image:
imp.show()
The EDM plugin that contains the watershed could have been indirectly applied to the currently active image, which is not recommended:
imp = IJ.getImage()  # the current image
imp.getProcessor().setThreshold(174, 174, ImageProcessor.NO_LUT_UPDATE)
IJ.run(imp, "Convert to Mask", "")
IJ.run(imp, "Watershed", "")
If you had called show() on the image at any early stage, just update the screen with:
imp.updateAndDraw()
… and counting particles, and measuring their areas
Continuing from the imp above, that contains the now watersheded “blobs” sample image:
# Create a table to store the results
table = ResultsTable()
# Create a hidden ROI manager, to store a ROI for each blob or cell
roim = RoiManager(True)
# Create a ParticleAnalyzer, with arguments:
# 1. options (could be SHOW_ROI_MASKS, SHOW_OUTLINES, SHOW_MASKS, SHOW_NONE, ADD_TO_MANAGER, and others; combined with bitwise-or)
# 2. measurement options (see https://imagej.net/ij/developer/api/ij/measure/Measurements.html)
# 3. a ResultsTable to store the measurements
# 4. The minimum size of a particle to consider for measurement
# 5. The maximum size (idem)
# 6. The minimum circularity of a particle
# 7. The maximum circularity
pa = ParticleAnalyzer(ParticleAnalyzer.ADD_TO_MANAGER, Measurements.AREA, table, 0, Double.POSITIVE_INFINITY, 0.0, 1.0)
pa.setHideOutputImage(True)

if pa.analyze(imp):
  print "All ok"
else:
  print "There was a problem in analyzing", blobs

# The measured areas are listed in the first column of the results table, as a float array:
areas = table.getColumn(0)
To print out the area measurement of each:
>>> for area in areas: print area
76.0
185.0
658.0
434.0
...
Now, we want to measure the intensity of each particle. To do so, we’ll retrieve the ROI from the ROIManager, set them one at a time on the original (non-watershed, non-thresholded) image stored in the variable blobs, and measure:
# Create a new list to store the mean intensity values of each blob:
means = []

for roi in RoiManager.getInstance().getRoisAsArray():
  blobs.setRoi(roi)
  stats = blobs.getStatistics(Measurements.MEAN)
  means.append(stats.mean)
Finally read out the measured mean intensity value of each blob, along with its area:
for area, mean in zip(areas, means):
  print area, mean
6.0 191.47368421052633
185.0 179.2864864864865
658.0 205.61702127659575
434.0 217.32718894009216
477.0 212.1425576519916
...
Creating an image from a text file
A data file containing rows with 4 columns:
...
399 23 30 10.12
400 23 30 12.34
...
… where the columns are X, Y, Z and value, for every pixel in the image. We assume we know the width and height of the image. From this sort of data, we create an image, read out all lines and parse the numbers:
width = 512
height = 512
stack = ImageStack(width, height)

file = open("/home/albert/Desktop/data.txt", "r")

try:
  fp = FloatProcessor(width, height)
  pix = fp.getPixels()
  cz = 0
  # Add as the first slice:
  stack.addSlice(str(cz), fp)
  # Iterate over all lines in the text file:
  for line in file.readlines():
    x, y, z, value = line.split(" ")
    x = int(x)
    y = int(y)
    z = int(z)
    value = float(value)
    # Advance one slice if the Z changed:
    if z != cz:
      # Next slice
      fp = FloatProcessor(width, height)
      pix = fp.getPixels()
      stack.addSlice(str(cz), fp)
      cz += 1
    # Assign the value:
    pix[y * width + x] = value
  # Prepare and show a new image:
  imp = ImagePlus("parsed", stack)
  imp.show()
# Ensure closing the file handle even if an error is thrown:
finally:
  file.close()
Obtain/View histogram and measurements from an image
The easiest way is to grab an image and call an ImageJ command to show its histogram:
imp = IJ.openImage("https://imagej.net/ij/images/blobs.gif")
IJ.run(imp, "Histogram", "")
How ImageJ does it, internally, has to do with the ImageStatisics class:
stats = imp.getStatistics()
print stats.histogram

array('i',[0, 0, 0, 0, 0, 0, 0, 0, 53, 0, 0, 0, 0, 0, 0, 0, 304,
           0, 0, 0, 0, 0, 0, 0, 1209, 0, 0, 0, 0, 0, 0, 0, 3511, 0,
           0, 0, 0, 0, 0, 0, 7731, 0, 0, 0, 0, 0, 0, 0, 10396, 0, 0,
           0, 0, 0, 0, 0, 7456, 0, 0, 0, 0, 0, 0, 0, 3829, 0, 0, 0,
           0, 0, 0, 0, 1992, 0, 0, 0, 0, 0, 0, 0, 1394, 0, 0, 0, 0,
           0, 0, 0, 1158, 0, 0, 0, 0, 0, 0, 0, 1022, 0, 0, 0, 0, 0,
           0, 0, 984, 0, 0, 0, 0, 0, 0, 0, 902, 0, 0, 0, 0, 0, 0,
           0, 840, 0, 0, 0, 0, 0, 0, 0, 830, 0, 0, 0, 0, 0, 0, 0,
           926, 0, 0, 0, 0, 0, 0, 0, 835, 0, 0, 0, 0, 0, 0, 0, 901,
           0, 0, 0, 0, 0, 0, 0, 1025, 0, 0, 0, 0, 0, 0, 0, 1180, 0,
           0, 0, 0, 0, 0, 0, 1209, 0, 0, 0, 0, 0, 0, 0, 1614, 0, 0,
           0, 0, 0, 0, 0, 1609, 0, 0, 0, 0, 0, 0, 0, 2220, 0, 0, 0,
           0, 0, 0, 0, 2037, 0, 0, 0, 0, 0, 0, 0, 2373, 0, 0, 0, 0,
           0, 0, 0, 1568, 0, 0, 0, 0, 0, 0, 0, 1778, 0, 0, 0, 0, 0,
           0, 0, 774, 0, 0, 0, 0, 0, 0, 0, 1364, 0, 0, 0, 0, 0, 0, 0])
The histogram, area and mean are computed by default. Other values like the median need to be specified.
To calculate other parameters, specify them by bitwise-or composition (see flags in Measurements):
stats = imp.getStatistics(Measurements.MEAN | Measurements.MEDIAN | Measurements.AREA) print “mean:”, stats.mean, “median:”, stats.median, “area:”, stats.area
mean: 103.26857775590551 median: 64.0 area: 65024.
If we set a ROI to the image, then we are measuring only for the inside of the ROI. Here we set an oval ROI of radius 25 pixels, centered:
radius = 25 roi = OvalRoi(imp.width/2 - radius, imp.height/2 -radius, radius2, radius2) imp.setRoi(roi) stats = imp.getStatistics(Measurements.MEAN | Measurements.MEDIAN | Measurements.AREA) print “mean:”, stats.mean, “median:”, stats.median, “area:”, stats.area
mean: 104.96356275303644 median: 64.0 area: 1976.0
To display the histogram window ourselves, we may use the HistogramWindow class:
hwin = HistogramWindow(imp)
… of which we may grab the image (the plot itself) and save it:
plotimage = hwin.getImagePlus()
IJ.save(plotimage, "/path/to/our/folder/plot.tif")
Removing bleeding from one channel to another
The technique to use is to divide one channel by the other: the channel to denoise divided by the channel that bled through.
The relatively high-level way to do it is to split the channels and call the ImageCalculator with a “Divide” argument:
1 - Obtain an RGB image stack
imp = WindowManager.getCurrentImage()
if imp.getType() != ImagePlus.COLOR_RGB:
  IJ.showMessage("The active image is not RGB!")
  raise RuntimeException("The active image is not RGB!")

if 1 == imp.getNSlices():
  IJ.showMessage("Not a stack!")
  raise RuntimeException("Not a stack!")
2 - Prepare stacks to split slices
stack = imp.getStack()
red_stack = ImageStack(imp.width, imp.height)
green_stack = ImageStack(imp.width, imp.height)
3 - Iterate all slices – notice slices are 1<=i<=size
for i in range(1, imp.getNSlices()+1):
  slice = stack.getProcessor(i)
  red_stack.addSlice(str(i), slice.toFloat(0, None))
  green_stack.addSlice(str(i), slice.toFloat(1, None))
4 - Apply “divide” via ImageCalculator to the red_stack, which is a new 32-bit stack
Don’t use the parameters “create” or “float” or “32” in the parameters string
of the calc.calculate call–then the result of the operation would be
in a new stack that opens beyond our control. Without them, results are
applied to the red_stack
calc = ImageCalculator()
calc.calculate("Divide stack", ImagePlus("red", red_stack), ImagePlus("green", green_stack))
5 - Compose a new color stack
new_stack = ImageStack(imp.width, imp.height)
for i in range(1, imp.getNSlices()+1):
  cp = stack.getProcessor(i).duplicate()
  cp.setPixels(0, red_stack.getProcessor(i))
  new_stack.addSlice(stack.getSliceLabel(i), cp)
6 - Show the new image
ImagePlus("Normalized " + imp.title, new_stack).show()
Alternatively and as an example of direct pixel manipulation, we’ll iterate all slices of the image stack, divide the red channel by the green channel, and compose a new stack:
1 - Obtain an RGB image stack
imp = WindowManager.getCurrentImage()
if imp.getType() != ImagePlus.COLOR_RGB:
  IJ.showMessage("The active image is not RGB!")
  raise RuntimeException("The active image is not RGB!")

if 1 == imp.getNSlices():
  IJ.showMessage("Not a stack!")
  raise RuntimeException("Not a stack!")

stack = imp.getStack()
2 - Create a new stack to store the result
new_stack = ImageStack(imp.width, imp.height)
3 - Iterate all slices – notice slices are 1<=i<=size
for i in range(1, imp.getNSlices()+1):
  # Get the slice i
  slice = stack.getProcessor(i)
  # Get two new FloatProcessor with the green and red channel data in them
  red = slice.toFloat(0, None)
  green = slice.toFloat(1, None)
  pix_red = red.getPixels()
  pix_green = green.getPixels()
  # Create a new FloatProcessor for the normalized result
  new_red = FloatProcessor(imp.width, imp.height)
  pix_new_red = new_red.getPixels()
  # Iterate and set all normalized pixels
  for k in range(len(pix_red)):
    if 0 != pix_green[k]:
      pix_new_red[k] = pix_red[k] / pix_green[k]
  # Create a ColorProcessor that has the normalized red and the same green and blue channels
  cp = slice.duplicate()
  cp.setPixels(0, new_red)   # at channel 0, the red
  # Store the normalized slice in the new stack, copying the same slice label
  new_stack.addSlice(stack.getSliceLabel(i), cp)
4 - Show the normalized stack
new_imp = ImagePlus("Normalized " + imp.title, new_stack)
new_imp.show()
Notice that this second approach is much slower: accessing every pixel from jython has a high cost. If you would like to do very fast pixel-level manipulations, use java or Clojure.
Subtract the minimal value to an image
Which is to say, translate the histogram so that the lowest value is at zero.
# Obtain current image and its pixels
imp = IJ.getImage()
pix = imp.getProcessor().convertToFloat().getPixels()

# find out the minimal pixel value
min = reduce(Math.min, pix)

# create a new pixel array with the minimal value subtracted
pix2 = map(lambda x: x - min, pix)

ImagePlus("min subtracted", FloatProcessor(imp.width, imp.height, pix2, None)).show()
Notice we used:
- The
reducefunction to obtain a single value from a list of values (the pixel array) by applying a function to every pair of consecutive values (in this case, the Math.min). lambda, which is used to declare an anonymous function that takes one argument.- The
mapfunction, which runs a function given as argument to every element of a list (here, every pixel) and returns a new list with all the results.
Extract a specific color channel for a given time frame of a composite image
Suppose you have a 4D multicolor image, and want to obtain a stack of slices corresponding to a specific color channel and time frame.
The CompositeImage is a stack whose slices are interpreted as belonging to specific color channels, Z slices and time frames. To find out which slice corresponds to what, use the getStackIndex method of the ImagePlus, which translates between color channels, z slices and time frames to the slice index in the underlying ImageStack.
from ij import IJ, ImagePlus, ImageStack

def extractChannel(imp, nChannel, nFrame):
 """ Extract a stack for a specific color channel and time frame """
 stack = imp.getImageStack()
 ch = ImageStack(imp.width, imp.height)
 for i in range(1, imp.getNSlices() + 1):
   index = imp.getStackIndex(nChannel, i, nFrame)
   ch.addSlice(str(i), stack.getProcessor(index))
 return ImagePlus("Channel " + str(nChannel), ch)

imp = IJ.getImage()
extractChannel(imp, 1, 1).show()
Notice that color channels, stack slices and time frames are all 1-based. For example, if you have 3 color channels, then these have indices 1, 2, and 3 (not 0, 1 and 2).
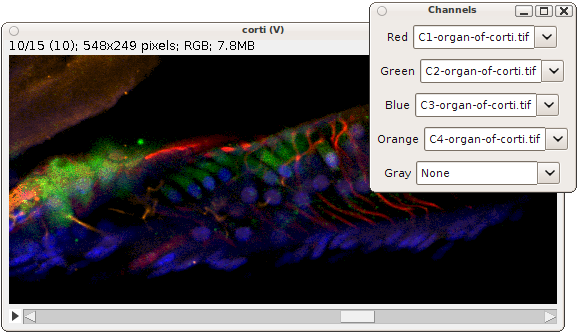
Visualize any number of TIFF stacks in a single composite multi-color image stack
Suppose you have 1000 stacks of Drosophila fly brains, each with different neurons labeled in a single color channel. Suppose that you have registered all these confocal stacks. Were you to overlay them, you would see whether the labeled neurons overlap in 3D space or not.
Here is a script to do that. First, it asks for a directory containing any number of TIF image stacks. It assumes all stacks have the same dimensions, and that they are all single channel (i.e. just red, or just green, etc.). Then, it displays a small window with a listing of many colors: red, green, blue, orange, gray, etc. Any of the hundreds of stacks in the directory can be assigned to each color channel.
The stacks are accessed in a virtual way, so even 1000 (one thousand) stacks will be managed just fine in small laptop.
One could easily add more color channels. But there are already lots.
The script uses Imglib scripting to normalize images and generate the color composite. See this imglib scripting tutorial for in-depth explanations.
# 2010-12-03 Albert Cardona and Arnim Jenett
# At HHMI Janelia Farm, Fiji tutorials class
#
# Select a directory with multiple image stacks
# all of the same dimensions, and show a channel
# chooser window to visualize up to 5 of them
# in red, green, blue, orange, and gray.
#
# The stacks are all virtual, opened via LOCI
# with BFVirtualStack. The composition of the
# RGB ColorProcessor is done with the
# script.imglib library.
#
# Each color channel is shown normalized.
# Currently works only with TIF stacks,
# and it will interpret them as single-channel.


from loci.plugins.util import BFVirtualStack
from loci.formats import ChannelSeparator
from ij.io import DirectoryChooser
import os
from javax.swing import JScrollPane, JPanel, JComboBox, JLabel, JFrame
from java.awt import Color, GridLayout
from java.awt.event import ActionListener
from script.imglib.math import Compute, Max, Multiply
from script.imglib.algorithm import Normalize
from script.imglib.color import Red, Green, Blue, RGBA
from mpicbg.imglib.image.display.imagej import ImageJFunctions as IJF


# Choose a directory with lots of tif stacks
dc = DirectoryChooser("Choose directory with stacks")
srcDir = dc.getDirectory()

# Open each tif stack as a virtual BFVirtualStack
bfvs = []
names = []
for filename in os.listdir(srcDir):
  if filename.endswith(".tif"):
    print "Reading metadata from", filename
    cs = ChannelSeparator()
    names.append(filename)
    cs.setId(srcDir + filename)
    bfvs.append( BFVirtualStack(srcDir + filename, cs, False, False, False) )

names.sort()
names = ["None"] + names


colorToRGB = {
'Red' : [255,0,0],
'Green' : [0,255,0],
'Blue' : [0,0,255],
'Orange' : [255,127,0],
'Cyan' : [0,255,255],
'Yellow' : [255,255,0],
'Magenta' : [255,0,255],
'Indigo' : [75,0,130],
'Violet' : [238,130,238],
'Greyscale' : [255,255,255],
'Aquamarine' : [127,255,212],
'Navy Blue' : [0,0,128],
'Sky Blye' : [135,206,235],
'Turquoise' : [64,224,208],
'Beige' : [245,245,220],
'Brown' : [165,42,42],
'Chocolate' : [210,105,30],
'Dark wood' : [133,94,66],
'Light wood' : [133,99,99],
'Olive' : [128,128,0],
'Green yellow' : [173,255,47],
'Sea green' : [32,178,170],
'Khaki' : [240,230,140],
'Salmon' : [250,128,114],
'Pink' : [255,192,203],
'Tomato' : [255,99,71],
'Scarlet' : [140,23,23],
'Purple' : [128,0,128],
'Wheat' : [245,222,179],
'Silver grey' : [192,192,192]
}

# Encode color RGB in floats:
tmp = {}
for c,rgb in colorToRGB.iteritems():
  tmp[c] = [v/255.0 for v in rgb]
colorToRGB = tmp

# Colors in the desired listing order:
colors = ['Red', 'Green', 'Blue',
          'Orange', 'Indigo',
          'Cyan', 'Yellow', 'Magenta',
          'Turquoise', 'Tomato', 'Olive',
          'Violet', 'Green yellow', 'Khaki',
          'Scarlet', 'Beige', 'Chocolate',
          'Silver grey', 'Pink', 'Wheat',
          'Sea green', 'Greyscale', 'Light wood',
          'Sky Blye', 'Brown', 'Salmon', 'Navy Blue',
          'Aquamarine', 'Purple', 'Dark wood']

# Initalize table of colors vs stacks to use:
table = {}
for k,v in zip(colors, [1] + [0 for i in range(len(colors)-1)]):
  table[k] = v


def asImg(color, section):
  global bfvs, table
  index = table[color]
  if 0 == index:
    return 0  # is "None" color
  return IJF.wrap(ImagePlus("", bfvs[index-1].getProcessor(section)))

def maybeNormalize(fn):
  """ Do not normalize if no images are present. """
  if 0 == fn:
    return fn
  cursors = []
  fn.findCursors(cursors)
  if len(cursors) > 0:
    return Multiply(Normalize(fn), 255)
  return fn

def blendColors(section):
  global bfvs, table, colorToRGB
  red =  0
  green = 0
  blue = 0
  for colorName,index in table.iteritems():
    if 0 == index: continue
    img = IJF.wrap(ImagePlus("", bfvs[index-1].getProcessor(section)))
    rgb = colorToRGB[colorName]
    if 0 != rgb[0]:
      red = Max(red, Multiply(img, rgb[0]))
    if 0 != rgb[1]:
      green = Max(green, Multiply(img, rgb[1]))
    if 0 != rgb[2]:
      blue = Max(blue, Multiply(img, rgb[2]))
  return red, green, blue

class VS(VirtualStack):
  def __init__(self):
    self.last = None
  def getProcessor(self, i):
    """ Channel color composition into a single RGB image, as ColorProcessor. 'i' is the section index, 1<=i<=size """
    red, green, blue = blendColors(i)
    # Transform to RGB by normalizing and scaling to 255
    red = maybeNormalize(red)
    green = maybeNormalize(green)
    blue = maybeNormalize(blue)
    # Compose
    rgb = RGBA(red, green, blue).asImage()
    self.last = IJF.displayAsVirtualStack(rgb).getProcessor()
    return self.last
  def getSize(self):
    return bfvs[0].getSize()
  def getSliceLabel(self, i):
    return str(i)
  def getWidth(self):
    return self.last.getWidth()
  def getHeight(self):
    return self.last.getHeight()
  def getPixels(self, i):
    return self.getProcessor(i).getPixels()
  def setPixels(self, pix, i):
    pass


# Create a new image stack
print os.path.split(srcDir)
ourImp = ImagePlus(os.path.split(srcDir)[1], VS())
ourImp.show()

# Create a bunch of panels, one for each color channel
all = JPanel()
layout = GridLayout(len(colors), 2)
all.setLayout(layout)

# GUI to choose which stacks is shown in which channel
class Listener(ActionListener):
  def __init__(self, color, choice, imp):
    self.color = color
    self.choice = choice
    self.imp = imp
  def actionPerformed(self, event):
    global table
    table[self.color] = self.choice.getSelectedIndex()
    self.imp.updateAndRepaintWindow()

for color in colors:
  all.add(JLabel(color))
  choice = JComboBox(names)
  choice.setSelectedIndex(table[color])
  choice.addActionListener(Listener(color, choice, ourImp))
  all.add(choice)

frame = JFrame("Channels")
frame.getContentPane().add(JScrollPane(all))
frame.pack()

frame.setVisible(True)
Sort all points of a PointRoi into a chain by distance to each other
There may be better ways, but here is one. Read the header to understand its limitations.
# Albert Cardona 2010-12-17 for Victoria Butler at HHMI Janelia Farm
# Given a PointRoi, order the points in a chain
# Assumes that the point furthest from all points
# is the start or the end of the chain.

from javax.vecmath import Point2f

# Obtain the PointRoi of the current image
proi = IJ.getImage().getRoi()

# Interrupt if the ROI is not a PointRoi instance:
if proi.getClass() != PointRoi:
  raise Exception("Not a PointRoi!")

class Point(Comparable):
  def __init__(self, x, y):
    self.p = Point2f(x, y)
    self.distances = {}
    self.distAll = None
  def distance(self, point):
    return self.p.distance(point.p)
  def distanceToAll(self):
    if self.distAll is None:
      self.distAll = reduce(lambda a, b: a + b, self.distances.values())
    return self.distAll
  def compareTo(self, point):
    if self.distanceToAll() < point.distanceToAll():
      return -1
    return 1
  def toString(self):
    return self.p.toString()
  def closest(self, points):
    """ Find the closest point that is not contained in the set of given points. """
    next = None
    dist = Float.MAX_VALUE
    for p,d in self.distances.iteritems():
      if d < dist and not p in points:
        next = p
        dist = d
    return next

# Convert PointRoi points to Point instances
px = proi.getXCoordinates()
py = proi.getYCoordinates()
bounds = proi.getBounds()
points = []
for i in range(proi.getNCoordinates()):
  points.append(Point(bounds.x + px[i], bounds.y + py[i]))

# Precompute all-to-all distances
allToAll = {}
for j in range(len(points)):
  for k in range(j+1, len(points)):
    distance = points[j].distance(points[k])
    points[j].distances[points[k]] = distance
    points[k].distances[points[j]] = distance

# Choose a starting point.
# In this case, we use the point most distant from all other points
points.sort()
first = points[-1]
print "First:", first

# Grow the chain from the starting point
chain = [first]
seen = set() # for fast look-up
seen.add(chain[0])
while len(chain) < len(points):
  next = chain[-1].closest(seen)
  if next is None:
    break
  chain.append(next)
  seen.add(next)

print "Chain:", chain
Correct illumination in a stack: apply the illumination of one slice to all others
The Multi-focus 3D Microscope (Sara Abrahamsson and Matz Gustafsson) takes a single image and later, computationally, 9 image planes are extracted.
The middle slice usually has the desired illumination levels, while the other 8 slices (4 before and 4 after) do not. Here is a script to apply the illumination of the 5th slice to all other slices.
The script takes a directory of images and processed them all, resulting in new images stored as “*-corrected.tif” in the same directory.
# Albert Cardona 2011-06-09 at HHMI Janelia Farm
# Takes a stack of 9 slices
# and then computes the mean and stdDev of slice number 5
# and normalize the intensity of the other 8 slices
# to that of slice 5.
#
# Created for Jiji Chen to process image stacks from
# the multifocus 3D microscope from Matz Gustafsson
# and Sara Abrahamsson


from math import sqrt
import os

def computeMean(pixels):
  return sum(pixels) / float(len(pixels))

def computeStdDev(pixels, mean):
  s = 0
  for i in range(len(pixels)):
    s += pow(pixels[i] - mean, 2)
  return sqrt(s / float(len(pixels) -1))

def process9ImagePlanes(imp):
  # reference slice
  refSlice = 5
  ref = imp.getStack().getProcessor(5)
  refMean = sum(ref.getPixels()) / float(len(ref.getPixels()))
  refStdDev = computeStdDev(ref.getPixels(), refMean)

  # New stack with the corrected slices
  stack = ImageStack(ref.width, ref.height)

  for i in range(1, 10):
    # skip the reference slice
    if 5 == i:
      stack.addSlice(imp.getStack().getSliceLabel(5), ref.convertToFloat())
      continue
    ip = imp.getStack().getProcessor(i).convertToFloat()
    mean = computeMean(ip.getPixels())
    stdDev = computeStdDev(ip.getPixels(), mean)
    ip.add(-mean)
    ip.multiply(1/stdDev)
    ip.multiply(refStdDev)
    ip.add(refMean)
    stack.addSlice(imp.getStack().getSliceLabel(i), ip)

  return ImagePlus(imp.title, stack)


def accept(filename):
  """ Work only with TIFF files. """
  return len(filename) - 4 == filename.rfind(".tif")

def run():
  dc = DirectoryChooser("pick folder with image stacks")
  folder = dc.getDirectory()
  if folder is None:
    return
  for filename in filter(accept, os.listdir(folder)):
    imp = IJ.openImage(os.path.join(folder, filename))
    if imp is None:
      print "Failed to open image:", filename
      continue
    corrected = process9ImagePlanes(imp)
    IJ.save(corrected, os.path.join(folder, filename[0:-4] + "-corrected.tif"))

run()
Add a mouse listener to the canvas of every open image
from java.awt.event import MouseAdapter

def doSomething(imp):
 """ A function to react to a mouse click on an image canvas. """
 IJ.log("clicked on: " + str(imp))

class ML(MouseAdapter):
 def mousePressed(self, event):
   canvas = event.getSource()
   imp = canvas.getImage()
   doSomething(imp)

listener = ML()

for imp in map(WindowManager.getImage, WindowManager.getIDList()):
 win = imp.getWindow()
 if win is None:
   continue
 win.getCanvas().addMouseListener(listener)
After running the script, clicking on any image will result in printing a line to the log window, like:
clicked on: imp[Untitled-1 400x200x1]
Add a key listener to the canvas of every open image
from ij import IJ, WindowManager
from java.awt.event import KeyEvent, KeyAdapter

def doSomething(imp, keyEvent):
  """ A function to react to key being pressed on an image canvas. """
  IJ.log("clicked keyCode " + str(keyEvent.getKeyCode()) + " on image " + str(imp))
  # Prevent further propagation of the key event:
  keyEvent.consume()

class ListenToKey(KeyAdapter):
  def keyPressed(this, event):
    imp = event.getSource().getImage()
    doSomething(imp, event)

listener = ListenToKey()

for imp in map(WindowManager.getImage, WindowManager.getIDList()):
  win = imp.getWindow()
  if win is None:
    continue
  canvas = win.getCanvas()
  # Remove existing key listeners
  kls = canvas.getKeyListeners()
  map(canvas.removeKeyListener, kls)
  # Add our key listener
  canvas.addKeyListener(listener)
  # Optionally re-add existing key listeners
  # map(canvas.addKeyListener, kls)
Create a virtual stack from the TIF files present in a folder and its subfolders, recursively
# Walk recursively through an user-selected directory
# and add all found filenames that end with ".tif"
# to a VirtualStack, which is then shown.
#
# It is assumed that all images are of the same type
# and have the same dimensions.

import os
from ij.io import DirectoryChooser
from ij import IJ, ImagePlus, VirtualStack

def run():
  srcDir = DirectoryChooser("Choose!").getDirectory()
  if not srcDir:
    # user canceled dialog
    return
  # Assumes all files have the same size
  vs = None
  for root, directories, filenames in os.walk(srcDir):
    for filename in filenames:
      # Skip non-TIFF files
      if not filename.endswith(".tif"):
        continue
      path = os.path.join(root, filename)
      # Upon finding the first image, initialize the VirtualStack
      if vs is None:
        imp = IJ.openImage(path)
        vs = VirtualStack(imp.width, imp.height, None, srcDir)
      # Add a slice, relative to the srcDir
      vs.addSlice(path[len(srcDir):])
  #
  ImagePlus("Stack from subdirectories", vs).show()

run()
Open the slices of a very large multi-image stack file one by one, and save each as a new image file
# 2011-10-18 Albert Cardona for Nuno da Costa
# Choose a multi-slice image stack file in a virtual way
# and save each slice as an individual image file
# in a user-chosen directory.

import os
from loci.plugins.util import BFVirtualStack
from loci.formats import ChannelSeparator

def run():
  # Choose a file to open
  od = OpenDialog("Choose multi-image file", None)
  srcDir = od.getDirectory()
  if srcDir is None:
    # User canceled the dialog
    return
  path = os.path.join(srcDir, od.getFileName())
  # Choose a directory to store each slice as a file
  targetDir = DirectoryChooser("Choose target directory").getDirectory()
  if targetDir is None:
    # User canceled the dialog
    return
  # Ready:
  cs = ChannelSeparator()
  cs.setId(path)
  bf = BFVirtualStack(path, cs, False, False, False)
  for sliceIndex in xrange(1, bf.getSize() +1):
    print "Processing slice", sliceIndex
    ip = bf.getProcessor(sliceIndex)
    sliceFileName = os.path.join(targetDir, str(sliceIndex) + ".tif")
    FileSaver(ImagePlus(str(sliceIndex), ip)).saveAsTiff(sliceFileName)

run()
Apply a binary mask to every slice in an image stack
Will work with regular stacks and with any kind of complex stack like a composite image or a 4d volume. Keep in mind that all stack types in ImageJ consists of a sequence of 2d images, each editable with an ImageProcessor obtained from the ImageStack that one can get from the ImagePlus. (The ImagePlus being what the opener or the WindowManager provides.)
# Albert Cardona 2012-10-05 for Sara Abrahamsson
#
# Take a stack of images and a mask,
# and clear the area outside the mask for every image.
#
# ASSUMES that the mask:
# 1. Is 8-bit;
# 2. has the area to keep as 255;
# 3. has the area to clear as zeros.


from ij import IJ
from ij import WindowManager as WM

# If the images are open:
volume = WM.getImage("stack.tif")
mask = WM.getImage("mask.tif")

# Or if the images have to be loaded from files:
# volume = IJ.openImage("/Users/sara/images/stack.tif")
# mask = IJ.open("/Users/sara/images/mask.tif")

# Obtain the underlying stack of 2d images
stack = volume.getStack()

# Fill every stack slice with zeros for the area outside the mask
for i in xrange(1, stack.getSize() + 1):
  # ip is the ImageProcessor for one stack slice
  ip = stack.getProcessor(i)
  ip.setValue(0)
  ip.fill(mask)

volume.updateAndDraw()
volume.show()
Note that it is counterintuitive that the area outside the mask gets filled with zeros. If you want the area inside the mask to get filled with zeros, then add this step before the loop:
mask = mask.duplicate()
mask.invert()
Open all series in a LIF file with Bio-Formats
# 2014-11-24 Harri Jäälinoja

from loci.plugins.in import ImagePlusReader,ImporterOptions,ImportProcess
import sys

filename = sys.argv[1]
opts = ImporterOptions()
opts.setId(filename)
opts.setUngroupFiles(True)

# set up import process
process = ImportProcess(opts)
process.execute()
nseries = process.getSeriesCount()

# reader belonging to the import process
reader = process.getReader()

# reader external to the import process
impReader = ImagePlusReader(process)
for i in range(0, nseries):
    print "%d/%d %s" % (i+1, nseries, process.getSeriesLabel(i))

    # activate series (same as checkbox in GUI)
    opts.setSeriesOn(i,True)

    # point import process reader to this series
    reader.setSeries(i)

    # read and process all images in series
    imps = impReader.openImagePlus()
    for imp in imps:
        imp.show()
        wait = Wait(str(i) + imp.getTitle())
        wait.show()
        imp.close()

    # deactivate series (otherwise next iteration will have +1 active series)
    opts.setSeriesOn(i, False)
Open and save movies with the FFMPEG I/O plugin
First note that the FFMPEG I/O plugin was a proof-of-concept that is completely unmaintained.
Then open the Fiji Updater, push the “Manage update sites” at the bottom left of the dialog, and install the FFMPEG plugin by Johannes Schindelin by ticking its checkbox, as explained in more detail here.
See also the Java source code for the IO class from the FFMPEG plugin source code site.
""" Albert Cardona for Marta Zlatic, 2014-01-24. """

from fiji.ffmpeg import IO
from java.awt import Color
import os

def load(path, first_frame=0, last_frame=-1):
  """ Load the whole movie by default. """
  io = IO()
  imp = io.readMovie(path, False, first_frame, last_frame)
  return imp

def save(path, imp, frame_rate=30, bit_rate=400000):
  """ frame_rate in fps (frames per second).
      bit_rate defines the quality of the movie: higher bit rate results in larger, higher quality movies.
      The movie format (e.g. AVI, MPG, etc.) is chosen by the path filename extension. """
  io = IO()
  io.writeMovie(imp, path, frame_rate, bit_rate)


def process(imp, convert, roi, time_zero, time_range):
  """ Crop, convert to another format, and time-stamp. """
  stack = imp.getStack()
  size = stack.getSize()
  bounds = roi.getBounds()
  new_stack = ImageStack(bounds.width, bounds.height)
  for i in xrange(1, size + 1):
    ip = convert(stack.getProcessor(i))
    ip.setRoi(roi)
    c = ip.crop()
    c.setColor(Color.white)
    time = "%.2f" % (time_zero + time_range * (float(i-1) / (size -1)))
    c.drawString(time, 5, 15)
    new_stack.addSlice(str(i), c)

  return ImagePlus(imp.title, new_stack)


def batch_process(extension, source_dir, output_dir, convert, roi, time_zero, time_range):
  for filename in os.listdir(source_dir):
    if filename.endswith(extension):
      if os.path.exists(target_dir + filename):
        # Skip if movie exists at destination
        continue
      imp = load(source_dir + filename)
      imp2 = process(imp, convert, roi, time_zero, time_range)
      imp.flush()
      save(target_dir + filename, imp2)
      imp2.flush()


def convert(ip):
  """ Convert to 8=bit and crop the range to [0, 128] pixel values. """
  c = ip.convertToByte(True)
  c.setMinAndMax(0, 128)
  return c


source_dir = '/path/to/list_of_AVI_movies/'
target_dir = '/path/to/new_list_of_AVI_movies/'

roi = Roi(50, 50, 256, 256)
time_zero = 30   # start at 30 seconds
time_range = 30  # range of (also) 30 seconds

# Process all AVI movie files, saving them also as AVI files
batch_process('.avi', source_dir, target_dir, convert, roi, time_zero, time_range)
Skeletonize an image and analyze the skeleton
from ij import IJ
from skeleton_analysis import AnalyzeSkeleton_,Graph,Edge,Vertex

# open image, blur, make b/w, skeletonize
imp = IJ.openImage("/path/to/image.tif")
IJ.run(imp,"Gaussian Blur...","sigma=5")
IJ.run(imp,"Make Binary","")
IJ.run(imp,"Skeletonize","")

# run AnalyzeSkeleton
# (see https://fiji.sc/AnalyzeSkeleton
# and https://fiji.sc/javadoc/skeleton_analysis/package-summary.html)
skel = AnalyzeSkeleton_()
skel.setup("",imp)
skelResult = skel.run(skel.NONE, False, True, None, True, True)

# get the separate skeletons
graph = skelResult.getGraph()
print len(graph)
print skelResult.getNumOfTrees()

def getGraphLength(graph):
    length = 0
    for g in graph.getEdges():
    length = length + g.getLength()
    return length

# find the longest graph
graph = sorted(graph, key=lambda g: getGraphLength(g), reverse=True)
longestGraph = graph[0]

# find the longest edge
edges = longestGraph.getEdges()
edges = sorted(edges, key=lambda edge: edge.getLength(), reverse=True)
longestEdge = edges[0]
Find peaks in a 3D image
# @ImagePlus imp

from fiji.plugin.trackmate.detection import DogDetector
from ij.gui import PointRoi
from ij.plugin.frame import RoiManager
from net.imglib2.img.display.imagej import ImageJFunctions

# Set the parameters for DogDetector
img = ImageJFunctions.wrap(imp)
interval = img
cal = imp.getCalibration()
calibration = [cal.pixelWidth, cal.pixelHeight, cal.pixelDepth]
radius = 0.2 # the radius is half the diameter
threshold = 100
doSubpixel = True
doMedian = False

# Setup spot detector
# (see http://javadoc.imagej.net/Fiji/fiji/plugin/trackmate/detection/DogDetector.html)
#
# public DogDetector(RandomAccessible<T> img,
#            Interval interval,
#            double[] calibration,
#            double radius,
#            double threshold,
#            boolean doSubPixelLocalization,
#            boolean doMedianFilter)
detector = DogDetector(img, interval, calibration, radius, threshold, doSubpixel, doMedian)

# Start processing and display the results
if detector.process():
    # Get the list of peaks found
    peaks = detector.getResult()
    print str(len(peaks)), "peaks were found."

    # Add points to ROI manager
    rm = RoiManager.getInstance()
    if not rm:
        rm = RoiManager()

    # Loop through all the peak that were found
    for peak in peaks:
        # Print the current coordinates
        print peak.getDoublePosition(0), peak.getDoublePosition(1), peak.getDoublePosition(2)
        # Add the current peak to the Roi manager
        proi = PointRoi(peak.getDoublePosition(0) / cal.pixelWidth, peak.getDoublePosition(1) / cal.pixelHeight)
        proi.setPosition(int(peak.getDoublePosition(2) / cal.pixelDepth))
        rm.addRoi(proi)

    # Show all ROIs on the image
    rm.runCommand(imp, "Show All")

else:
    print "The detector could not process the data."
Tips and Tricks
Getting a list of all members in one package
You can use the Python function *dir(
import ij
print dir(ij)
As of April 26nd, 2010, you need to start Fiji with:
fiji -Dpython.cachedir.skip=false --
for dir(<package>) to work.
Specifying the encoding of the source
When your source code contains non-ASCII characters (such as umlauts), Jython will complain with a *SyntaxError: Non-ASCII character in file ‘
You can fix this issue by putting the line
# -*- coding: iso-8859-15 -*-

as first line into your source code (or if it starts with *\#!/usr/bin/python*, as second line), as suggested [here](http://docs.python.org/tutorial/interpreter.html#source-code-encoding). You might need to replace the string *iso-8859-15* by something like *utf-8* if your source code is encoded in UTF-8.

### Changing the default encoding

By default, Jython encodes the standard output (and other streams) with the ASCII encoding. Often, this is not what you want. You can change the default encoding like this:

    from org.python.core import codecs
    codecs.setDefaultEncoding('utf-8')

### Error handling with try / except / finally

See complete documentation at: [jython book chapter 6](http://jythonpodcast.hostjava.net/jythonbook/chapter6.html).

    x = 10
    y = 0

    try:
         z = x / y
    except NameError, e1:
         print "A variable is not defined!", e1
    except ZeroDivisionError, e2:
         print "Dividing by zero doesn't make any sense! Error:", e2
    finally:
         print "This line will always print no matter what error occurs."

Which prints:
Dividing by zero doesn’t make any sense! Error: integer division or modulo by zero This line will always print no matter what errors occurs
To catch any kind of errors, use sys.exc_info:
import sys

try:
  z = x / z
except:
  print "Error: ", sys.exc_info()
Which prints:
Error: (<type 'exceptions.NameError'>, NameError("name 'x' is not defined",), <traceback object at 0x2>)
To ensure that you see the stack trace, print it to the ImageJ log window instead of stdout (whathever the latter may be):
IJ.log(str(sys.exc_info()))
Importing other .py scripts (modules)
If you want to import other python files, you need to import them. This requires that the files are found in the so-called search path, a list of directories in which Jython looks for the modules (.py files) to import. You can easily extend the search path:
from sys import path
from java.lang.System import getProperty

# extend the search path by $FIJI_ROOT/bin/
path.append(getProperty('fiji.dir') + '/bin')

# Now you can import $FIJI_ROOT/bin/compat.py
import compat
A situation you are likely to encounter is when you have multiple jython scripts in a folder under the fiji plugins folder.
For example, suppose you have the folder my scripts under the fiji plugins folder, in which you have the script Filters.py with the following filter functions in it:
# Script plugins/my scripts/Filters.py
from ij import IJ
from ij.plugin import Duplicator

def median(imp, radius):
  """ Apply a median filter to a copy
	  of the given ImagePlus, and return it. """
  copy = Duplicator().run(imp)
  IJ.run(copy, "Median...", "radius=" + str(radius))
  return copy

def removeOutliers(imp, radius, threshold, bright):
  """ Apply a remove outliers filter to a copy
	  of the given ImagePlus, and return it. """
  copy = Duplicator().run(imp)
  which = "Bright" if bright else "Dark"
  IJ.run(copy, "Remove Outliers...", "radius=" + str(radius) \
	  + " threshold=" + str(threshold) + " which=" + which)
  return copy
And now you have a second script in which you want to use a function from the Filters.py script:
from ij import IJ
import sys
from java.lang.System import getProperty
sys.path.append(getProperty("fiji.dir") + "/plugins/my scripts")
from Filters import median

imp = IJ.getImage()
medianFiltered = median(imp, 5.0)
medianFiltered.show()
Defining a class and creating instances of the new class
A simple class to store an X,Y coordinate. (In real code, just use javax.vecmath.* classes such as Point3f, Point3d, etc.)
The constructor is defined with __init__, and takes at least one argument , named self by convention (you may name it something else, like this).
from math import sqrt, pow

class Point:
  def __init__(self, x, y):
	self.x = x
	self.y = y
  def distance(self, other):
	return sqrt(pow(self.x - other.x, 2), pow(self.y - other.y, 2))
… and create two instances, and measure the distance between them. To create the new instances, we use the name of the class with the arguments in brackets:
p1 = Point(10, 20)
p2 = Point(40, 55.3)

print "Distance:", p1.distance(p2)
Adding a static method to a class
A static method is a method of a class that doesn’t need a self first argument. You may call this method by using the name of the class alone–you don’t need to invoke it on an instance.
To declare a method as static, decorate it with @staticmethod, as shown below for method two:
class Numbers:
  def one(self):
    return 1

  @staticmethod
  def two():
    return 2
Now, to invoke these methods, notice how two doesn’t need to be invoked on an instance (we merely prepend the class name), but one does:
print Numbers.two()

that = Numbers()
print that.one()
Why would you want to use a static method? It is useful to keep the namespace tidy, to avoid name collisions.
Creating multi-dimensional native java arrays
Suppose you want to create a one-dimensional double array, the equivalent of double[] in java. This is what you would do:
from jarray import array

data = [1.0, 2.0, 3.0, 4.0]

arr = array(data, 'd')
Other accepted primitive array types are:
z  boolean
c  char
b  byte
h  short
i  int
l  long
f  float
d  double
But now suppose you want a two-dimensional double array, the equivalent of double[][] in java. How to do that? Here’s how:
from jarray    import array
from java.lang import Class

data = [[1.0, 2.0], [3.0, 4.0]]
twoDimArr = array(data, Class.forName('[D'))
Essentially, what we did is to give the function array the argument class of a one-dimensional double array, so that it will create an array of that–hence a two-dimensional double array.
For a three-dimensional array in jython, you’d just add another [ (square bracket) to the class name:
from jarray import array
from java.lang import Class

data = [[[1, 2, 3], [4, 5, 6]], [[1, 2, 3], [4, 5, 6]]]
threeDimArr = array(data, Class.forName('[[D'))
See the jarray documentation.
To create primitive arrays of any class, pass along the class itself. For example, a native array of String:
from jarray import array

texts = ["one", "two", "three"]

strings = array(texts, String)
Of course arrays can also be created empty. For numbers, all values will be zero. For an arbitrary class such as String, all values will be null (or None, in python parlance).
In the example below, we create an empty two-dimensional array of double[N][] type, where the smaller, inner arrays are null (just like in java a new double[5][] would have the second-order also all null):
from jarray import zeros

twoDimArr = zeros(5, Class.forName("[D"))

print twoDimArr
# prints: array([D, [None, None, None, None, None])

# fill each slot with a new array of length 3:
for i in range(len(twoDimArr)):
  twoDimArr[i] = zeros(3, 'd')

print twoDimArr
#prints: array([D, [array('d', [0.0, 0.0, 0.0]), array('d', [0.0, 0.0, 0.0]),
# array('d', [0.0, 0.0, 0.0]), array('d', [0.0, 0.0, 0.0]), array('d', [0.0, 0.0, 0.0])])
Inline java code inside jython: the Weaver
Jython is great at doing high-level operations on images. But sometimes one wants to edit pixels specifically. The performance of low-level loops in jython are far from the performance offered by java. But writing a special-purpose java class for a minor piece of code is painful and requires specific java skills regarding code compilation and classpath management.
The weaver removes all the pain.
The weaver offers two ways to embed java code: the inline and the method.
Here is an example using the inline approach, where the float[] pixels array of the current image is iterated to compute the mean intensity:
from fiji.scripting import Weaver
from ij import IJ
from java.lang import Double

# The currently open image
imp = IJ.getImage()

fp = imp.getProcessor().convertToFloat()
pixels = fp.getPixels()  # a float array, float[]
Three arguments:
1. The java code to embed.
2. The dictionary of bindings, where the key is the name to use within the java code, and the value is the object to bind to it.
3. The return type (optional; defaults to java.lang.Object).
w = Weaver.inline(
    """
    double sum = 0;
    for (int i=0; i<pixels.length; i++) {
        sum += pixels[i];
    }
    return sum / pixels.length;
    """,
    {"pixels" : pixels}, Double)

mean = w.call()

print mean
The above is trivial and it is meant only as an example (there are better ways to get the mean value, such as via imp.getStatistics(). Notice that the Weaver.inline function takes three arguments: the java code to inline, the map of bindings, and the return type. In the example, we pass only the float[] pixels array, and define Double as the return type. The return type is optional.
Internally, bindings are represented as fields in a java class, set as either primitives (like double, int …) or the least general public class or superclass of the object to bind.
A better example that exploits the capabilities of the Weaver.inline is the following: compile the function once, and then call it over and over with different parameters. The bindings cannot be changed, but if they are arrays or collections, one can change the elements of these collections. For example, to obtain a new ImageStack that is the result of applying XOR to each consecutive pair of slices (which will give you the boundaries of objects):
from ij import IJ, ImagePlus, ImageStack
from fiji.scripting import Weaver

# The currently open image, an 8-bit stack
imp = IJ.openImage("https://imagej.net/ij/images/bat-cochlea-volume.zip")

slices = [None, None]

w = Weaver.inline(
    """
    byte[] pix1 = (byte[]) slices.get(0);
    byte[] pix2 = (byte[]) slices.get(1);

    byte[] xor = new byte[pix1.length];
    for (int i=0; i<pix1.length; i++) {
        xor[i] = (byte)(pix1[i] ^ pix2[i]);
    }
    return xor;
    """,
    {"slices" : slices})

stack = imp.getStack()
stackXOR = ImageStack(stack.width, stack.height)

for i in range(2, imp.getNSlices()+1):
  # Put the pixel arrays into the pre-made list
  slices[0] = stack.getPixels(i-1)
  slices[1] = stack.getPixels(i)
  # Invoke native code
  stackXOR.addSlice( str(i-1), w.call() )

ImagePlus("XORed stack", stackXOR).show()
The above approach with Weaver.inline becomes a bit verbose and ad-hoc, having to edit the contents of the slices list.
Instead, here is the same code but using the Weaver.method approach, where, instead of bindings, we pass the arrays directly as method arguments. This approach requires knowing a bit more about java, but not much, to declare a full java class method (or any number of them). The returned w object contains that method, which we can invoke with, in this case, the two byte arrays as arguments:
from ij import IJ, ImagePlus, ImageStack
from fiji.scripting import Weaver

# The currently open image, an 8-bit stack
imp = IJ.openImage("https://imagej.net/ij/images/bat-cochlea-volume.zip")

w = Weaver.method(
  """
  public byte[] xor(byte[] pix1, byte[] pix2) {
    byte[] xor = new byte[pix1.length];
    for (int i=0; i<pix1.length; i++) {
        xor[i] = (byte)(pix1[i] ^ pix2[i]);
    }
    return xor;
  }
  """)

stack = imp.getStack()
stackXOR = ImageStack(stack.width, stack.height)

for i in range(2, imp.getNSlices()+1):
  # Invoke native code
  stackXOR.addSlice( str(i-1), w.xor(stack.getPixels(i-1), stack.getPixels(i)) )

ImagePlus("XORed stack", stackXOR).show()
There are two additional, optional arguments for Weaver.inline and Weaver.method:
- A list of classes to insert as imports, so that instead of fully qualified class names
ij.process.FloatProcessor ip = new ij.process.FloatProcessor(100, 100)… one can write the much briefer:
FloatProcessor ip = new FloatProcessor(100, 100) - A boolean, to show the generated java code in a tab of the Script Editor.
Here is a small example, using Weaver.method, that uses imports. The script subtracts “10” from every pixel:
from net.imglib2.type.numeric.real import FloatType
from net.imglib2.img.display.imagej import ImageJFunctions as IJF
from fiji.scripting import Weaver
from ij import IJ
from net.imglib2 import Cursor, IterableInterval
from net.imglib2.type.numeric.real import FloatType

# Grab a 32-bit image
imp = IJ.getImage()

# View it as an ImgLib2 image
img = IJF.wrap(imp)

# Declare a java method to subtract a value from every pixel
w = Weaver.method(
  """
  public void subtract(final IterableInterval<FloatType> img, final float value) {
    final FloatType v = new FloatType(-value);
    final Cursor<FloatType> cursor = img.cursor();
    while (cursor.hasNext()) {
      cursor.fwd();
      cursor.get().add(v);
    }
  }
  """,
  [IterableInterval, Cursor, FloatType])

w.subtract(img, 10)

imp.updateAndDraw()
Of course the Weaver is a java library, and may be used from any scripting language such as Javascript, JRuby, and others.
All the above is inspired by the Scientific Python Weaver, or scipy Weaver, which inlines C code inside a python file.
Reading command line arguments given to a script
The Fiji launcher can execute scripts. When running scripts from the command line with the launcher, it is convenient to read out the arguments given to the script. For example, suppose you create a script to open an image file and do some processing with it, and you want to read the name of the file to open from the command line argument. Here is how:
import os, sys
from ij import IJ

# Expecting one argument: the file path
if len(sys.argv) < 2:
  print "Usage: ./fiji-linux64 <script-name> <file-path>"
  sys.exit(1)

filepath = sys.argv[1]

# Check if the file exists
if not os.path.exists(filepath):
  print "File does not exist at path:", filepath
  sys.exit(1)

# Open the image
imp = IJ.openImage(filepath)
print "Processing:", imp.title

# Do some processing ...
IMPORTANT: notice that, when executing scripts from the command line, there is no auto-importing of common imports. So above we must declare “from ij import IJ” to import the namespace IJ with all the static utility functions such as openImage.
Catching errors from a running macro
ImageJ exits with zero even when it fails (see bug report). A possible fix is to convert the macro into a plugin but a quicker fix, is to wrap the macro call into a script. For this purpose, it is enough to check the returned string of runMacroCode, which will return the string [aborted] in case of failure:
from ij import IJ
import sys

if not len (sys.argv) > 1:
  raise TypeError ("No macro file argument")

status = IJ.runMacroFile(sys.argv[1])
if status == '[aborted]':
  raise StandardError ("Macro execution failed")

sys.exit (0)
Of course, if your macro happens to return [aborted] for success, you’re out of luck ;)
Running 3rd party java libraries
It is possible to run external java programs within Jython. To make them available, just copy the corresponding jar file into Fiji’s plugins folder. To import the respective java classes, just do
import name.of.external.java.library as foo
If the class names of the external package are unknown, one possibility is to inspect the jar file manually. On Linux and Mac OS systems just do on the command line
jar tvf <library>.jar
This will print the jar contents as plain text, look for entries ending with “.class”. For the implementation of json in jython, provided at jyson.xhaus.com, the output looks like:
jar tvf jyson-1.0.2.jar
     0 Sat Mar 17 14:06:40 CET 2012 META-INF/
   106 Sat Mar 17 14:06:38 CET 2012 META-INF/MANIFEST.MF
     0 Sat Mar 17 14:06:40 CET 2012 com/
     0 Sat Mar 17 14:06:40 CET 2012 com/xhaus/
     0 Sat Mar 17 14:06:40 CET 2012 com/xhaus/jyson/
   174 Sat Mar 17 14:06:40 CET 2012 com/xhaus/jyson/JSONDecodeError.class
   174 Sat Mar 17 14:06:40 CET 2012 com/xhaus/jyson/JSONEncodeError.class
   162 Sat Mar 17 14:06:40 CET 2012 com/xhaus/jyson/JSONError.class
  1650 Sat Mar 17 14:06:40 CET 2012 com/xhaus/jyson/JysonCodec.class
  6350 Sat Mar 17 14:06:40 CET 2012 com/xhaus/jyson/JysonDecoder.class
  3899 Sat Mar 17 14:06:40 CET 2012 com/xhaus/jyson/JysonEncoder.class
The JysonCodec.class is the toplevel class, so to import this library include the following line in your jython script:
import com.xhaus.jyson.JysonCodec as jyson
Jython for plugins
Using a jython script as a plugin
The simplest way is to place the jython script file into fiji/plugins/ folder or a subfolder, and it will appear in the menus after running Plugins › Scripting › Refresh Jython Scripts or Help › Refresh Menus, or on restarting Fiji.
If you want to have the Jython script show up in a place outside the Plugins menu, just put the file into an appropriate subdirectory of fiji/plugins/Scripts/; for example, if you put a Jython script called Animation_.py into fiji/plugins/Scripts/File/New/, it will be available as File › New › Animation.
To populate an update site, the updater let the possibility to directly upload jython scripts as .py (or $py.class for the one that resides in the Jars/Lib folder). Alternatively if you want to bundle multiple scripts you can pack them into a jar archive as described below.
Distributing jython scripts in a .jar file
PLEASE NOTE: there is no need to do the following – unless you want to bundle a couple of scripts in one package. See entry above.
The whole idea is to be able to distribute an entire collection of scripts in a single .jar file, for best convenience.
In this example, we create two jython scripts that we want to distribute in a .jar file as plugins:
The printer.py script:
IJ.log("Print this to the log window")
… and the create_new_image.py script:
ip = ByteProcessor(400, 400)
imp = ImagePlus("New", ip)
ip.setRoi(OvalRoi(100, 100, 200, 200))
ip.setValue(255)
ip.fill(ip.getMask())
imp.show()
Manual packaging
Place both scripts under a folder named scripts/ .
You will need a tiny .java file specifying a launcher PlugIn, such as:
package my;
import ij.plugin.PlugIn;
import Jython.Refresh_Jython_Scripts;

public class Jython_Launcher implements PlugIn {
    public void run(String arg) {
        new Refresh_Jython_Scripts().runScript(getClass().getResourceAsStream(arg));
    }
}
Notice we place the above file under directory my/, packaged.
To compile it:
$ javac -classpath .:ij.jar:../jars/fiji-scripting.jar:../plugins/Jython_Interpreter.jar my/Jython_Launcher.java
(check that the path to the three jars that you need is correct!)
Then we define the plugins.config file:
Plugins>My Scripts, "Print to log window", my.Jython_Launcher("/scripts/printer.py")
Plugins>My Scripts, "Create image with a white circle", my.Jython_Launcher("/scripts/create_new_image.py")
Finally, we put all files in a .jar file:
$ jar cf my_jython_scripts.jar plugins.config my/Jython_Launcher.class scripts/*py
Then, drop the jar file into fiji/plugins/ folder and run “Help - Update Menus”, or restart fiji. Your scripts will appear under Plugins - My Scripts.
For clarity, this is a summary of the files in the folder:
my/Jython_Launcher.javamy/Jython_Launcher.classscripts/printer.pyscripts/create_new_image.pyplugins.config
With Maven
Even if you are not familiar with Maven, packaging the py script into a jar is rather straightforward.
First make sure that you have installed Maven and a java jdk and add the path to those 2 in your environment variables (see Maven installation).
Then download a zip of this Github repository. And follow the guidelines :
- place your script in a subfolder of
Ressources - eventually modify the pom file according to your dependencies (see Building a POM
- then open a command line in the folder and type
mvn package.
Eventually you can also type mvn -Dimagej.app.directory=/path/to/your/Fiji.app -Dimagej.deleteOtherVersions=older to have the dependencies automatically coped to an ImageJ installation : handy to test your package on a fresh installation.
NB : This latter command with the dependencies was reported not to function with windows Powershell, although the normal packaging works. Use a different command line tool in this case.
Notice, though, that you don’t need to do the .jar packaging at all. Just place the python scripts directly under fiji/plugins/My Scripts/ and they will appear in the menus as regular plugins, and similarly be handle by the updater to populate an update site.
Jython examples in Fiji
- Find Dimension of Raw Image
- Edit LUT As Text
- Delayed Snapshot
- Command Launcher GUI
- List all threads
- Extract stack under AreaList in TrakEM2.
- Set all transforms to identity for TrakEM2 objects.
- Select All objects in TrakEM2.
- Measure AreaList in TrakEM2.
See also
- Albert Cardona’s crash course in Jython scripting with Fiji.
- Jython for TrakEM2 Scripting.