The content of this page has not been vetted since shifting away from MediaWiki. If you’d like to help, check out the how to help guide!
This guide discusses how to modify an already-existing plugin, and contribute your changes back.
* If you are interested in developing a new plugin instead, see Writing plugins.
* If you have completed a plugin that you would like to share with the community, see Distributing your plugins.
Introduction
Sometimes you may want to contribute to an already existing ImageJ plugin or library. For example, a bug is found in one plugin and you want to fix it, or you would like to improve one library by adding more functions. This tutorial describes step by step how to do it with a practical case.
In many cases, the plugin or library will have its own source code repository online somewhere. For instance, in the Fiji project, plugin code lives in the Fiji GitHub organization; e.g., the VIB-lib library’s repository is VIB-lib. This structure allows for easy, independent development of each individual component.
This tutorial assumes you are familiar with Git. If this is not the case, please go ahead and read the existing documentation.
In this example, we want to fix some bugs and add some functionality to the VIB-lib library. Let’s see step by step how to do it:
GitHub
In your favorite browser, log into your GitHub account. If you don’t have an account yet, go ahead and create one.
Fork
Go to the library’s repository (in this case https://github.com/fiji/VIB-lib) and “fork” the repository (click on the upper-right “Fork” button):

By doing this, you will be duplicating the whole repository into your own GitHub account. This way you can freely work on the library with an identical version of the existing repository’s master branch. See GitHub: how to fork a repository for more details.
Clone
Next, go to your command line, move to your workspace folder and clone the repository:
$ git clone https://github.com/username/VIB-lib
(change “username” for your GitHub account name)
Configure remotes
To sync changes you make in a fork with the original repository, you must configure a remote that points to the upstream repository in Git. In our case:
$ cd VIB-lib
$ git remote add upstream https://github.com/fiji/VIB-lib
$ git fetch upstream
See GitHub: how to configure a remote fork and GitHub: how to sync a fork for more details.
Create a topic branch
Create a new branch with a descriptive name. Since we want to work on AmiraMesh files, we call it “amira-io”:
$ git checkout -b amira-io
Development
Now we develop our code to include our changes in the library.
Building
Most of the ImageJ plugins and support libraries are developed as Maven projects. Developers typically prefer one of the supported Integrated Development Environments to build and run the code.
The most popular IDE is undoubtedly Eclipse, and you can follow this tutorial to build the plugin or library (you only need to change the URL from the ImageJ repository to the appropriate plugin or library repository URL).
Commit early, commit often!
Remember to:
- Make changes and commit them to your topic branch
- Push the commits to your GitHub repository; e.g.: git push -u origin amira-io
Pull request
Finally, once you have tested your new code and are satisfied with the results, you have to propose to add your contributions to the original project. In GitHub, you do so by using pull requests:
First, switch to your branch:
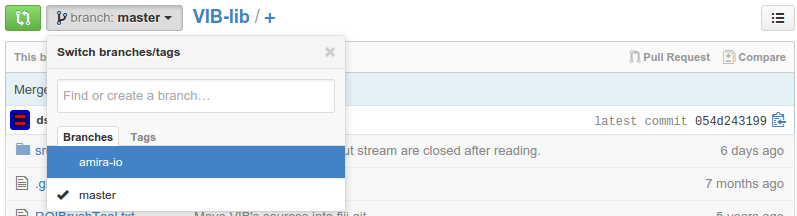
Then click on the Compare & Review button:
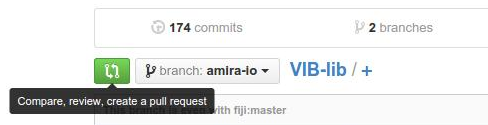
After starting the review, you’re presented with a review page where you can get a high-level overview of what exactly has changed between your branch and the repository’s master branch. You can review all comments made on commits, identify which files changed, and get a list of contributors to your branch.
Finally, when you’re ready to submit your pull request, click Create pull request:

See GitHub: how to send a pull request for more details.
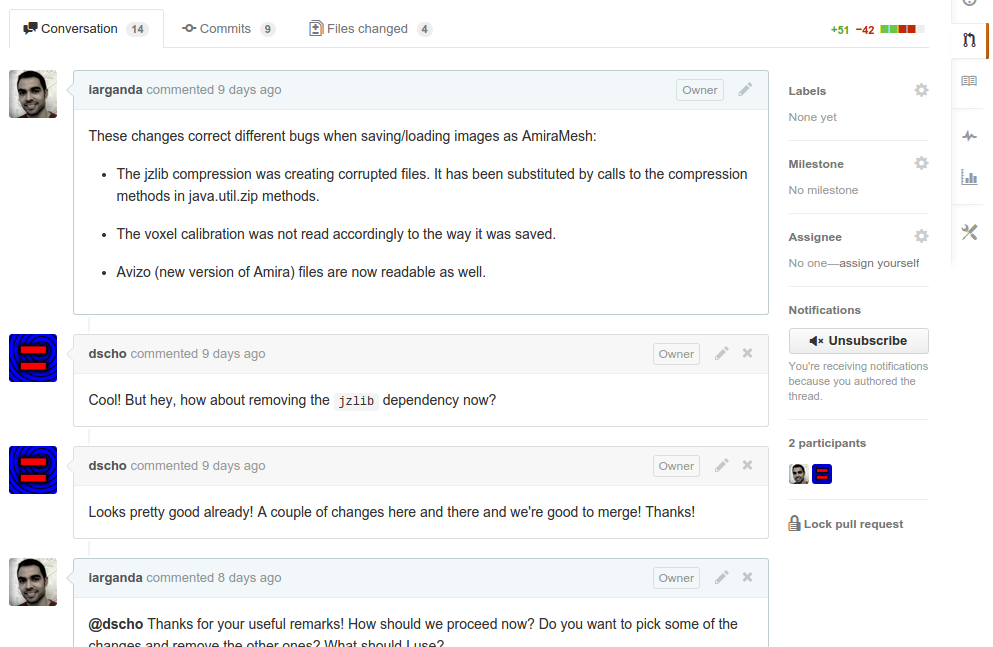
Pull request discussion
Once the pull request is created, it is automatically sent to the person in charge of the original repository. After reviewing the basic description, commits, and cumulative diff, the person tasked with applying the changes may have questions or comments. The discussion view is designed to encourage and capture this type of discussion:
Modifying your commits
From the discussion, you might realize you need to modify a part of the changes you made on your branch. Some of the changes introduced by your commits can be fixed with new commits (that will appear in the discussion view of the pull request). But some commits may need to be modified so the history of your repository stays reasonably clean. In that case, you need to use the git rebase command:
If you prefer using a graphical interface (e.g. Atlassian SourceTree or GitHub Desktop) instead of the command line, there are also options to do an interactive rebase. To force-push your amended commits to the existing branch on github though, the best option is to use the command line, see below.
Rebase operates over a range of commits. You provide it a starting point, and it then automatically includes all commits after that point, up to the current state of your branch.
For example, you can specify a specific commit to start from:
git rebase -i 6272a7bf
If we aren’t sure which commit to start from, we can just rebase over the entire branch:
git rebase -i $(git merge-base --fork-point master)
In our example, we run the first command and immediately Git launches our default text editor and open a file that details the commits in the range we’ve chosen:
pick 36fc3d2 Use java.util.zip tools to decode (inflate) AmiraMesh files instead of zjlib methods.
pick 25b44e1 Encode (deflate) using java.util.zip methods instead of the zjlib ones.
pick 913d6e3 Remove unused imports.
pick 45adf88 Add progress bar updates.
pick 1d6e8d9 Make call to static method correctly.
pick 1c1f88f Correct typos
pick 478c271 Fix bug when reading AmiraMesh files.
pick ffeaab8 Allow Avizo files to be read as well.
pick a3e4aec Remove jzlib dependency, now unnecessary.
pick 7d18362 Allow Avizo files to be read as well.
pick e768fd1 Add method to write AmiraMesh file faster using more memory.
pick 88dbc1c Add method to read AmiraMesh file fast using a more memory.
pick 4e4c7a4 Make sure the files and output streams are closed after writing.
pick 86a79cf Make the output stream a class field so it can be properly closed as well after writing the file.
pick def586d Correct indention.
pick c536d3d Make sure the file and input stream are closed after reading.

# Rebase 6272a7b..054d243 onto 6272a7b
#
# Commands:
#  p, pick = use commit
#  r, reword = use commit, but edit the commit message
#  e, edit = use commit, but stop for amending
#  s, squash = use commit, but meld into previous commit
#  f, fixup = like "squash", but discard this commit's log message
#  x, exec = run command (the rest of the line) using shell
#
# These lines can be re-ordered; they are executed from top to bottom.
#
# If you remove a line here THAT COMMIT WILL BE LOST.
#
# However, if you remove everything, the rebase will be aborted.
#
# Note that empty commits are commented out
Breaking this information, from top to bottom, we see that:
- Sixteen commits are listed, which indicates that there were sixteen changes between our starting point and our current branch state.
- The commits you chose to rebase are sorted in the order of the oldest changes (at the top) to the newest changes (at the bottom).
- Each line lists a command (by default, pick), the commit hash, and the commit message. The entire git rebase procedure centers around your manipulation of these three columns. The changes you make are rebased onto your repository.
- After the commits, Git tells you the range of commits we’re working with (6272a7b..054d243).
- Finally, Git gives some help by telling you the commands that are available to you when rebasing commits.
We can now change the first word of any of the sixteen lines to apply any of the six available rebasing commands: pick, reword, edit, squash, fixup and exec. You can also remove any of the lines (so that commit will be lost) or reorder to change the order of the commits.
Once we’re done editing this file with our desired commands for each commit, we save it and close it. Then Git will automatically process each commit, starting with the oldest, carrying out our instructions at each step.
- No extra input is needed for commits marked pick or fixup
- Commits marked reword or squash will cause the rebase process to pause, opening a text editor where you can update the commit message as appropriate. The rebase automatically continues when this text file is saved and closed.
- Commits marked edit will also pause the rebase process, temporarily reverting control back to the terminal. In this case, we make whatever changes are required at this state of the code. Changes can be added and used to create new commits as normal, and/or merged into the current pre-existing commit using:
git commit --amend
After any necessary changes have been committed, rebasing can continue by calling the command:
git rebase --continue
If we make a mistake while editing a commit, we can always undo the whole process using:
git rebase --abort
When the rebase process completes, we should see the following message in the command line:
$ Successfully rebased and updated refs/heads/master.
At this point, if we are happy with the rebase we should push the changes back to our remote branch:
git push origin +HEAD
Note that the “+HEAD” in this command tells git to overwrite the remote branch, similar to a force push.
If we are not happy with the state after our rebase, we can reset our local branch using:
git reset --hard $(git rev-parse --abbrev-ref --symbolic-full-name @{u})
Closing pull request
Once all the developers involved in the conversation are satisfied with the state of the branch, the person in charge of the repository will merge and close the pull the request:

See also
This tutorial has been written using the following references: