 Teaser of what DenoiSeg can compute on your data.
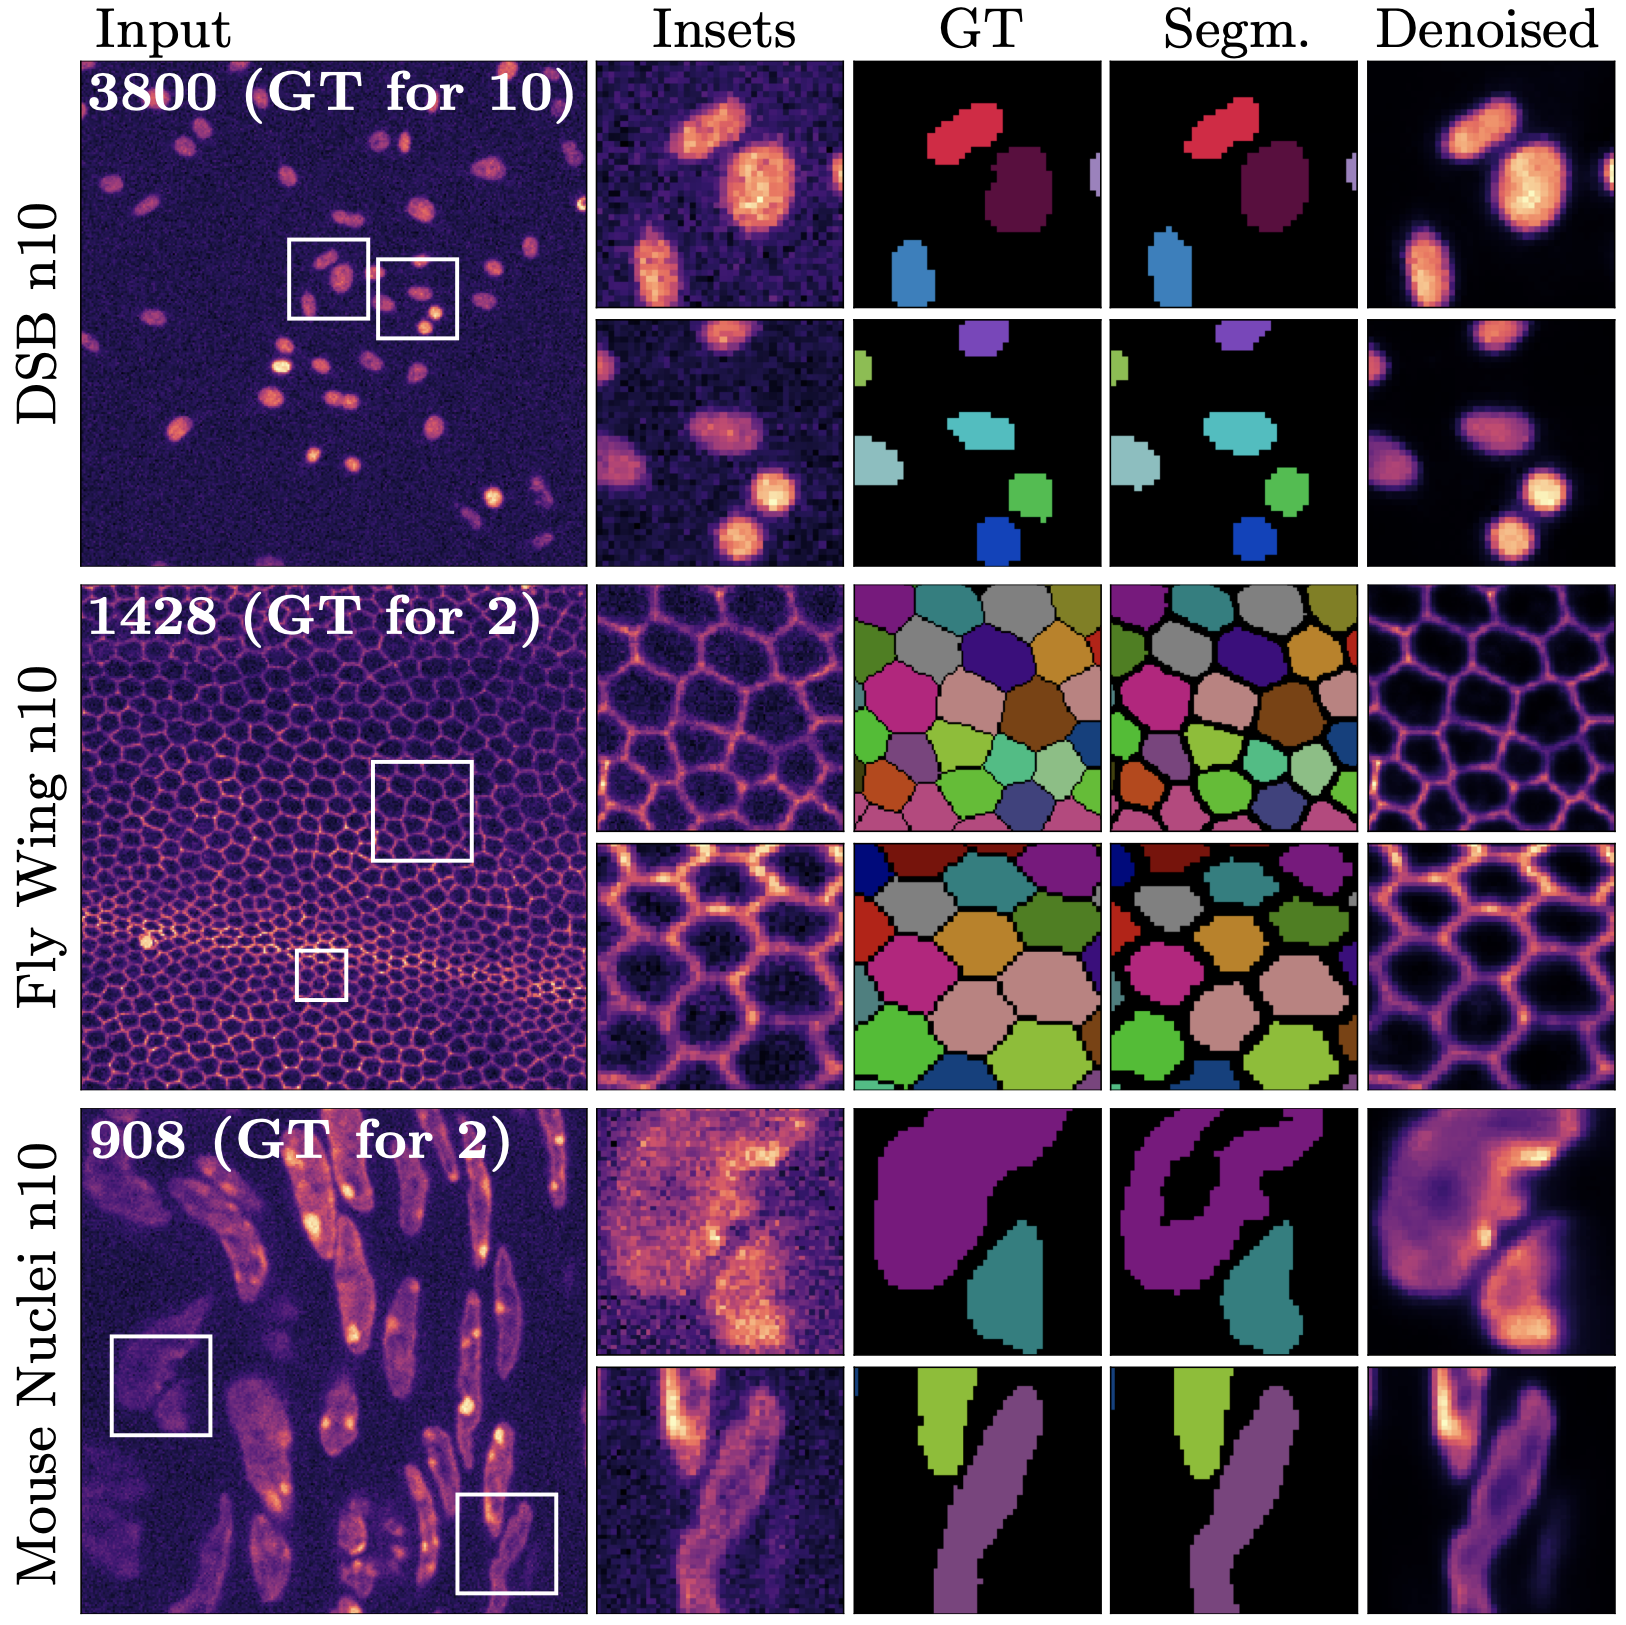
DenoiSeg is a neural network based algorithm for instance segmentation. The interesting thing about DenoiSeg is, that - although primarily meant for segmentation - the algorithm also learns to denoise your images. The knowledge acquired by denoising the images, improves the segmentation results. DenoiSeg can solve hard segmentation tasks, just like other neural network bases algorithms. But it requires less training data, you only need to manually generate segmentation for about 2 to 10 images. (Other methods usually require much manual segmentations for at least 50 image.)
This website describes the DenoiSeg Fiji Plugin. Which makes it very easy to use DenoiSeg. All you need is your images, manually generated segmentations for a few of them, a computer with a NVIDIA graphics card and Fiji installed.
Segmenting your data with DenoiSeg requires 3 steps:
- Create manual segmentations for few of your images. (This might take around 8 h of manual work.)
- Train the neural network. The result is a trained neural network, which is called: model. (Training keeps your computer busy for around 12 h. This can be done over night, as you don’t need do anything.)
- Prediction: Use the train model to segment as much images as you want. This step is much faster, just 1 second per image.
This Fiji plugin is part of CSBDeep, a collection of neural network algorithm in Fiji. For more information about our open source implementation , examples and images, click here.
Publication: DenoiSeg - Joint Denoising and Segmentation
Abstract
Microscopy image analysis often requires the segmentation of objects, but training data for this task is typically scarce and hard to obtain. Here we propose DenoiSeg, a new method that can be trained end-to-end on only a few annotated ground truth segmentations. We achieve this by extending Noise2Void, a self-supervised denoising scheme that can be trained on noisy images alone, to also predict dense 3-class segmentations. The reason for the success of our method is that segmentation can profit from denoising, especially when performed jointly within the same network. The network becomes a denoising expert by seeing all available raw data, while co-learning to segment, even if only a few segmentation labels are available. This hypothesis is additionally fueled by our observation that the best segmentation results on high quality (very low noise) raw data are obtained when moderate amounts of synthetic noise are added. This renders the denoising-task non-trivial and unleashes the desired co-learning effect. We believe that DenoiSeg offers a viable way to circumvent the tremendous hunger for high quality training data and effectively enables few-shot learning of dense segmentations.
Installation
The DenoiSeg Fiji Plugin is part of the CSBDeep update site. Look here, for detailed instructions on how to install an update site. Or just follow these steps:
- Start ImageJ / Fiji
- Open the updater via
Help > Update... - Click on
Manage update sites - Select the
CSBDeepupdate site - Click on
Apply changes - (optional) read this page for GPU support
- Restart ImageJ / Fiji
You should now have access to these plugins:
Usage
Training
Read this page for how to get GPU support. With out a GPU the training will take ages.
Prepare your data
- create two folders for training and two folders for validation, name them e.g.
X_train,Y_train,X_val, andY_val - Put noisy images into
X_train, the more the better - Label some of them carefully - the more the better, but a handful labelings of high quality can be sufficient as well. Each labeling should be zero where there is background and the same integer number for each pixel of the same object.
- Put the labels into
Y_train- each labeling file needs to have the same name as the matching raw data inX_train - Do the same for
X_valandY_val. Aim for having about 10% validation data and 90% training data. If in doubt, use more data for training.
Example data
If you just want to test the Fiji plugin you may use this data. It was used to create the screenshots below.
Please note: You may not use this training data to segment your images. You need to prepare your own training data to get good results for your images.
Train plugin
 N2V train parameters
- Start ImageJ / Fiji
- Click on
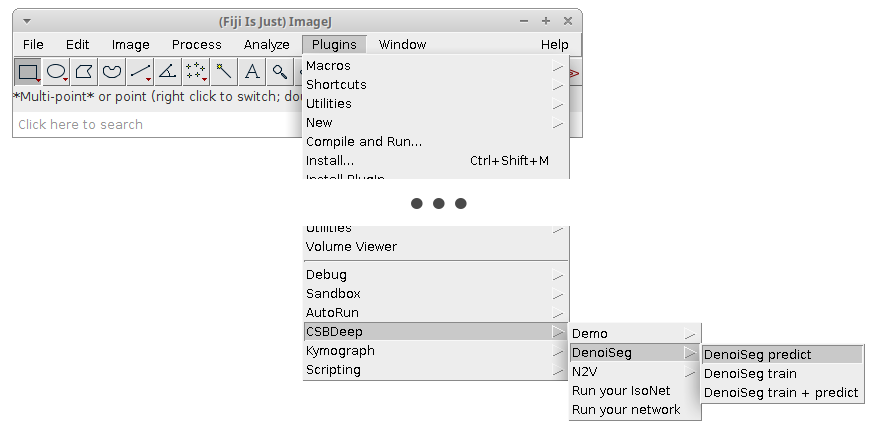
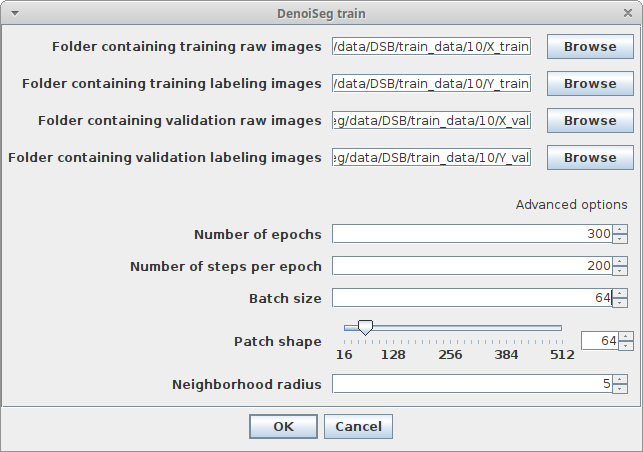
Plugins > CSBDeep > DenoiSeg > DenoiSeg trainand adjust the following parameters:Folder containing training raw imagesChoose the folder we calledX_trainin the above data preparation section. It contains raw noisy data.Folder containing training labeling imagesChoose the folder we calledY_trainin the above data preparation section. It contains some labelings matching the raw noisy data.Folder containing validation raw imagesChoose the folder we calledX_valin the above data preparation section. It contains raw noisy data for judging the quality of the training progress.Folder containing validation labeling imagesChoose the folder we calledY_valin the above data preparation section. It contains some labelings matching the raw noisy validation data.Number of epochsHow many epochs should be performed during trainingNumber of steps per epochHow many steps per epoch should be performedBatch size per stepHow many tiles are batch processed by the network per training stepPatch shapeThe length of X, Y (and Z) of one training patch (needs to be a multiple of 16)Neighborhood radiusN2V specific parameter describing the distance of the neighbor pixel replacing the center pixel
- Click
Ok - Look below at the What happens during and after training section for what happens next
Train & predict plugin (one-click solution)
 N2V train & predict parameters
- Start ImageJ / Fiji
- Open a noisy image you want to denoise and segment directly after training
- Click on
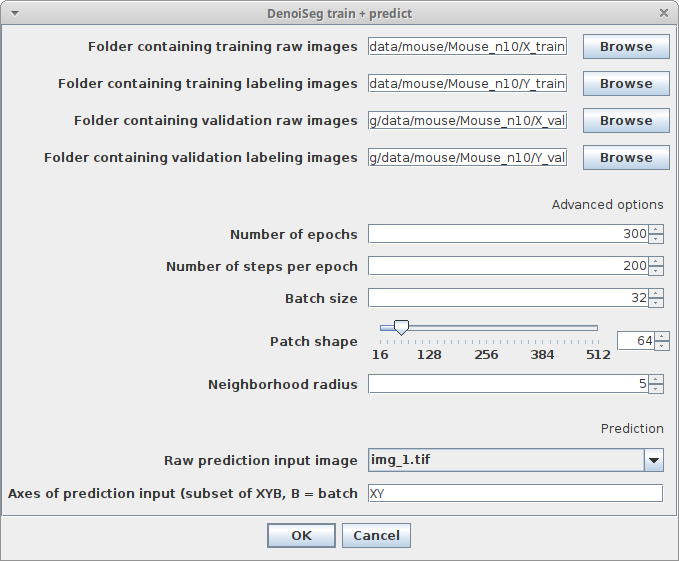
Plugins > CSBDeep > DenoiSeg > DenoiSeg train & predictand adjust the following parameters:Raw prediction input imageChoose the image which should be denoised and segmented after trainingAxes of prediction inputThis parameter helps to figure out how your input data is organized. It’s a string with one letter per dimension of the input image. For 2D images, this should beXY. If your data has another axis which should be batch processed, set this parameter toXYB- Regarding the other parameters please have a look at the descriptions in Train plugin
- Click
Ok - Look below at the What happens during and after training section for what happens next
What happens during and after training
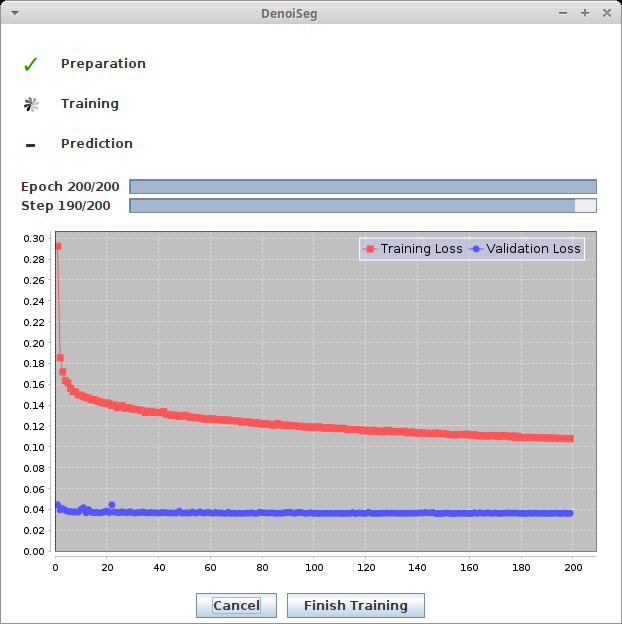 DenoiSeg training progress window
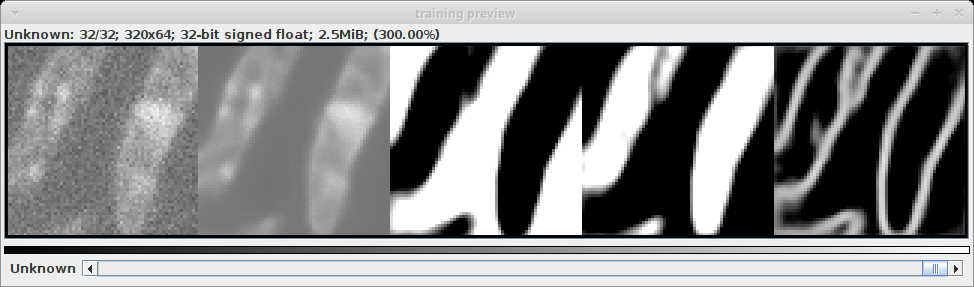 N2V training preview window
During training, you will see two windows:
- The progress window keeps you updated of the steps the training process is going through. It also plots the current training and validation loss.
- The preview window is generated from the first validation batch. It is split into five parts.
- the original noisy data
- the predicted denoised image
- the predicted probability if each pixel being on the background
- the predicted probability if each pixel being on the foreground
- the predicted probability if each pixel being on the border
After training, two additional windows should appear. They represent two trained models. One is the model from the epoch with the lowest validation loss, the other one the model from the last epoch step. For DenoiSeg, using the model from the last epoch is almost always recommended. The windows will look similar to this:
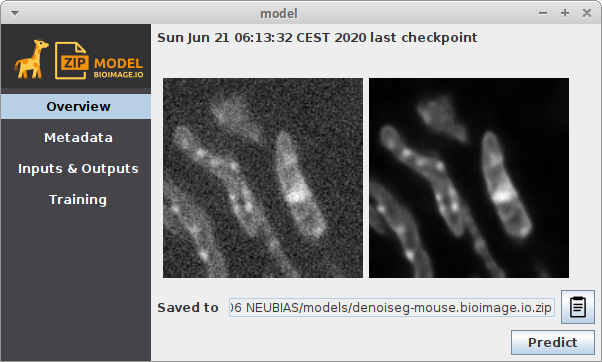
They are stored to a temporary location which you can see in the Overview section of the model window under Saved to...
Copy the model from there to another permanent destination on your disk if you want to keep this trained model.
Prediction
There are two ways to predict from a trained model. For both cases, the resulting image will consist of four channels:
- the denoised image
- the probability of each pixel being on the background
- the probability of each pixel being on the foreground
- the probability of each pixel being on the border
The user currently has to use these probabilities to compute the segmentation themself. In the future, further postprocessing steps will be available to automatically compute segmentations based on the output of the trained model.
You can open the model directly: <div class="thumbnail" >
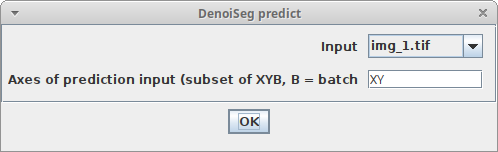 DenoiSeg prediction from model parameters
</div>
DenoiSeg prediction from model parameters
</div>
- Start Fiji
- Open an image you want to denoise and segment and for which you have a pretrained model available as ZIP file
- Click
Import > bioimage.io.zipand choose your trained model. The model will open in a window as depicted above - Click
Predictin the model window and adjust the following parameters:InputThe image you want to denoiseAxes of prediction inputThis parameter helps to figure out how your input data is organized. It’s a string with one letter per dimension of the input image. For 2D images, this should beXY. If your data has another axis which should be batch processed, set this parameter toXYB
Alternatively, you can use the DenoiSeg menu: <div class="thumbnail" >
 DenoiSeg prediction parameters
</div>
DenoiSeg prediction parameters
</div>
- Start Fiji
- Open an image you want to denoise and for which you have a pretrained model available as ZIP file
- Click
Plugins > DenoiSeg > DenoiSeg predictand adjust the parameters as described above, with this addition:Trained model fileThe ZIP file containing the pretrained model (it should end with.bioimage.io.zip)
Exporting trained models from Python to ImageJ / Fiji
It’s possible to train a DenoiSeg neural network using Python. The required code and instructions can be found here. The model that has been trained in Python, can be used in Fiji as well:
- In Python, run this at the end of your training:
mode.export_TF(). - Locate the exported model file
- Proceed as described in Prediction
Creating labelings for the training
There are many possibilities for how to create labelings. But since we get this question a lot, here is how we do it:
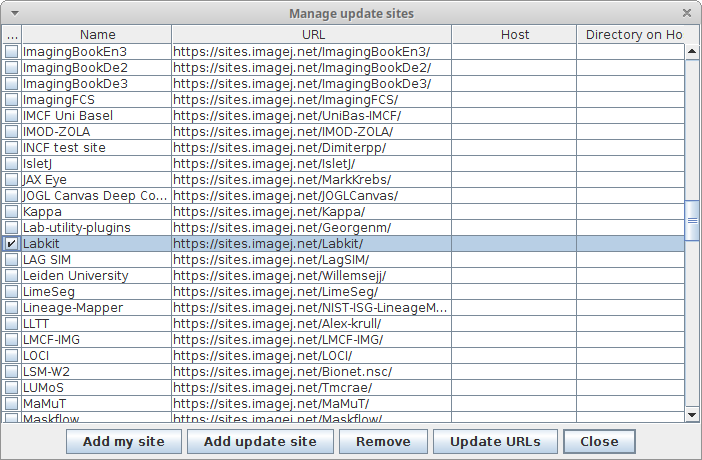 Update site Labkit
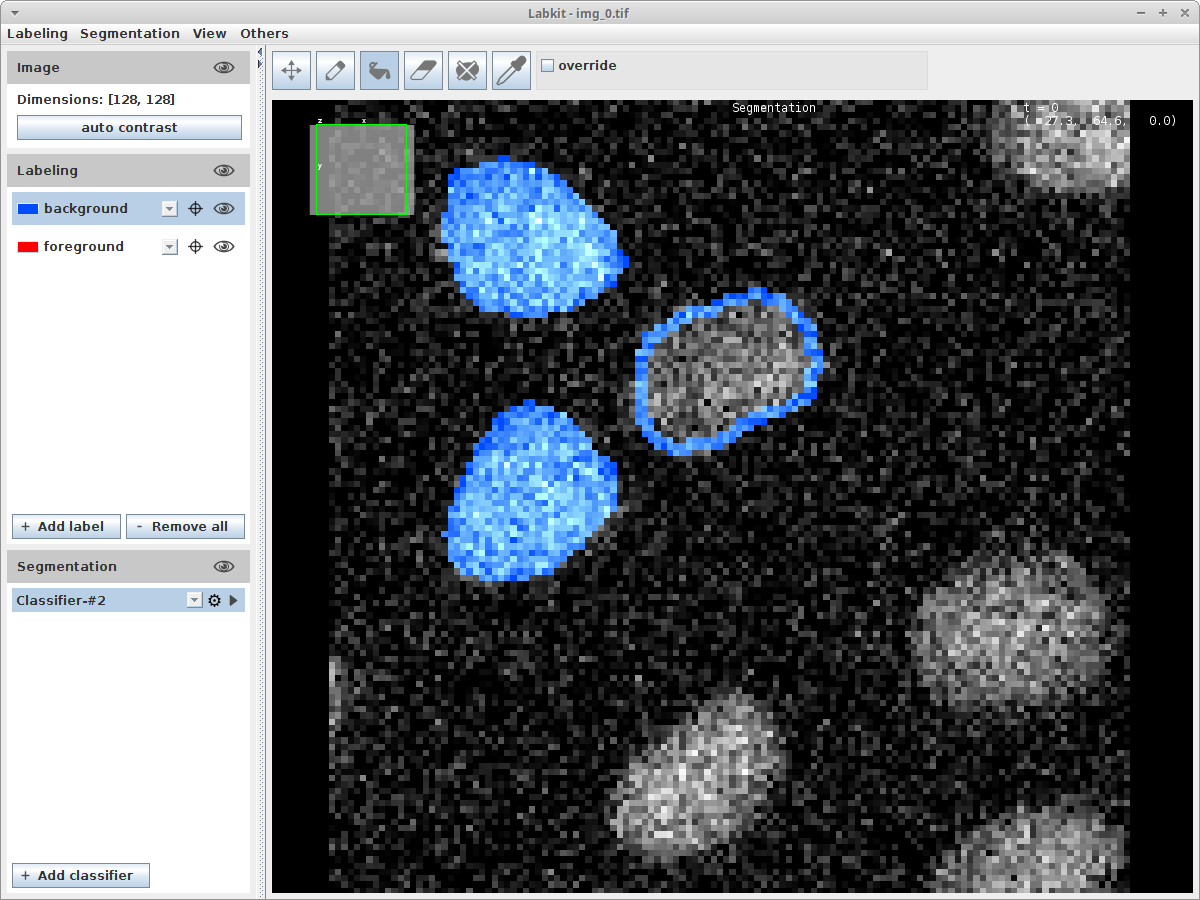 Labkit
 3D Objects counter options
- Install the Labkit update site via
Help > Update..., clicking onManage update sites, and selectingLabkit - Restart Fiji
- Open the image you want to label
- Click
Plugins > Segmentation > Labkit - Carefully label your data. Use e.g. the pencil tool to outline your labelings and the bucket tool to fill the outlines.
- Export the mask by clicking the meny item
Labeling > Show Labeling in ImageJ - Convert the exported mask (with zero for background and one for foreground into an indexed labelimage
- Click
Analyze > 3D Objects Counter - Make sure to deselect
Exclude objects on edges - Save the displayed labeling to disk
- Click