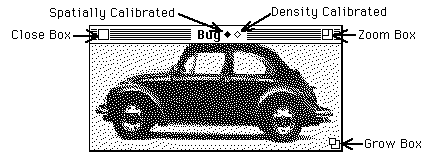
Click in the Zoom Box to switch the window to "Scale to Fit Window" mode and make it as large as possible, while still maintaining the same aspect ratio. Restore the window to its original size by clicking again in the Zoom Box, or by using the Unzoom command. Note that the magnifying glass and the grabber tools do not work in Scale to Fit mode.
The Grow Box is used for resizing the window. In Scale to Fit mode, the image will be rescaled to fit any resized window. For magnified images, you can use the Grow Box to make the window larger than its original size.
A black diamond is displayed in the title bar of spatially calibrated images and a white diamond if the image is density calibrated.
Map
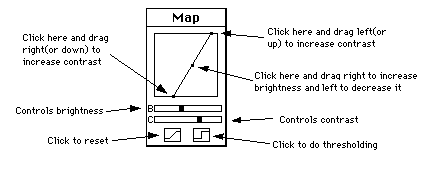
Use the Map window to optimize the brightness and contrast of images by modifying the video look-up table. To vary brightness, click and drag inside the frame. This moves the plot (a piece-wise linear transformation function) horizontally, changing the Y-intercept while maintaining a fixed slope. Brightness can also be altered using the 'B' slide control. To change contrast, click and drag in the margin to move the two end-points that define the function, or use the 'C' slide control. A good strategy for optimizing the contrast of an image is to click (outside the frame) in the lower left hand corner, than drag horizontally to the right until the image starts to saturate. Similarly, click in the upper right hand corner, and drag horizontally to the left.
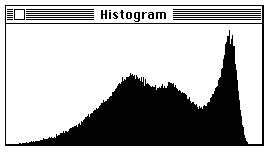
The Histogram window displays the gray value histograms produced by the Show Histogram
command. This function shows, for each of the 256 possible gray values, the number
of pixels within the selection that have that value. The histogram values are dynamically displayed in the Info window whenever the cursor is over the histogram window.
Both the histogram plot and the 256 data values can be copied to the Clipboard (using
Copy) whenever the histogram window is active. The data values can also be saved
to a text file using the Export command. The LUT window displays the contents of the video Look-Up Table (LUT), which Image
uses to transform each of the 256 possible pixels values into one of 16 million possible
screen colors.
Histogram
Another way to display histograms is to use the macro distributed with Image
(in "Plotting Macros") that displays histograms in grayscale or color, where each
of the 256 columns is drawn in the grayscale or color that that column represents.
LUT
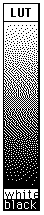
Click in the LUT window with any of the drawing tools to "pick up" a new drawing (foreground)
color. Click with the eraser, or option-click with any other tool, to pick up a new
background color. Select "LUT" in the Save As dialog box to save the look-up table of the current image.
With the LUT tool (the one with double-headed arrow), click and drag near the top
or bottom of a color table to adjust the contrast of the current image. Click and
drag near the center to adjust brightness. To edit a color in a color table, double-click
on it with the eyedropper tool. All 256 entries in the LUT can be rotated by clicking
and dragging with the option key held down.
Paste Control
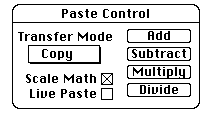
The Paste Control window allows you to control how image selections are pasted, or
to do image arithmetic on pasted images. It is only effective during paste operations.
Use the Transfer Mode
pop-up menu to specify the method (Copy
, And
, Or
, Xor
, Replace
or Blend
) used to copy the image during a paste operation. The Paste Control window is activated
by selecting Paste Control from the Windows menu, or by typing command-y.
In the default Copy
mode, pasting occurs normally. When And
, Or
, or Replace
are selected, the selection is copied to the screen using "And", "Or", or "Replace
with Transparency" modes, respectively, allowing you to see both the object being
pasted and the underlying image. When attempting to align two images, it is usually
easier if one of the images is first converted to binary using Make Binary, Find Edges,
or Dither. Macros are available in the file "More Macros" for rapidly switching among
the different transfer modes.
The foreground color is initially set to black and the background color to white whenever
And
, Or
, or Replace
are selected, but you are can vary the foreground and background colors during the
paste operation by clicking (or option-clicking) in the LUT window. This will produce
some interesting, and possibly useful, effects. Or
mode can be used to color objects in binary images created by Image
or programs such as by SuperPaint and MacDraw. Simply select the object you want
to color, Copy, switch to Or
mode, then select a color by clicking in the LUT window.
Replace
mode replaces the destination pixel with the source pixel if the source pixel isn't
equal to white. Replace
mode is useful for overlaying colored objects with white backgrounds (e.g. text or
plots) onto another image.
In Blend
mode, destination pixels are replaced with the arithmetic average of the source and
destination pixels. It is similar to an Add
operation with Scale Math
checked. Blend
mode, however, works with true color images, and does not terminate the paste operation.
Color images to be blended must have the same color palette.
Clicking on Add
, Subtract
, Multiply
or Divide
causes the specified image arithmetic operation to be performed and terminates the
paste operation. For example, clicking on Subtract
subtracts the selection being pasted from the current window. If Scale Math
is checked, arithmetic operations are done in two passes. In the first pass, Image
determines the minimum and maximum gray levels that would result from performing
the operation. In the second pass, the image arithmetic is actually performed and
the resulting pixel values scaled to the range of 0 to 255. Results are clipped to
0 and 255 if Scale Math
is not checked. Arithmetic operations are always done on raw pixel values, ignoring
any density calibration that may be in effect. Add
, Subtract
, Multiply
and Divide
only work with rectangular selections.
Subtraction is probably the most useful arithmetic operation. It can be used to subtract
the background (the image with features of interest removed from view) from an image.
It can also be used to detect differences between two images or for motion analysis.
Selecting Live Paste
causes the currently pasted selection to use "live" TV camera input. The selection
must have been copied from the Camera window and pasted into some other window.
Use the arrow keys to "nudge" the selection currently being pasted in any of four
direction by a single pixel. You can get interesting effects, including an embossed
look similar to a bas-relief, by using the arrow keys to offset an image by one pixel,
and then subtracting it from itself. To see how this works, try Select All (command-a),
Copy (command-c), Paste (command-v), down arrow, right arrow, and Subtract
.
Plot
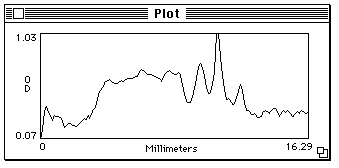
The Plot window is created, or updated, by the density profile tool, the Plot Profile
command, or the Calibrate command. Use the Grow Box in the lower right corner of
the window to make the plot larger (or smaller). The Plot window must be the currently
active window in order to Print or Copy the current plot. To activate the Plot window,
click on it, or select Plot from the Windows menu. When active, the Plot window's
title bar will be highlighted (as show above), and Plot will be checked in the Windows
menu.
The current plot can be copied to the Clipboard using the Copy command. Once on the
Clipboard, the plot can be pasted into an image window, or into another application.
The plot is copied to the Clipboard in both graphic and text formats. The Graphic
form will be used if you paste into a program that deals primarily with graphics, such
as MacDraw. The text form (i.e. the pixel values) will be used if you paste into
a program that is text oriented, such as Excel.
Whenever the cursor is over the Plot window, X (the pixel location) and Y (the pixel
value) coordinate values are continuously displayed in the Info window. In the case
of calibration plots, X is the uncalibrated pixel value (in the range 0-255) and
Y is the calibrated value. For straight line selections, holding down the mouse button in
the plot window causes a cross hair cursor to appear in the corresponding part of
the image.
Several aspects of profile plots, such as y-axis scaling and plot size, can be changed
using the Profile Plot Options command.
Info
The Info window displays the current cursor position and value, measurement results,
and status messages. The values displayed at top of the window (e.g. X
, Y
and Value
) are dynamically updated and have different meanings depending on which window the
cursor is in.
Image Window -
X and Y are the current cursor coordinates, where the origin is at the lower left-hand
corner and positive X
is to the right and positive Y
is up. (Note, you can change the origin to the upper left using the Preferences command.)
Value
is the gray value of the pixel at the current X-Y coordinates. Gray values range
from 0 (white) to 255 (black). For density calibrated images, Value
is the calibrated pixel value and the gray value is shown in parenthesis. In the
case of color images, Value
is the index used by the color look-up table.
FFT Window - If the mouse is over an active frequency domain (FFT) window, its location is displayed in polar coordinates. The angle is expressed in degrees, while the radius is expressed in either pixels per cycle (p/c) or, if a spatial scale calibration has been made using Set Scale, in [units] per cycle (e.g. mm/c).
LUT Window -
Index
is the look-up table index at the cursor location. RGB
are the associated red, green, and blue brightness values in the look-up table. You
can use this information to help you set the foreground or background grayscale,
or color, to a specific grayscale value or index. When using the LUT tool, Lower
and Upper
are the lower and upper LUT indexes of the current grayscale or color look-up table.
Map Window -
When manipulating the Map, Lower
and Upper
are the lower and upper LUT indexes of the current grayscale or color look-up table.
Histogram Window -
X
is the current x-axis (grayscale) value and Y
is the number of pixels in the selection which have that value.
Plot Window -
X
is the pixel location and Y is the corresponding plot y value. For calibration plots,
X
is the uncalibrated pixel value (in the range 0-255) and Y
is the calibrated value.