
If you check Open All
, select an image, and then click on the Open button, Image
will open all the images in that folder, not just the one selected.
Use this command to read image files created by non-Macintosh based systems, to display
spreadsheet data (text) as an image, or to import raw color look-up tables. It presents
the following dialog box that allows you to select the type of file to be imported.
Select TIFF
to open 8 and 16-bit TIFF files imported from other systems, such as an IBM PC. Once
a 16-bit TIFF file has been imported, you can use Rescale (a k a Revert to Saved)
to find the optimum 16-bit to 8-bit mapping. 16-bit TIFF files that represent white
as zero open inverted.
Closes the currently active image, text, Plot, or Histogram window, i.e., the one
with the highlighted title bar. Hold down the option key to close all currently open
image windows. Typing option-command-w or option-clicking in the close box of an
image window will also close all the image windows.
TIFF
Raw Pixel Data
Open
Use the Open command to load and display images (in TIFF, PICT, PICS and MacPaint
format), text files, color look-up tables (LUTs) or region of interest outlines.
The following file types are supported:
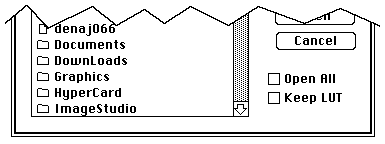
Check Keep LUT
if you want the image to be displayed using the current video look-up table, rather
than the one saved with the image. This feature can be used to combine PICT files
with different palettes into a montage. When the PICT file is opened, and the image
and screen LUTs are different, the pixel values are remapped to make the colors consistent.
Import
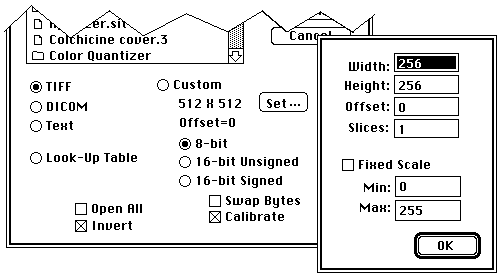
Select DICOM
to import 16-bit files in the DICOM-3 (Digital Imaging and Communications in Medicine)
and ACR-NEMA formats used in radiology. A DICOM dictionary is required to decode
the DICOM or ACR-NEMA header. This dictionary is available from rsbweb.nih.gov,
in the /pub/nih-image/documents directory. It must be located in the same folder as NIH
Image or in the System folder. When opening a DICOM file, hold the option key down
to get a full header dump. When using the "Open All" option, hold the shift key down
to fix 16-bit to 8-bit scaling. NIH Image's DICOM reader was written by Jim Nash, www.SynergyResearch.com.
Select Text
to import a two-dimensional array of numbers stored in tab-delimeted text format,
for example, a spreadsheet saved as "Text Only". Values do not have to be in the
range 0-255, and may be in decimal or scientific format. By reading in the text file
twice, image
is able to determine the number of rows and columns, and to scale to 8-bits (1-254).
Blank cells are assumed to have a value of zero. If Fixed Scale
is checked then automatic scaling is disabled, values are scaled to 8-bits from the
range Min-Max,
values less than Min
are set to Min,
and values greater than Max
are set to Max
.
Select Look-Up Table
to import a 768 byte binary LUT consisting of 256 consecutive red values, 256 consecutive
green values, and 256 consecutive blue values. The values should be in the range
0-255.
Select Custom
to open other types of 8-bit and 16-bit binary images. Width
is the width of the image in pixels and Height
is the number of lines in the image. For 16-bit images, the maximum value that can
be entered for Width
is 4096. Offset
specifies the number of bytes Image
will skip before it starts reading the pixel data. For example, use an offset of
512 to skip over a 512 byte file header. Set Slices
to more than one to import 3D data sets such as multi-slice volumes from medical
scanners
Image
computes the minimum and maximum pixel values of 16-bit images and uses this information
to linearly scale to 8-bits (1-254). Check Swap Bytes
when importing 16-bit images from "little-endian" systems, such as an IBM-PC or VAX.
If Calibrate
is checked Image
automatically sets up a linear density calibration function to provide an approximation
of the original 16-bit pixel values. The approximated values should not vary from
the original 16-bit values by more than (Max-Min)/254, where Min and Max are the
minimum and maximum 16-bit values. If Fixed Scale
is checked then automatic scaling is disabled and the 16-bit data is linearly scaled
from Min
-Max
to 1-254.
You can redo the 16-bit to 8-bit scaling at any time using the Rescale command. Note that the Calibrate feature is disabled when importing a 16-bit stack and Fixed Scale is not checked.
Use the Import command to scale 16-bit images from medical scanners to the 8 bit
format required by Image
. For example, to import raw MRI scans from a GE SIGNA scanner, set width
and height
to 256, select 16-bit Signed
, and set Offset
to 14336. The macro "Import GE Signa Files" (in the file Stacks) will automatically
import a series of raw GE SIGNA files.
Check Open All
to import all of the images in a folder. The images must all have the same width,
height, etc. Open All
does not work with imported text files and look-up tables.
Check Invert
to invert imported 8-bit images.
Close
Save
Resaves the currently active image or text window to disk. You will be prompted for
a name in the case of an image newly created using New, Duplicate or Start Capturing.
Files are resaved in their original format. In other words, TIFF files are resaved
in TIFF format, and PICT files are resaved in PICT format.
Hold down the option key (notice how Save changes to Save All) to save all currently
open image windows.
Save As
Allows you to saves the currently active image (or rectangular selection) in TIFF,
PICT or MacPaint) format, to save a stack in TIFF or PICS format, or to save the
current look-up table, selection outline, or text window.
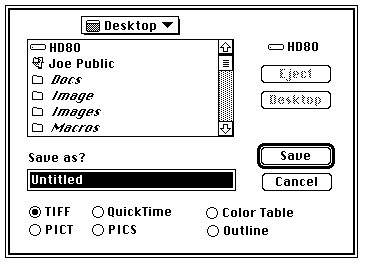
Saves the currently active image or stack to a file in uncompressed 8-bit TIFF format.
You will be asked to enter a name for the new file. The menu command changes to Save
Selection As if a rectangular selection is active, allowing you to save a subsection of the image. Note that the ability to save selections does not work for stacks,
but there are macros available to get around this limitation. TIFF is the default
file format in Image,
and is usually the best format for saving digitized or scanned images.
PICT
Saves the currently active image to a PICT file. PICT files can be exported to many
other Mac programs, including Canvas, Photoshop, SuperPaint and MacDraw. Because
they are compressed, PICT files also have the advantage of being more compact if
the image contains large homogeneous regions, which is typical of computer generated images.
Unfortunately, the run length compression scheme used with PICT files is ineffective
with most scanned images.
You should avoid PICT files if you are doing quantitative image analysis. The Mac
imaging model is most concerned with the color of each pixel, and does not care so
much about the actual pixel value. Thus PICT files cannot guarantee that
the pixel values remain fixed. TIFF is a machine and system independent
image standard that avoids this problem.
QuickTime
Saves the currently active stack to disk as a QuickTime movie. A dialog box allows you to select the compression scheme and image quality level.
PICS
Saves the currently active stack to disk in PICS format, a file format supported by
many Mac animation programs. PICS files are compressed using the same run length
encoding scheme used for PICT files. Stacks containing areas of uniform color or
gray value saved in PICS format will be smaller than stacks saved in TIFF format. Use the "Movie
Player" utility that comes with QuickTime to convert PICS files into QuickTime movies.
Note that the stack's spatial and density calibration data are not saved as part of the PICS file.
Color Table
Saves the current look-up table (LUT) as a separate file.
Outline
Saves the X-Y coordinates of the current selection outline. X-Y coordinates of curved
line selections, and selections that have been edited, cannot be saved.
Export
Exports images, look-up tables, measurement results, density profile plot values,
or histogram values to disk for use with programs other than Image.
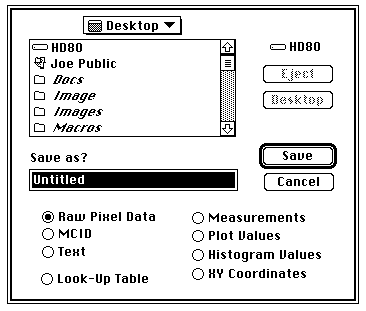
Exports the current image (or selection) as binary pixel data, in row order, one byte
per pixel, without a header.
MCID
Exports the current image (or selection) as an MCID file. MCID files have the same
format as raw pixel data files, but are preceded by a four byte header which contains
the width (minus one) and height (minus one), stored as two 16-bit numbers in Intel
byte order.
Text
Exports the current image (or rectangular selection) as a tab-delimited, spreadsheet
compatible text file consisting of uncalibrated pixel values.
Look-Up Table
Saves the current video Look-Up Table (LUT) as a 768 byte binary file consisting of
256 red values, 256 green values, and 256 blue values.
Measurements
Exports the current measurements to a tab-delimited text file compatible with spreadsheet
and statistical analysis programs. Use the Analyze/Options dialog box to specify
which measurements are recorded and/or exported. This option is also used to export
angle measurements made with the angle tool, and X-Y coordinate measurements made with
the cross hair tool. Measurements can also be exported by copying them to the Clipboard.
Plot Values
Exports the data values representing the most recent density profile to a text file.
If you have just used the Calibrate command to do density calibration, and are viewing
the density calibration plot, then this option exports the 256 Y-values of the current calibration plot.
Histogram Values
Exports the 256 gray level counts from the most recent histogram to a text file.
X-Y Coordinates
Exports the X-Y coordinates of the current selection outline as a two column, tab-delimited
text file. X-Y coordinates of rectangular and oval selections, and selections that
have been edited, can not be exported.
Record Preferences
Saves the current state of the following Image
program parameters:
Settings are saved in a file named 'Image Prefs'
in the Preferences folder inside the System folder. You can revert to the default
settings be deleting copies of this file in either the System or Preferences folders
and restarting Image.
You can startup Image with customized settings by double-clicking on a copy of 'Image Prefs'. In this case, Image will use the settings in the copy. Note, however, that Record Preferences always saves the settings in the Preferences folder.
Revert to Saved
Reverts to the most recently saved version of the current image, effectively undoing
all changes made since the last Save command. Reverting does not currently work with
stacks or imported text files. For imported 16-bit images, this command changes to
Rescale, described below.
Rescale
Replaces Revert to Saved whenever an imported 16-bit image or imported 16-bit TIFF
file is active. This command linearly scales the 16-bit data (on disk) from the range
Min
-Max
to 1-254, where Min
and Max
are determined by using the controls in the Map window or by using the LUT tool.
16-bit pixels with values less than Min
are set to 1 and 16-bit pixels with values greater than Max
are set to 254. The image's absolute minimum and maximum pixel values are used if
the LUT has not been altered.
The Highlight Saturated Pixels
option in the Preferences dialog box can be used determine locations within the image
where density measurements may be invalid do to clipping at Min
or Max
. It causes pixels that were less than or equal to Min
to be displayed in yellow and pixels that were greater than or equal to Max
to be displayed in red.
Duplicate
Creates a new window displaying a copy of the current image, or of the current selection
if only part of the image is selected. The newly created image inherits the look-up
table, plus any spatial or density calibration, of the image being duplicated.
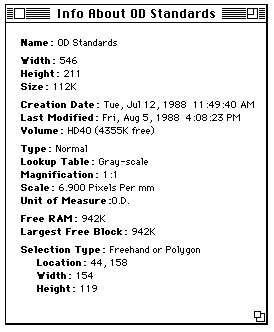
Get Info
Displays an image window, such as the one below, giving information about the currently
active image and about the status of the system.
Acquire
Use this sub-menu to access Photoshop compatible acquisition plug-ins. The plug-ins
must be stored in a folder named "Plug-ins" located either in the same folder as
Image
or in the System Folder. Using plug-ins, Image
can acquire 8-bit grayscale, 8-bit indexed color, and 24-bit color images. 24-bit
color images are stored in three slice stacks and displayed using 8-bit indexed color,
similar to the way the Capture Color command works. Several of the plug-in listed
below, including "Plug-in Digitizer" for use with the AV Macs, are available by anonymous
FTP from rsbweb.nih.gov, in the /pub/nih-image/plug-ins directory.
The following plug-ins have been reported to work with Image
:
Export
Use this sub-menu to access Photoshop compatible export plug-ins. Export plug-ins
must be stored in a folder named "Plug-ins" located either in the same folder as
Image
or in the System Folder. Two export plug-ins have been successfully tested with Image
: a plug-in that supports the Scion TV-3 video output card (used to drive a video
printer) and the PhaserPrint plug-in for the Tektronix Phaser IIsd dye sublimation
printer.
Page Setup
Lets you specify printing orientation (portrait or landscape) and scale (25% to 400%).
The quality of density profile and calibration plots will be better if you leave
the scale set at 100% and enlarge the plot window before printing the plot. Hold
down the option key while selecting Page Setup to display a dialog box offering several custom
grayscale halftoning options.
Print
Print images, text, plots, histograms, and measurement results. What gets printed
is determined by which window is currently active. The print command changes (e.g.,
Print Image
,
Print Plot
, etc.) depending on what kind of window is currently active.
Print Image
- Prints the currently active image. Images larger than the printer page (normally
552 x 730 pixels) are automatically scaled to fit the page.
Print Plot
- Prints the current density profile or calibration plot. The size of the printed
plot is proportional to the size of the plot window, which can be made larger using
the "grow box" in the lower right corner.
Print Histogram
- Prints the contents of the histogram window.
Print Measurements
- Prints the results of measurements made with the Measure command, or with the angle
or the cross hair tools. This option is enabled whenever you have recorded one or
more measurements and either the Info or Results window is active.
Print Text
- Prints the contents of the current text window. Text is always printed using 9-point
Monaco.
Quit
Closes all image windows after asking, in each case, whether changes made during the
session should be saved, then quits to the Finder. If measurements have been made,
but not saved, a dialog box will be displayed notifying you of that fact.
[Next]
[Contents]
[Home]