Trainable Segmentation Plugin (deprecated)
DEPRECATION NOTICE: This page describes the Trainable Segmentation plugin, the previous incarnation of the Trainable Weka Segmentation plugin and library. We encourage users and developers to work with the more advanced and properly maintained Trainable Weka Segmentation instead.
| Trainable Segmentation (Fiji) | |
|---|---|
| Author | Verena Kaynig, Ignacio Arganda-Carreras, Albert Cardona |
| Maintainer | Verena Kaynig and Ignacio Arganda-Carreras |
| Source | on GitHub |
| Initial release | March 16th, 2010 |
| Latest version | January 6th, 2012 |
| Development status | deprecated |
| Category | Segmentation |
Contents
User Manual
This manual shows you how to use the deprecated Trainable Segmentation plugin. Trainable means that you have to draw some examples of at least 2 different things you want to differentiate in the image and then a classifier is trained by your examples and segments the rest of the image. Afterwards you can also apply the trained classifier to other images or stacks.
The plugin can be found in the Fiji menu under Plugins › Segmentation › deprecated › Trainable Segmentation.
Chose training image
First, you have to choose the image you want to train on.
Now open the plugin ( Plugins › Segmentation › deprecated › Trainable Segmentation). It opens a training window that contains the training image.
Make example annotations
Next, we have to teach the plugin what a membrane in the image looks like. So we select pixels from a membrane using the freeline tool.
Now push the "Add to class 2" button. The selected trace will turn green, showing that it is been selected as a representative example of class 2.
For training it is also important what a membrane does not look like. So we select some other pixels and push the "Add to class 1" button.
Train the classifier
Now it is time to train the classifier and look at the result, so we push the "Train classifier" button on the left side. After training the plugin will automatically classify all pixels from the training image and present the result in a color overlay. This overlay can be switched on and off with the "Toggle overlay" button.
Refine the training
Looking at the classification result there are some cases that are harder to classify than others. We add more annotations to help the classifier correct these cases. This is done by adding examples and then pushing the train classifier button in between to see how the result changes. If you want to delete an example trace, select the trace in the right list (it turns to yellow in the training image) and then double click on it. Here are some examples of what the annoations can look like:
And here is the corresponding classification result:
Apply the trained classifier to other images
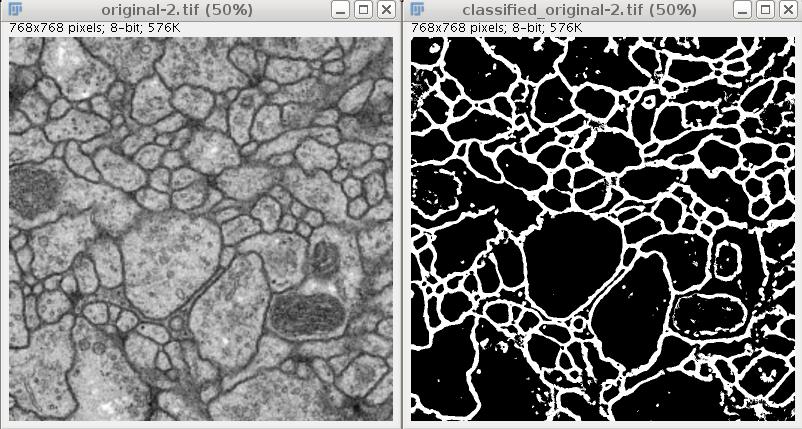
If you want a binary image of this result you can use the "Create result" button and a new window with the classification image will open.
The other option is to apply the trained classifier to other images or stacks. For this we click the "Apply classifier" button. A dialog opens asking for the image or stack that should be classified using the current trained classifier. Depending on the size of this image or stack, the classification can take some time. When it is finished you see the image/stack the classifier was applied to and the result in new windows. These images can now be saved or further processed.
Tips
- You can use the save data and load data buttons to save the annotated examples. When you then open a new training image you can also load annotations from the former image and now add new examples on the new image. The classifier will be trained on the loaded and the currently annotated examples.
- Use a small image for training, as the classification of the whole image is taking some time. Training on the small image will limit your waiting time.
- At the moment the plugin is aimed for gray value images that are hard to segment with a threshold alone. When you have color images you might want to look at the SIOX plugin to segment them.
Have fun!
Troubleshooting
Common problems and solutions:
- I don't find the plugin in my Fiji menus!: Don't worry, depending on your Fiji release, the updater may not offer you this plugin automatically. Just go to Help › Update Fiji, then click on "Advanced mode", and on the "View Options" box, select "View uninstalled plugins only". Then the Trainable Segmentation plugin should appear and you should be able to install it.

