Online Manual for the
MBF-ImageJ collection

2.
Importing Image Files
ImageJ primarily uses TIFF as the image file format. The menu command “File/Save” will save in TIFF format. The menu command “File/Open” will open TIFF files and import a number of other common file formats (e.g. JPEG, GIF, BMP, PGM, PNG) as well as those detailed below.
Files can be also dragged and dropped to the toolbar to open them.
2.1 Bio-Formats Importer
Many more file formats can be imported via ImageJ plugins. Particular mention needs to go to the LOCI group at University of Wisconsin and their Bio-Formats suite of plugins. These import and exporting a wide number of file formats along with their important metadata. They can be accessed directly via the menu command "File/Import/LOCI Bio-Formats Importer" or indirectly via the "File/Open" menu command which will use the Bio-Formats suite if it needs to.
A short list of the ~40 different
biology related image formats that can be opened using the LOCI Bio-Formats
importer includes formats from Leica, Zeiss, Olympus, Biorad, Media Cybernetics,
Improvision, Nikon, Bitplane and Perkin Elmer.

A full list of the supported file formats can be found on their website http://www.loci.wisc.edu/ome/formats.html.
Drag and dropping an image file
to the ImageJ toolbar will prompt the Bio-Formats plugin to select the
appropriate import function.
You will be prompted with a dialog and your preferences remembered. These are
self explanatory.
Some image file formats are more akin to databases rather than images (e.g. Leica LIF files). In these cases a second dialog will list the images in the 'database' prompting you to select which to open.
2.2 Zeiss LSM Panel
 The LSM
panel plugin duplicates the Zeiss LSM file import function of the LOCI BioFormat
Importer but will also extensively catalogue the LSM metadata. The “*.LSM Import Panel” which is activated by the menu command “File/Import/*.LSM
Panel”.
The LSM
panel plugin duplicates the Zeiss LSM file import function of the LOCI BioFormat
Importer but will also extensively catalogue the LSM metadata. The “*.LSM Import Panel” which is activated by the menu command “File/Import/*.LSM
Panel”.
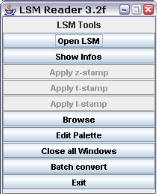
Images are opened as 8-bit colour images with the “no-palette” pseudocolour (!) from the LSM acquisition software. Each channel is imported as a separate image/stack. Lambda stacks are therefore imported as multiple images, not a single stack. They can be converted to a stack with the menu command: “Image/Stacks/Covert Images to stack”.
Once opened, the file information can be accessed and the z/t/lambda information can be irreversibly stamped in to the images or exported to a text file.
2.3 Importing Noran SGI file
Noran movies can be opened in several ways:
“File/Import/Noran movie…
” opens the entire movie as an image stack.
“File/Import/Noran Selection…
” allows you to specify a range of frames to be opened
as a stack.
The Noran SGI plugins are not bundled with the ImageJ package. To receive them, please contact tonyc@uhnresearch.ca or their author, Greg Joss, so he can keep track of users. Greg Joss gjoss AT bio.mq.edu.au is in the Dept of Biology, Macquarie University, Sydney, Australia.
2.4 Importing multiple files from folder
Each time point of an experiment acquired with software such as Perkin Elmer’s UltraVIEW or Scion Image’s time lapse macro is saved by the acquisition software as a single TIF file. The experimental sequence can be imported to ImageJ via the menu command “File/Import/Image Sequence…”.
Locate the directory, click on the first image in the sequence and OK all dialogs. (You may get a couple of error messages while ImageJ tries to open any non-image files in the experimental directory.) The stack will “interleave” the multiple channels you recorded, and can be de-interleaved via “Plugins/Stacks - Shuffling/Deinterleave”.
Selected images that are not the same size can be imported as individual images windows using “File/Import/Selected files to open… ” or as a stack with the “File/Import/Selected files for stack… ”. Unlike the “File/Import/Image Sequence…” function, the images need not be of the same dimensions. If memory is limited, stacks can be opened as Virtual-Stacks with most of the stack remaining on the disk until it is required “File/Import/Disk based stack” .
2.5 Importing Multi-RAW sequence from folder
To form an image, ImageJ needs to know the image dimensions, bit-depth, slice number per file and any extraneous information in the file format (offset and header size). All you really need to tell it is the image dimension in x and y. These values should be obtainable from the software in which the images were acquired. Armed with this information follow these steps:
1. File/Import/Raw…
2. Select experimental directory.
3. Typical values for the dialog box are:
Image type = 16-bit unsigned (or 8 bit typically)
width and height as determined earlier
offset = 0, number of image = 1, gap = 0, ‘white’ is zero = off
‘Little-endian byte order’ = on, ‘open all files in folder’ = on to open all files in folder.
Non-image files will also be opened and may appear as blank images and need deleting: “Image/Stacks/Delete slice”. The stack will “interleave” the multiple channels you recorded, and can be de-interleaved via “Plugins/Stacks - Shuffling/DeInterleave”.
2.6 Importing AVI and MOV files
There are two plugins which can open uncompressed AVIs and some types of MOV file.
For opening (and writing) QuickTime you need a custom installation of QuickTime to include QT for Java (see section 1.3). QuickTime movies are then opened via “File/Import/*.MOV ”.
Uncompressed AVIs can be opened via “File/Import/*.AVI ”.
2.10 Other Import functions
Animated GI F - This plugin opens an animated GIF file as an RGB stack. Also opens single GIF images.