Problem: The image in Figure 1 has low contrast except for the dark particles. When
images are not pre-scaled for display, the contrast and brightness need to be adjusted,
much as on any electron microscope. This can be done in a variety of ways, such as dragging the dots or sliders in the Map window, or invoking the Process - Enhance Contrast
or Process - Equalize
commands. (Note that the Process menu was named Enhance in versions of NIH Image
earlier than 1.56.) Invoke the Enhance Contrast command, which works on the front
image window (there is only one image window activated so far in this session) by
selecting the Enhance Contrast
command from the Process menu and letting up on the mouse. The result is Fig. 2
-- the ordinary linear contrast enhancement, which uses the full available brightness
range (0 - 255) to display the image. Note that when the enhancement was done,
the LUT and Map windows changed also.
Contrast enhancement can also be done by using the mouse to move the B (brightness)
and C (contrast) sliders in the Map window, by moving any of the three dots on the
graph in the Map window, or by selecting the LUT tool and manipulating the color
bar in the LUT window.
A more severe enhancement is performed using the Process - Equalize
command. This can be done immediately (if you have not just used Process - Apply LUT
) because the image pixels are unaffected, and only the look up table is changed.
It is not necessary to revert to the original image (with the Revert To Saved
command). Equalization divides the pixels of the image as evenly as possible among
all the brightness intervals. In other words, each gray level is used to display
about the same number of pixels. This has the effect of bringing out detail in
the background or larger areas of the image, while loosing contrast in the small features
(Fig. 3). Now the thinner particles are evident, the pores of the filter are obvious,
but detail is lost inside the particles. Note from the Map window that this enhancement (for this particular image) can be approximated with linear contrast enhancement
by noting the position of the curve, clicking in the Map window, and then moving
the line to about the same position.


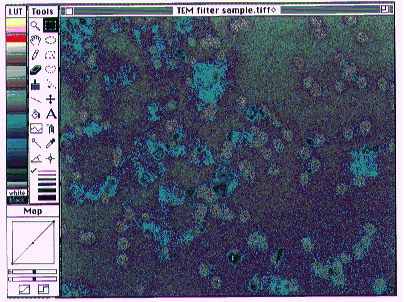
Another enhancement procedure that works well on this image is to take the logarithm of it using the Process - Arithmetic - Log command, then switch to a false color LUT using Options - Color Tables - Fire-1 command. The Log operation does affect the image pixels, which is what is desired because the Fire-1 LUT is applied next to the new values. This LUT is also called a thermal scale (Fig. 5), and is one of the most intuitive false color scales.

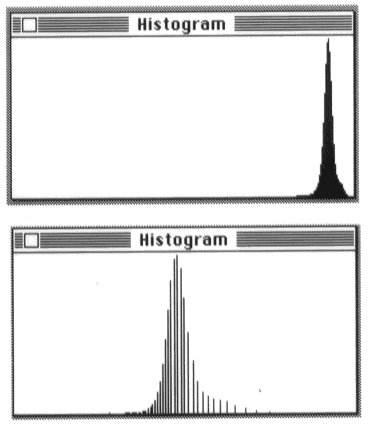
The changes in the pixel values can be seen easily by looking at the histogram before
(Fig. 6a) and after (Fig. 6b) the log operation, using Analyze - Show Histogram
. The changes in pixel values will also be seen in the Info window, as the cursor
is moved around the image, but they will be less obvious because the logarithms
have been rescaled to integer values (actually 8 bit byte values) between 0 and
255, which is the same value range that the original image had.
An additional comment on color scales: after switching to the finder or another application, especially with the 'Load System LUT when Switching' preference checked, the LUT might look as it does in Fig. 7. This LUT, the system LUT, renders the current image meaningless, but it is used to display color photographs and drawings with images designed to use it. Generally, the limitation of 256 colors means that images are displayed with proper colors, or the finder icons and menus are displayed with proper colors, but not both. This behavior is affected by the "Load System LUT when Switching" box which is accessed by the Options - Preferences... command. When the box is checked, then the image and color bar will assume crazy colors (due to the system palette) when in the finder, but the icons of the finder will appear normally. If the box is not checked, then the image will appear correctly, the LUT may have a few scattered colors, and the finder icons will be black and white. The image and color bar are restored to their original appearance when switching from the finder back to NIH Image. When the monitor is set to other color settings, such as millions of colors, the image and color bar may not be automatically restored. If the grayscale image is not restored on switching back to Image, or if you have modified the color scale in some way, do it manually with the Options - Grayscale command.