LUT Options
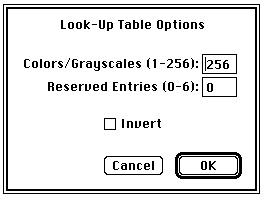
Allows you to specify the number of distinct colors or shades of gray in the current look-up table, to reserve up to six entries for annotation and graphics, or to invert the look-up table.
Colors/Grayscales is the number of colors or shades of gray used in the current look-up table. When increasing the number of colors, the required new colors are created by interpolating between existing colors. For example, if the current color table consists of the two colors, white and black, setting the number of colors to 64 creates a grayscale palette with 64 shades of gray.
Reserved Entries allows you to allocate up to six entries in the look-up table for colors that are never altered. For example, you could reserve one entry to add color annotation to a grayscale picture. Any extra colors are displayed at the bottom of the LUT window, allowing you to edit them by double-clicking with the eyedropper tool.
Check Invert and the current look-table will be inverted when you click on OK . Unlike the Invert command in the File Menu, pixels values are not altered, only the way the image is displayed on the screen. The first (0) and last (255) entries in the LUT, which are always white and black respectively, are never inverted since these entries are used for drawing the menu bar, title bars, dialog boxes, etc.
Font, Size, Style
Text handling in Image is similar to Macintosh painting programs such as MacPaint, SuperPaint, and PixelPaint, with the exception that you can only change the characteristics, such as size and style, of the last line entered. You can change the color (by clicking with the text tool in the LUT window), size, typeface, style and justification of the current line of text after the text has been entered. The background color can be changed by option-clicking in the LUT window.
Preferences
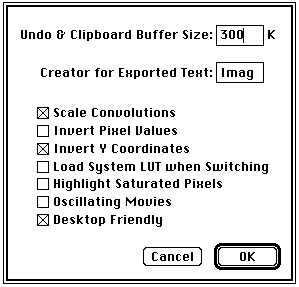
Displays the dialog box shown below, allowing you to change various parameters used by Image.
Undo & Clipboard Buffer Size allows you to change the size of the two internal image buffers used by Image . You must quit, and restart Image before buffer size changes take effect. Note that increasing the size of these buffers decreases the amount of RAM available for opened images. For example, increasing the size from 300K to 1000K decreases the RAM available for images by 1400K. You can get around this problem, assuming your computer has enough RAM, by increasing Image 's memory allocation using the Finder's Get Info command.
Creator for Exported Text specifies the four character creator code Image uses for exported text files. This code determines which application is launched when you double-click on an exported text file (e.g., measurements, profile plot data, XY coordinates). Use 'Imag' for Image, 'XCEL' for Excel and 'QKPT' for KaleidaGraph.
Pixel values resulting from filtering operations done using the Convolve command will be scaled to 8-bits if Scale Convolutions is checked, otherwise, they are clipped at 0 and 255.
Checking Invert Pixel Values sets up an inverting linear density calibration function for all non-calibrated open images. This causes gray values displayed in the Info and Results windows, in density profile plots, and in histograms, to be inverted. Subsequent image windows created using New, Start Capturing, and the Import of 8-bit images, will inherit this inverting calibration function.
Check Invert Y Coordinates if you want the X-Y origin to be the lower left corner of the image window, otherwise it will be in the upper left corner.
Checking Load System LUT When Switching causes Image to load the Apple default color palette before switching to other application. This may correct color display problems experienced with other applications, such as Microsoft Excel.
Checking Highlight Saturated Pixels causes pixels that are less than or equal to 1 to be displayed as yellow and pixels that are greater than or equal to 254 to be displayed in red.
Check Oscillating Movies if you want the Animate command in the Stacks menu to run movies in auto-reversing mode (1234321234), as opposed to the default wrap-around mode (123412341234).
Checking Desktop Friendly eliminates the annoying desktop color changes that occur when the monitor is set to 256 colors but it also reduces the number of colors available for displaying images.
The status of these settings can be made permanent using the Record Preferences command in the File menu.
Profile Plot Options
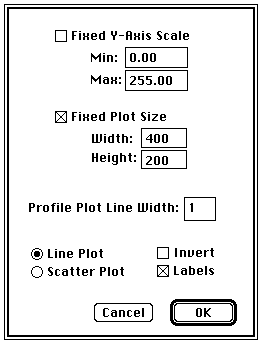
Displays a dialog box that allows you to set various options relating to the density
profile plots generated by the profile plot tool and the Plot Profile command. If
Fixed Y-Axis Scale
is checked, the y-axis range is fixed and the specified minimum and maximum are used,
otherwise, plots are scaled based on the minimum and maximum gray values. Fixed Plot Size
allows you to specify the size of the plot window. This is useful when pasting a
series of plots that you want to all be the same size into an image window. Profile Plot Line Width
specifies the line selection width. This controls the amount of pixel averaging done
when using the profile plotting tool or the Plot Profile command when used with a
line selection. All of these settings can be saved using the Record Preferences command.

Scale to Fit Window
Switches the currently active image window in and out of Scale to Fit
mode. If checked, the window is in the Scale To Fit
mode, and you can use the "grow box", in the lower right corner, to rescale the image.
Clicking in the "zoom box" at the right end of the title bar will switch that window
to Scale to Fit
mode and scale the window (and image) to fit the screen. In Scale to Fit
mode, you are not allowed to change the aspect ratio of an image and the magnifying
glass and grabber tools do not work. When in Scale to Fit
mode, the current magnification is shown in the title bar.
Threshold
Enables and disables thresholding mode. Thresholding is used to segment an image into
objects of interest and background on the bases of gray level. When thresholding
is enabled, objects are displayed in black and background is white. The threshold
is automatically set based on an analysis of the histogram of the current selection, or of
the entire image if there is no selection. Background pixels will be ignored when
making area and gray value measurements using the Measure and Analyze Particles commands.
To vary the threshold, use the LUT tool and click and drag near the black/white boundary
in the LUT window. As you vary the threshold, its value is continuously displayed
in the Info window.
Use the Make Binary command to set all thresholded pixels to black and all background
pixels to white. Use the wand tool to outline thresholded objects, and Analyze Particles
to automatically measure objects segmented by thresholding. As a shortcut, you can enable thresholding by clicking on the stair step icon in the Map window. This shortcut,
however, always sets the threshold to 128.
Density Slice
Enables and disables density slicing. Like thresholding, density slicing allows objects
to segmented on the bases of gray level. When density slicing is enabled, objects
are highlighted in red and background pixels are left unchanged. As in thresholding, background pixels are ignored when making area and density measurements. Click and
drag in the LUT window using the LUT tool to vary the size and location of the density
slice. As you manipulate the density slice, its upper and lower limits are continuously displayed in the Info window.
In the LUT window, you can double click within the density slice using the eyedropper
tool to change the highlighting color to something other than the default red. As
a shortcut, you can enable density slicing by double clicking on either the wand
or LUT tools.
To prevent desktop items, such as the menu bar, from changing color, white (0) and
black (255) entries in the LUT are never included within the density slice. Therefore,
thresholding usually works better for discriminating objects containing black pixels.
Use the Apply LUT command to set all pixels which are within the density slice to
the foreground color (or leave then unchanged) and all other pixels to the background
color (or leave them unchanged). The Make Binary command will set pixels within the
density slice to black, and all other pixels to white.
Propagate
The commands in this sub-menu allow you to copy various attributes of one image to
all other currently open images.
Look-Up Table -
Copies the current video look-up table to all open image windows. This provides a
way to transfer contrast, brightness or pseudocolor changes made to one image in
a set (e.g., a series of MRI scans), to all other images in the set.
Spatial Calibration -
The spatial calibration (e.g., pixels/centimeter) and unit of measurement associated
with the currently active image are transferred to all other open images. Note that
spatially calibrated images have a black diamond in the title bar following the name.
Density Calibration -
The density calibration associated with the currently active image is transferred
to all other open images. Note that density calibrated images have a white diamond
in the title bar following the name.
[Next]
[Contents]
[Home]