Introduction
Actions were my crude solution to the problem of adding random features to TrackMate without having to change the GUI too much. Adding buttons or dialogs or extra panels is cumbersome and I thought it would complexify the GUI, which is meant to be simple. A TrackMate action is a lazy workaround for this problem. You must keep in mind that is a placeholder for random feature ideas, and provided a quick and dirty way to test them.
A TrackMate action takes the shape of an item in a drop-down list in the last panel of the GUI. It can do more or less anything, since we pass everything to the action, even a reference to the GUI itself. Thanks to the SciJava discovery mechanism, we do not have to worry about adding it on the GUI: it will automatically be listed in the action list. The drawback of this simplicity is that you cannot use it to provide elaborated user interaction mechanisms, such as the ones you can find in a view.
In this tutorial, we will use it to launch the event logger we created in the previous tutorial of this series. If you remember, we saw in the last paragraph how to use the visible = false parameter the SciJava annotation to hide it from the view menu. Hereby preventing the user to access it. No problem, we will now build an action that will launch it as a supplementary view.
The TrackMateActionFactory interface
Again, the action behavior and its integration in TrackMate are split in two classes. The behavior is described by the TrackMateAction interface. The integration mechanism is controlled by the TrackMateActionFactory interface, which extends the TrackMateModule interface.
SciJava parameters recap
There is not much to say about the factory itself. It is the class that must be annotated with
@Plugin( type = TrackMateActionFactory.class )
All the SciJava annotation parameters apply, and they have the following meaning:
- The
enabled = true/falseparameter is used to control whether the action is enabled or not. A disabled action is not even instantiated. - The
visible = true/falseparameter determines whether the action is listed in the action panel. If false, the action factory is instantiated but the corresponding action will not be listed in the panel, preventing any use. - The
priority = doubleparameter is used here just to determine the order in which the action items appear in the list. High priorities are listed last.
Action factory methods
As of TrackMate version 7 (August 2021), actions are the only TrackMate modules that use the getIcon() method. The icon is then displayed in the action list, next to the action name. That’s it for the TrackMateModule part.
The method specific to actions is more interesting:
@Override
public TrackMateAction create()
This method does not have any parameter.
Important fields such as the model, etc., are passed to the action within the action class itself, but not in the factory
package plugin.trackmate.examples.action;

import javax.swing.ImageIcon;

import org.scijava.plugin.Plugin;

import fiji.plugin.trackmate.TrackMatePlugIn;
import fiji.plugin.trackmate.action.TrackMateAction;
import fiji.plugin.trackmate.action.TrackMateActionFactory;
import ij.ImageJ;
import ij.ImagePlus;

@Plugin( type = TrackMateActionFactory.class )
public class LaunchEventLoggerActionFactory implements TrackMateActionFactory
{

	private static final String INFO_TEXT = "<html>This action will launch a new event logger, that uses the ImageJ log window to append TrackMate events.</html>";

	private static final String KEY = "LAUNCH_EVENT_LOGGER";

	private static final String NAME = "Launch the event logger";

	@Override
	public String getInfoText()
	{
		return INFO_TEXT;
	}

	@Override
	public ImageIcon getIcon()
	{
		return null; // No icon for this one.
	}

	@Override
	public String getKey()
	{
		return KEY;
	}

	@Override
	public String getName()
	{
		return NAME;
	}

	@Override
	public TrackMateAction create()
	{
		return new LaunchEventLoggerAction();
	}
}
Nothing complicated.
The TrackMateAction interface
This interface is just made of two methods:
    public void execute( TrackMate trackmate, SelectionModel selectionModel, DisplaySettings displaySettings, Frame parent );

    public void setLogger(Logger logger);
The execute method is the one triggered by the user when he clicks the Execute button. It receives:
- A
TrackMateinstance, containing the current model and the settings. - The selection model, currently used in the GUI.
- The
DisplaySettingscurrently used in the current views. - A
Framereference, if you need e.g. to make a modal dialog. - that can be of use. In our case, as you saw in the factory class, we got the model and selection model through the controller.
The other method is used to pass a logger instance that is specific to the action panel in the GUI. All messages and updates sent to this logger will be shown on the action panel.
Here is how this translates simply in a simple launcher:
package plugin.trackmate.examples.action;

import java.awt.Frame;

import fiji.plugin.trackmate.Logger;
import fiji.plugin.trackmate.SelectionModel;
import fiji.plugin.trackmate.TrackMate;
import fiji.plugin.trackmate.action.TrackMateAction;
import fiji.plugin.trackmate.gui.displaysettings.DisplaySettings;
import plugin.trackmate.examples.view.EventLoggerView;

public class LaunchEventLoggerAction implements TrackMateAction
{

	private Logger logger;

	@Override
	public void execute( final TrackMate trackmate, final SelectionModel selectionModel, final DisplaySettings displaySettings, final Frame parent )
	{
		logger.log( "Launching a new event logger..." );
		final EventLoggerView view = new EventLoggerView( trackmate.getModel(), selectionModel );
		view.render();
		logger.log( " Done.\n" );
	}

	@Override
	public void setLogger( final Logger logger )
	{
		this.logger = logger;
	}
}
Wrapping up
And here are the results:
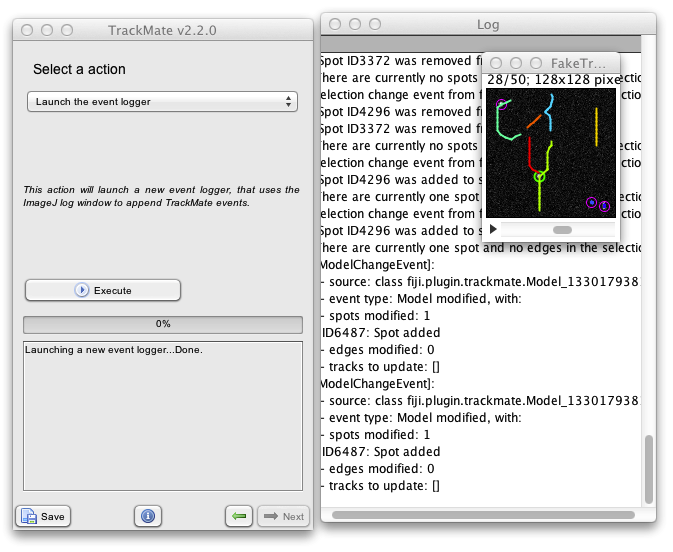
You can imagine a lot of applications for Actions. Since they give you access to most of the plugin context, you can basically plug anything there. The one limitation is that it does not fit perfectly in the existing GUI: actions just appear as items in a drop-down list. But in most cases it does not matter much. Actions are very useful to quickly graft a piece of new functionality on TrackMate.
This concludes this tutorial, which was pretty quick and simple. This is unfortunately the last time in this series that things are simple and short. The next tutorial will be about implementing a custom detector, which will turn to be quite complicated for apparently wrong reasons. See you there!