BigWarp is a tool for manual, interactive, landmark-based deformable image alignment. It uses the BigDataViewer for visualization and navigation, and uses a Thin Plate Spline implemented in Java to build a deformation from point correspondences.
The interface enables landmark pair placement and displays the effects of the warp on-the-fly.
Installation
BigWarp comes with Fiji. You can access it via Plugins › BigDataViewer › Big Warp Command for the newer startup dialog, or Plugins › BigDataViewer › Big Warp for the legacy dialog. If this is not visible in your installation, try updating Fiji with Help › Update….
Starting BigWarp
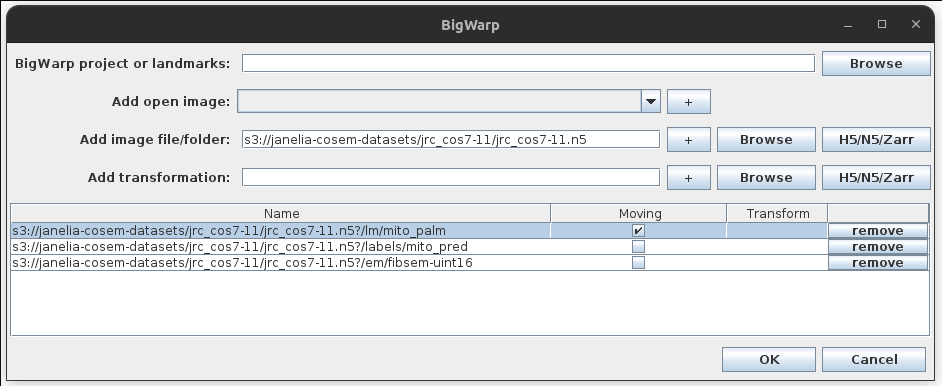
Big Warp Command
 |
|
Selected images are displayed in a table at the bottom of the dialog. Indicate an image as moving by checking the box in the “Moving” column. Only moving images will be transformed by BigWarp. Any number of images can be set as moving. Clicking will remove a row from the table.
BigWarp can also apply “external” transformations to images. These are shown in the Transform column of the table. They can be added with the “Add transformation” option above, or by writing a path or N5URL directly into the table.
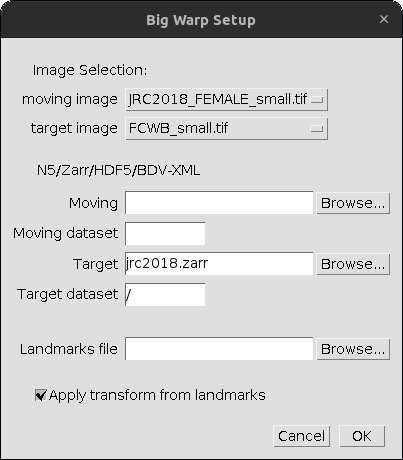
Big Warp
 |
|
Note: The moving or target images open in ImageJ may be multi-channel. Chunked file formats let you open images that are too large for “traditional” ImageJ, or stream image data on the fly from cloud storage.
Usage
Open two images in ImageJ, one moving and the other target and navigate to Plugins › BigDataViewer › Big Warp. A dialog will appear prompting selection of the moving and target images.
Alternatively, save your images with N5, Zarr, or as a bigdataviewer-xml, and specify the paths to those images in the BigWarp dialog. See the section on working with large images below.
Once the two image windows and one table window open, press ␣ Space to enter “landmark mode”. Next, click on a point in the moving image, then click on the corresponding point in the target image. After you have a few moving-target point pairs, press T to transform the moving image (you may need to re-navigate if the two image are very far apart: see the Q and W hotkeys below).
Getting Help
Press F1 at any time to open a help page with a listing of navigation and editing commands. For detailed help, create a post on the image.sc forum with a bigwarp tag. Report bugs on github.
Landmark point placement and display in the viewer
Landmark placements is done in Landmark mode which you enter by pressing ␣ Space. Users place pairs of corresponding points on the moving and target images.
The following table shows the available commands and keystrokes for landmark placement, warping.
|
T |
Toggle between warped view and raw view or moving image. |
|
⌃ Ctrl + O |
Open landmarks from saved file. |
|
⌃ Ctrl + S |
Save current landmarks to a file. |
|
␣ Space |
Toggle Landmark mode |
|
<Landmark mode>+ |
Clicking while in landmark mode adds a landmark point or selects and existing landmark. |
|
<Landmark mode>+ |
Clicking an existing point and dragging changes it's position. |
|
<Landmark mode>+⇧ Shift + |
"Move" a point. The initial click places a landmark point for the moving image. The release places a landmark point for the target image. |
|
<Landmark mode>+⌃ Ctrl + |
"Pin" a point. Add a landmark at the same location for both moving and target images. |
|
<Landmark mode>+⌃ Ctrl + ⇧ Shift + |
Place a point in the "other" space. Place a moving landmark from the fixed window, and vice versa. |
|
⌃ Ctrl + Z |
Undo the last landmark point change. |
|
⌃ Ctrl + Y |
Redo the last landmark point change. |
|
V |
Toggle point visibility in the viewer. |
|
N |
Toggle point name visibility in the viewer. |
 Left Click
Landmark selection and editing in the table
Some changes to landmarks can be done by interacting with the landmark table.
|
|
Select row. |
|
⌃ Ctrl + |
Add row to selection. |
|
⇧ Shift + |
Select range of rows. |
|
⎋ Esc |
Deselect all rows. |
|
|
Deletes a landmark pair (row in the table). |
|
|
Deletes all selected landmark pairs (row in the table). |
 Right Click
Notes on point addition and landmark pair selection
- Adding a new landmark pair selects that pair (row) in the table.
- If a row is “missing” a moving (target) landmark point, then it must be selected in order to add that missing point by clicking in the moving (target) viewer. Then BigWarp will find the “next” row that is missing a moving (target) landmark, and select that row automatically.
- If the selected row is not missing a landmark, the next click will add a new landmark pair.
- If multiple rows are selected when a viewer is clicked, the result will be as though only the first row was selected.
Selecting transformation types
Press F2 to bring up a transformation type selection window, or U to open the BigWarp options dialog (versions 4.0.0 or later support multiple options for transformations).
 |
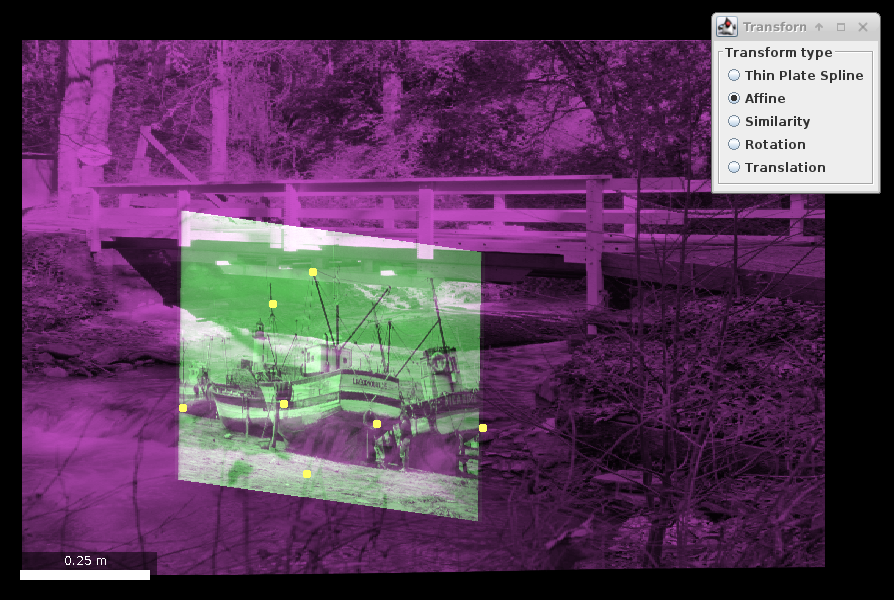 |
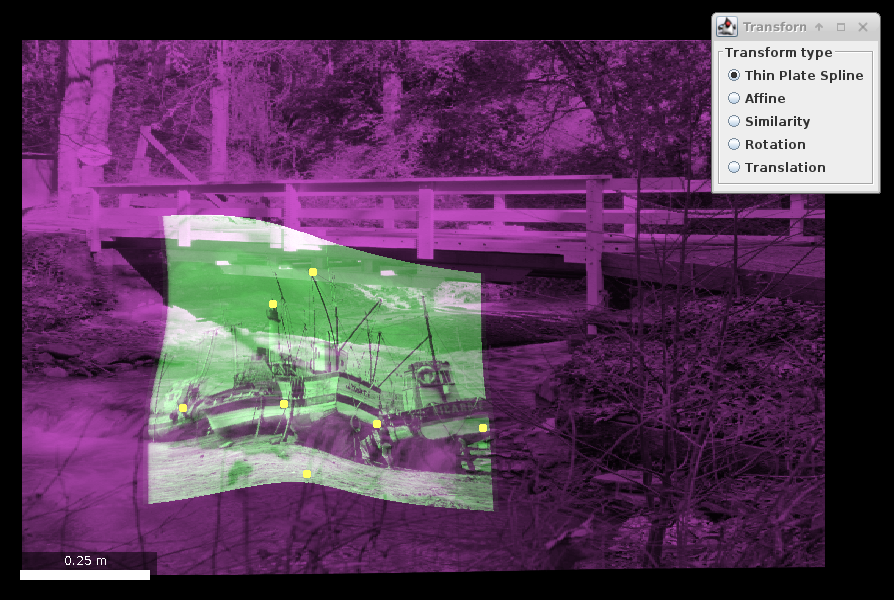
| Example of a thin plate spline transformation | Example of an affine transformation |
Table of transformation types
| Thin Plate Spline | The smoothest deformable transformation that maps moving landmarks exactly to the corresponding target landmarks. |
| Affine | Linear transform with translation, rotation, independent scales and shear (12 degrees of freedom) |
| Similarity | Linear transform with translation, rotation, and one scale parameter (7 degrees of freedom) |
| Rotation | Linear transform with translation, and rotation (6 degrees of freedom) |
| Translation | Translation only (3 degrees of freedom) |
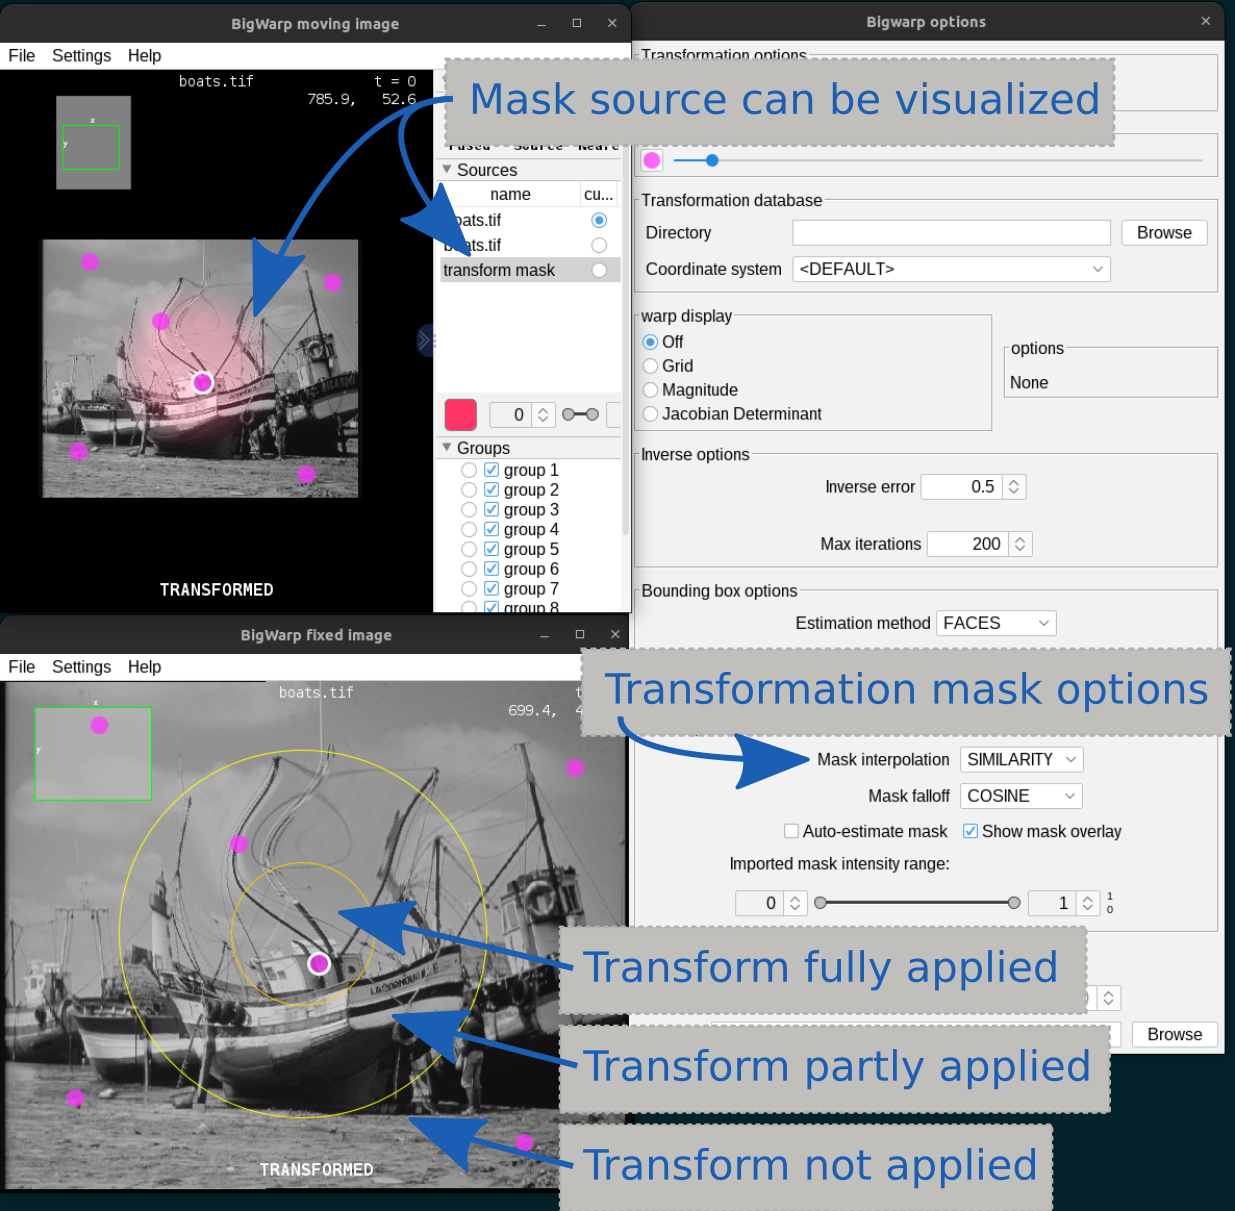
Masked transformations
It is sometimes useful to limit the transformation to a certain area, for example, when fine-tuning another transformation. Options for masked transformations can be found in the BigWarp options dialog Settings › BigWarp Options or shortcut U. (Available in version 9.0.0 or later)
Turn on a transformation mask by setting the “Mask interpolation option to one of LINEAR, ROTATION, or SIMILARITY.
Details
- Mask interpolation
- NONE : no masking
- LINEAR : mask with “linear” interpolation
- ROTATION : mask “rotation” interpolation
- SIMILARITY : mask “similarity” interpolation
We generally recommend the SIMILARITY option when using a transform mask, though all options should give similar results in
most cases.
- Mask falloff: The shape of the falloff curve of the spherical mask from the center (where it equals one) to the outside where it equals zero. Not relevant for imported masks.
- COSINE
- GAUSSIAN
- LINEAR
-
Auto-estimate mask: The size and position of the spherical mask will be automatically estimated as the smallest sphere that contains the clicked landmarks. Any manual edtis to the mask will turn this option off. Not relevant for imported masks.
- Show mask overlay: Overlays two circles on the fixed image window indicating mask size and position. Transformations are fully applied inside the inner circle, the transform is partly applied in between the two circles, and not at all applied outside the outer circle. Not relevant for imported masks.
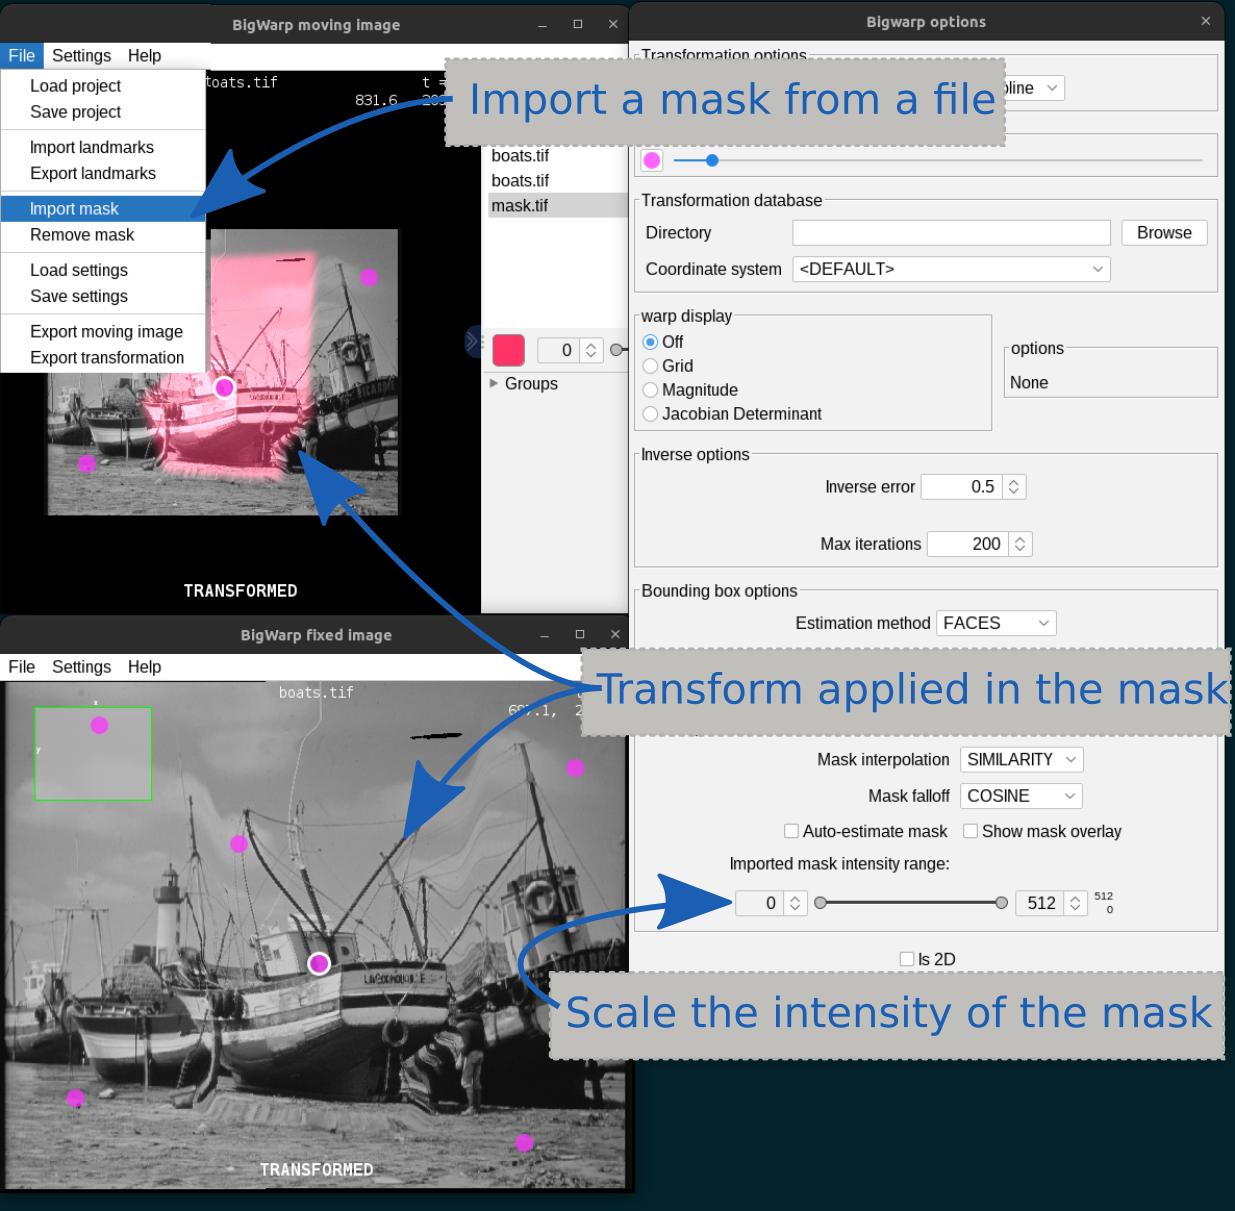
It is also possible to import a mask from a file with File › Import Mask, or remove an imported mask with File › Remove Mask. Masks should take values between zero and one, where a value of one indicates the transform will be fully applied, a value of zero indicates the transform will not be applied, and partially applied for values in between. For masks with an intensity range that is not \([0,1]\), use the Imported mask intensity range (see below) to map its intensities as desired.
- Imported mask intensity range: Linearly map the intensity of an imported mask to \([0,1]\). The left (right) intensity will be mapped to zero (one). The Only relevant for imported masks.
Navigation and Visualization
BigWarp inherits many image navigation, visualization, and grouping features with BigDataViewer, the details of which can be found on the BigDataViewer page or on the help page. BigWarp specific features are documented below.
The following table shows the available navigation commands using the mouse:
|
Q |
Align the non-active viewer with the active viewer. |
|
W |
Align the active viewer with the non-active viewer. |
|
E |
Centers the active viewer to the nearest landmark (considers 3D when applicable). |
|
⌃ Ctrl + D |
Centers the active viewer to the next landmark. |
|
⌃ Ctrl + ⇧ Shift + D |
Centers the active viewer to the previous landmark. |
|
R |
Resets the active viewer. |
|
U |
Show warp visualization / grid dialog. |
|
F3 |
Show moving image panel Visibility & and Grouping dialog. |
|
F4 |
Show target image panel Visibility & and Grouping dialog. |
|
⌃ Ctrl + E |
Export moving image as an ImagePlus. |
|
⌃ Ctrl + ⇧ Shift + E |
Export moving image as a Virtual ImagePlus. |
Commands shared with BigDataViewer
- Displaying multiple stacks (“sources”)
- Grouping sources
- Adjusting brightness and color
- Bookmarking views (locations and orientations)
Mouse navigation
|
|
Rotate (pan and tilt) around the point where the mouse was clicked. |
|
|
Translate in the XY-plane. |
|
|
Move along the z-axis. |
|
⌘ Command + |
Zoom in and out. |
 Middle Drag
Keyboard navigation
|
X, Y, Z |
Select keyboard rotation axis. |
|
← Left, → Right |
Rotate clockwise or counter-clockwise around the choosen rotation axis. |
|
↑ Up, ↓ Down |
Zoom in or out. |
|
,, . |
Move forward or backward along the Z-axis. |
|
⇧ Shift + X |
Rotate to the ZY-plane of the current source. (Look along the X-axis of the current source.) |
|
⇧ Shift + Y or ⇧ Shift + A |
Rotate to the XZ-plane of the current source. (Look along the Y-axis of the current source.) |
|
⇧ Shift + Z |
Rotate to the XY-plane of the current source. (Look along the Z-axis of the current source.) |
|
[ or N |
Move to previous timepoint. |
|
] or M |
Move to next timepoint. |
For all navigation commands you can hold ⇧ Shift to rotate and browse 10x faster, or hold ⌃ Ctrl to rotate and browse 10x slower. For example, ← Left rotates by 1° clockwise, while ⇧ Shift + ← Left rotates by 10°, and ⌃ Ctrl + ← Left rotates by 0.1°.
Save and load landmarks
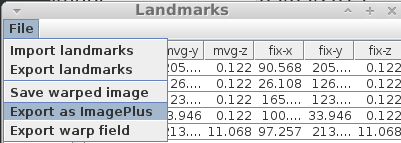
Landmarks can be exported and imported from plain text files using the drop down menu in the landmark table panel (File › Export (Import) landmarks).
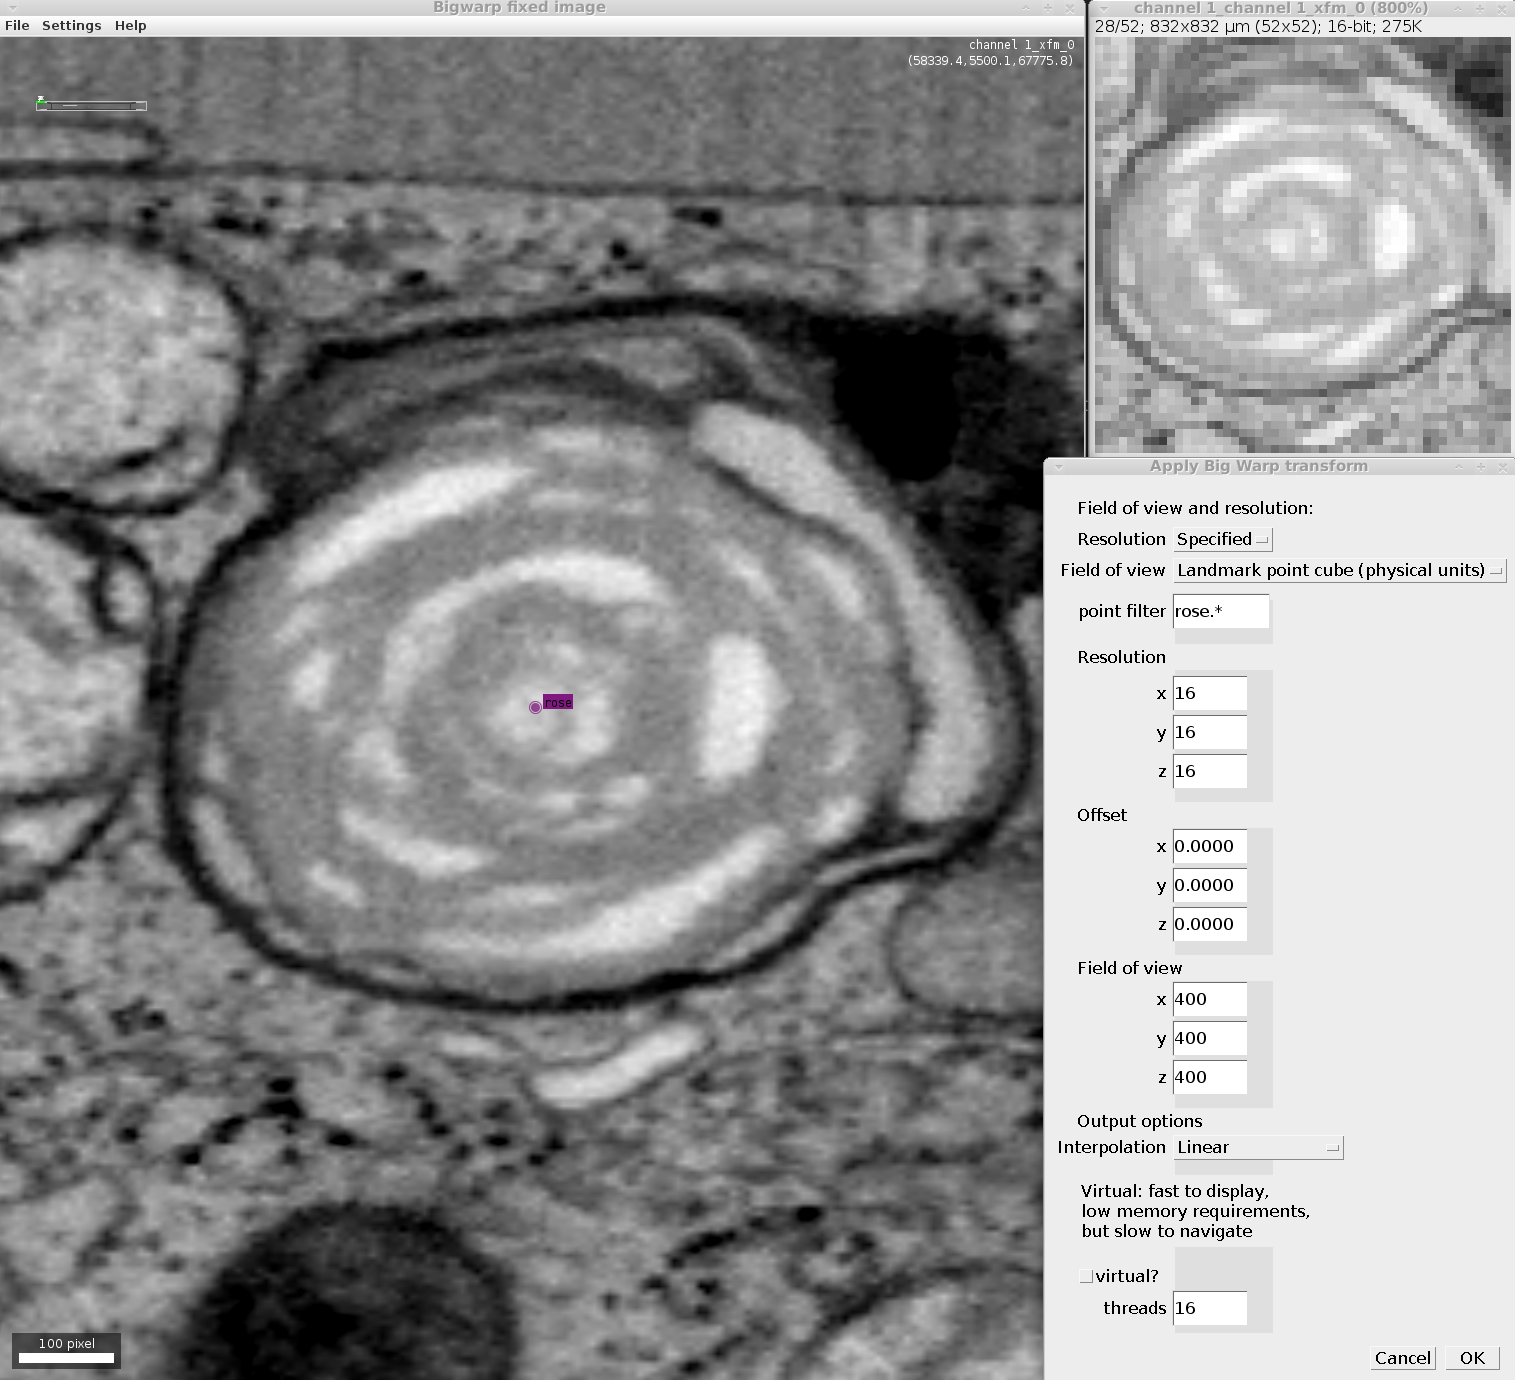
Export warped images
Export the warped moving image by clicking File › Export as ImagePlus or using the ⌃ Ctrl + E keyboard shortcut.
The default parameters will result in the exported image having the same dimensions as the target image.
Take care when exporting very large data sets as they can cause out-of-memory exceptions.
- Resolution
- Target: The output will have the same resolution as the target image
- Moving: The output will have the same resolution as the moving image
- Specified: The output will have the resolution given in the fields below (in the same units as the moving and target images).
- Field of view
- Target: The output will have the same field of view as the target image
- Moving: The output field of view will be the smallest bounding box that contains the warped moving images (approximated)
- Specified (pixel): The output field of view will be that given by the Offset and Field of View parameter fields where both are in units of pixels
- Specified (physical): The output field of view will be that given by the Offset and Field of View parameter fields where both are in the physical units of the moving and target images
The warped moving image can be exported as an in-memory or virtual ImagePlus. A virtual ImagePlus is generally faster to generate but slower to browse, whereas an in-memory ImagePlus will be slower to generate but faster to browse.
Apply transforms
Often, it is important to apply transforms estimated with one image to other images in the same space.
If you have moving and target images open in Fiji this script to transform the moving image into the space of the target image. You will need to provide a file containing the saved landmark point pairs.
To manually specify the field-of-view (FOV) of the target space, use this script
To make the scripts above appear in your Fiji Plugins menu, simply copy them into the /plugins/Scripts folder in your Fiji installation.
Export transforms
Export a transformation with File › Export transformation. BigWarp can export non-linear transformations as displacement fields that can either be displayed as a window in ImageJ or written to a file. BigWarp uses the OME-NGFF format to store transformations.
|
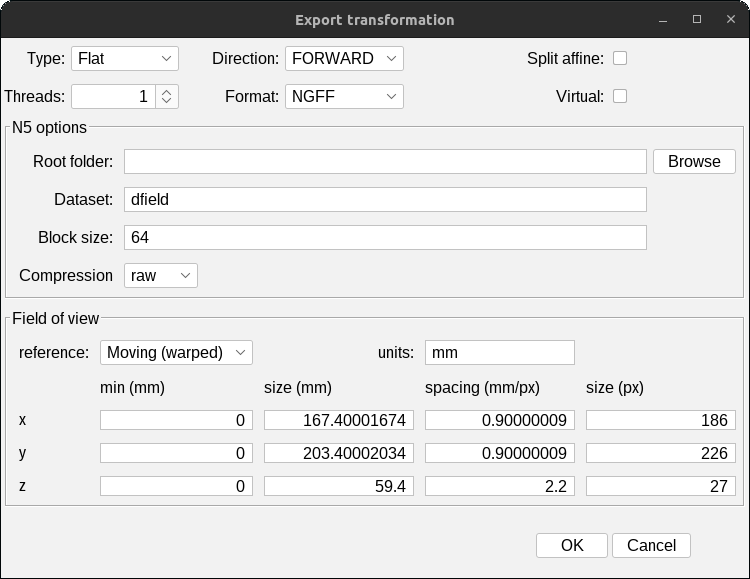 |
Warp 2d ImageJ ROIs
Download and install this script.
Usage:
- Run the script downloadable above.
- Indicate which open images correspond to the moving and fixed images in bigwarp.
- Select the csv file that stores bigwarp landmarks.
- Indicate whether you want to transform an ROI from moving to target space or vice versa.
- Click OK.
Note that the resulting ROI will be densely sampled. This is because an ROI with a particular shape may not have the same shape after being warped (i.e., a circle may not still be circular after being warped).
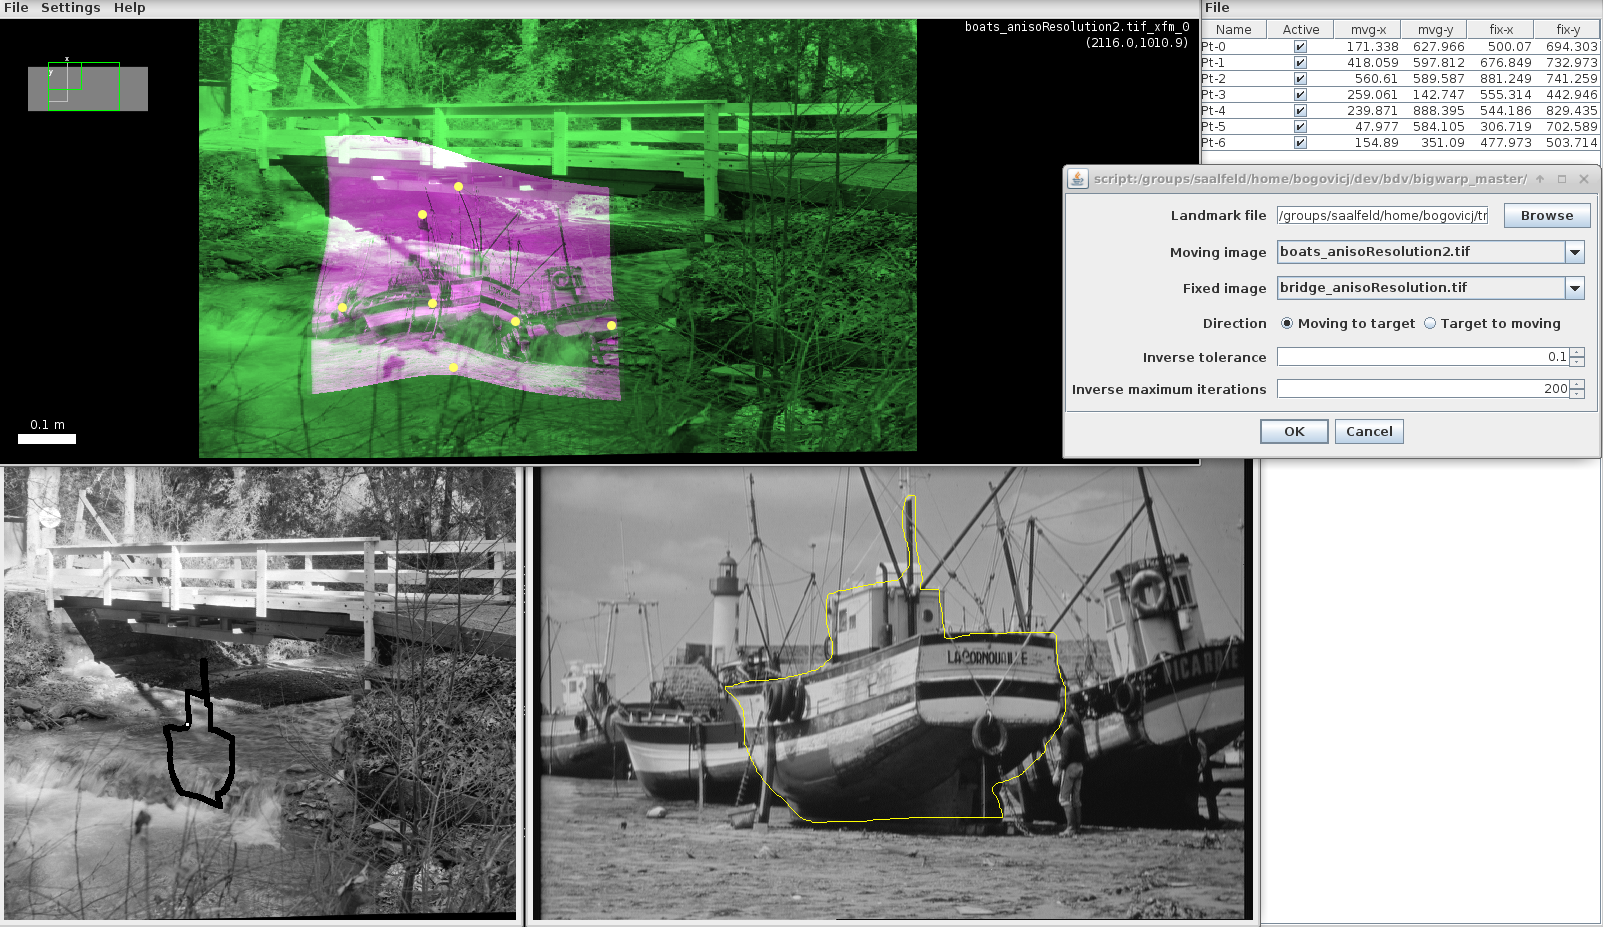
Example: In this example, we’ve chosen the boats sample as the moving image, the bridge sample as the target image, and have added some landmarks that transform the boats image.
To warp an ROI from the moving boats image to the fixed bridge image, we run the script with the options:
- Fixed image: boats
- Moving image: bridge
- Landmark file:
- Moving to target
The results are shown in the “Forward example” below.
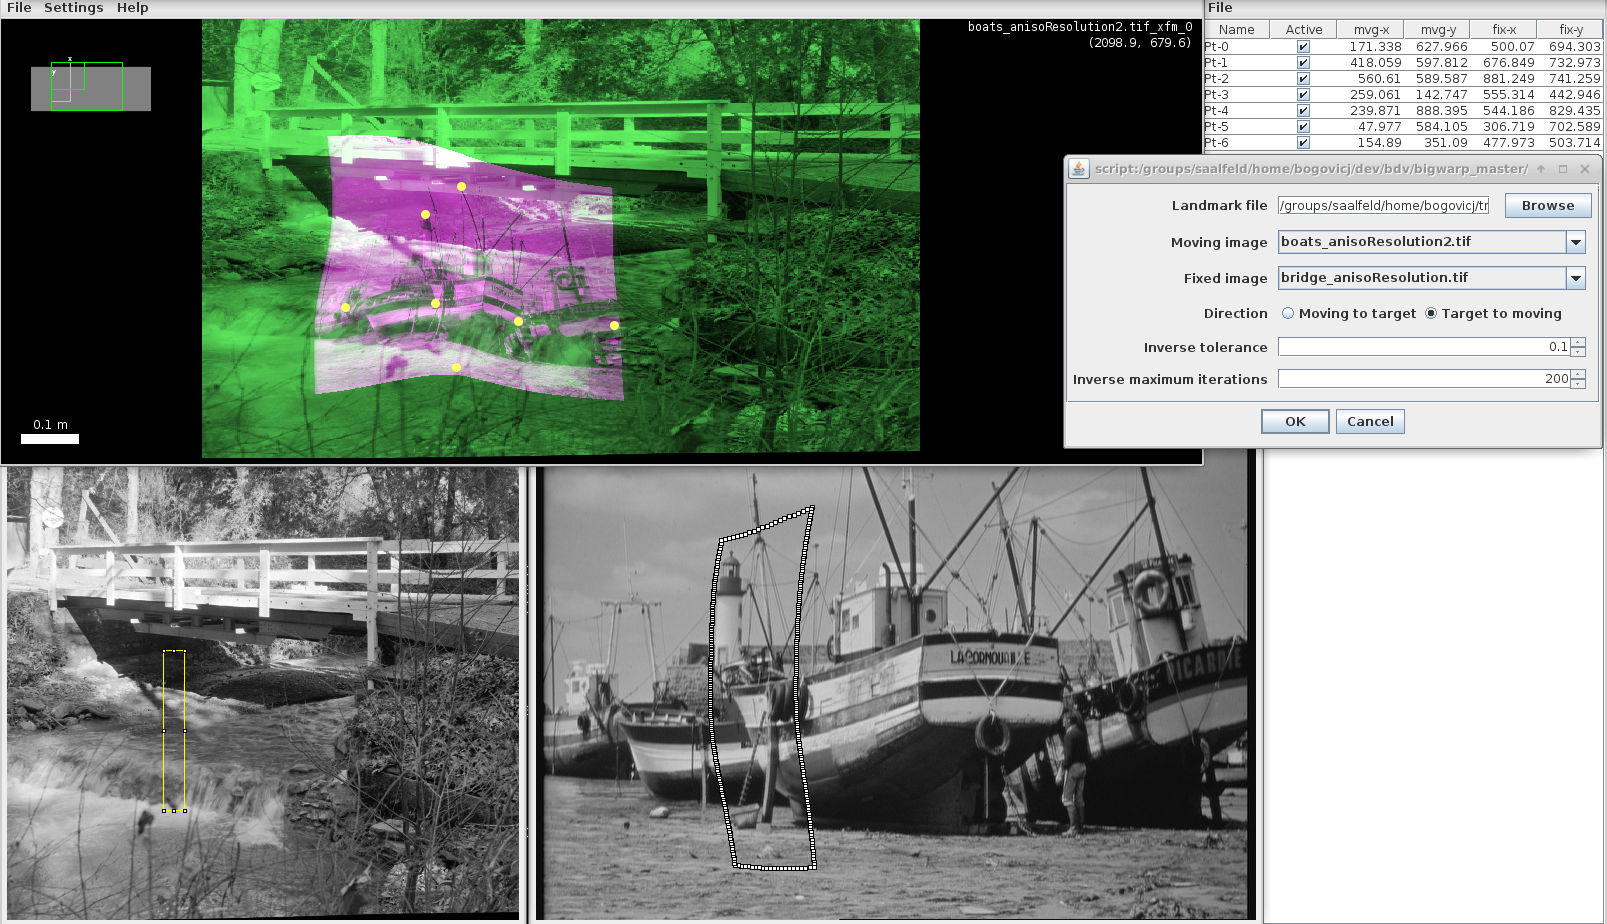
To warp an ROI from the moving boats image to the fixed bridge image, we run the script with the options:
- Fixed image: boats
- Moving image: bridge
- Landmark file:
- Target to moving
The results are shown in the “Inverse example” below.
 |
 |
| Forward example | Inverse example |
Note, at this time ImageJ ROIs are 2D objects. We recommend using another approach for 3D regions of interest.
Warp points in a csv file
Download and install this script.
Usage:
- Run the script download-able above.
- Select the csv file that stores bigwarp landmarks.
- Select the csv file storing the points you want to transform.
- Select the location for csv file you want the results to be stored in.
- Indicate whether you want to transform the points from moving to target space or vice versa.
- Click OK.
Note the input csv must be formatted:
x1,y1,z1
x2,y2,z2
...
xN,yN,zN
without quotation marks, spaces, or any other characters. Csv files storing bigwarp landmarks will not work as input to this script.
Working with large images
For very large images, we recommend first converting the volume to bigdataviewer’s xml/hdf5 format, or to N5 using the N5 plugin for Fiji. Bigwarp now supports both bdv/xml and n5 formats (versions 7.0.0 and later).
Older versions of BigWarp supported these scripts:
Tutorials
- A vitual tutorial given by John Bogovic in April 2022.
- An example of a 2d warping by Nicolas Chiaruttini in response to this forum post.
Publication
Publications using BigWarp
- Russell et al. “3D correlative light and electron microscopy of cultured cells using serial blockface scanning electron microscopy” J Cell Sci 130: 278-291 2017.
- Collinson et al. “Correlating 3D light to 3D electron microscopy for systems biology” Current Opinion in Biomedical Engineering 2017 3:49-55
- Lerner et al. “Mycobacterium tuberculosis replicates within necrotic human macrophages” J Cell Biol 2017
- Hildebrand et al. “Whole-brain serial-section electron microscopy in larval zebrafish” Nature 545:345–349 2017.
- Zhang et al. “A Complete Electron Microscopy Volume Of The Brain Of Adult Drosophila melanogaster” Cell 174:3 P730-743.e22, 2018.
- Gao et al. “Cortical column and whole-brain imaging with molecular contrast and nanoscale resolution.” Science 363 (6424) 2019.
- Wan et al. “Single-Cell Reconstruction of Emerging Population Activity in an Entire Developing Circuit.” Cell 179(2) 2019.
- Hoffman, Shtengel et al. “Correlative three-dimensional super-resolution and block-face electron microscopy of whole vitreously frozen cells.” Science 367 (6475) 2020.
- Weigel et al. “ER-to-Golgi protein delivery through an interwoven, tubular network extending from ER” Cell 184:9 2021.
- Chiaruttini et al. “An Open-Source Whole Slide Image Registration Workflow at Cellular Precision Using Fiji, QuPath and Elastix” Frontiers In Computer Science 2021.
- Ritter et al. “ESCRT-mediated membrane repair protects tumor-derived cells against T cell attack” Science 376 (6591) 2022.